RS5X User Manual: Difference between revisions
No edit summary |
No edit summary |
||
| (4 intermediate revisions by the same user not shown) | |||
| Line 1: | Line 1: | ||
'''Connecting with the device to the System (Laptop/Desktop)''' | '''Connecting with the device to the System (Laptop/Desktop)''' | ||
| Line 12: | Line 14: | ||
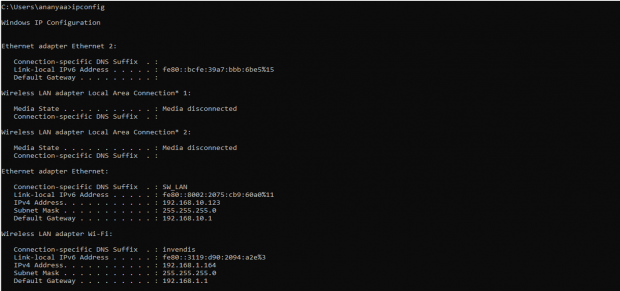
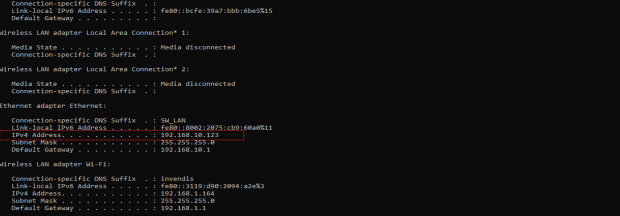
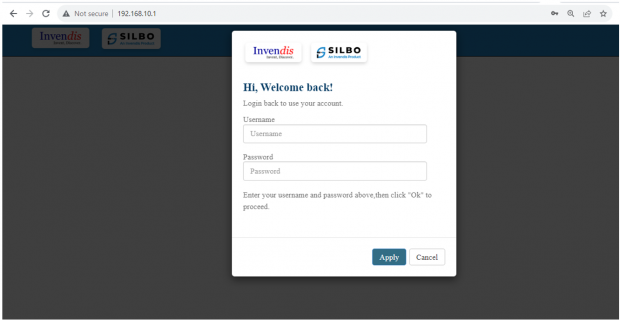
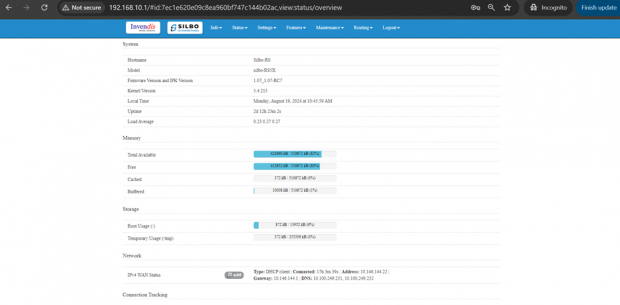
Please open the command prompt and ping to get the IP config of that device. | Please open the command prompt and ping to get the IP config of that device. | ||
Type the command '''Ipconfig''' | Type the command '''Ipconfig''' | ||
| Line 248: | Line 248: | ||
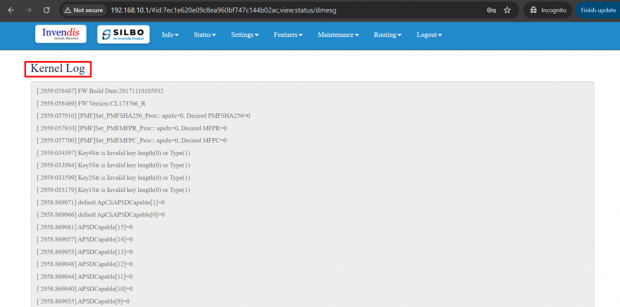
In this page the user gets to view the Kernel logs. | In this page the user gets to view the Kernel logs. | ||
[[File: | [[File:RS5X Kernel Log.png|frameless|620x620px]] | ||
== 2. Status == | == 2. Status == | ||
| Line 279: | Line 279: | ||
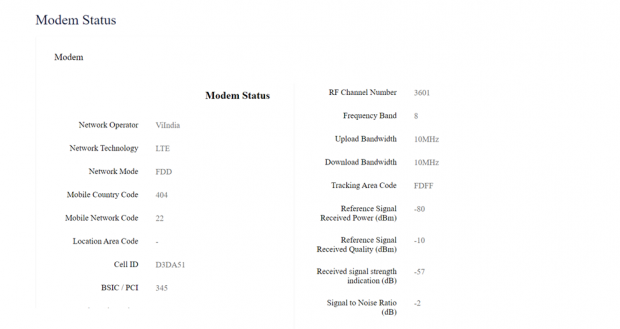
This modem status page provides comprehensive information about the cellular connection's network operator, technology, mode, and various signal quality metrics. | This modem status page provides comprehensive information about the cellular connection's network operator, technology, mode, and various signal quality metrics. | ||
[[File: | [[File:RS5X Modem .png|frameless|620x620px]] | ||
=== 2.4 Routes === | === 2.4 Routes === | ||
| Line 294: | Line 294: | ||
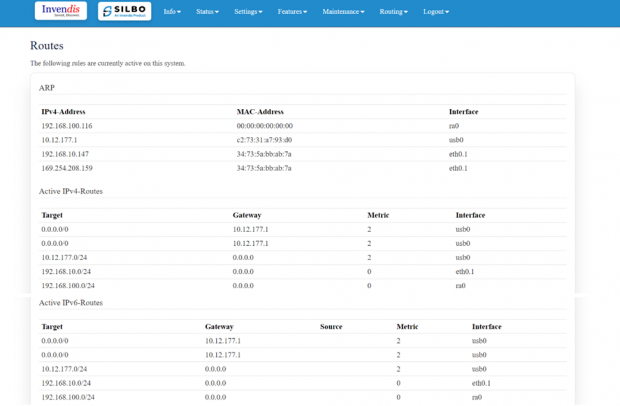
Example: Local networks '''192.168.10.0/24''' and '''192.168.100.0/24''' are managed through '''eth0.1''' and '''ra0''', respectively. | Example: Local networks '''192.168.10.0/24''' and '''192.168.100.0/24''' are managed through '''eth0.1''' and '''ra0''', respectively. | ||
[[File: | [[File:Rs5X routes.png|frameless|620x620px]] | ||
== 3. Settings == | == 3. Settings == | ||
| Line 310: | Line 310: | ||
* Tunnel | * Tunnel | ||
[[File: | [[File:RS5x settings.png|frameless|620x620px]] | ||
=== 3.1 Network === | === 3.1 Network === | ||
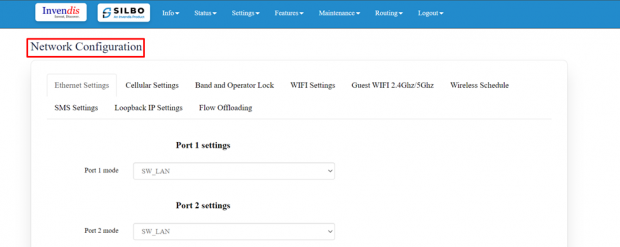
In this section the user does all the setting related configuration with reference to network like Ethernet Settings, Cellular Settings, Band lock and Operator Lock, Wi-Fi Settings, Guest Wi-Fi etc. | In this section the user does all the setting related configuration with reference to network like Ethernet Settings, Cellular Settings, Band lock and Operator Lock, Wi-Fi Settings, Guest Wi-Fi etc. | ||
[[File: | [[File:Rs5x network.png|frameless|620x620px]] | ||
| Line 321: | Line 322: | ||
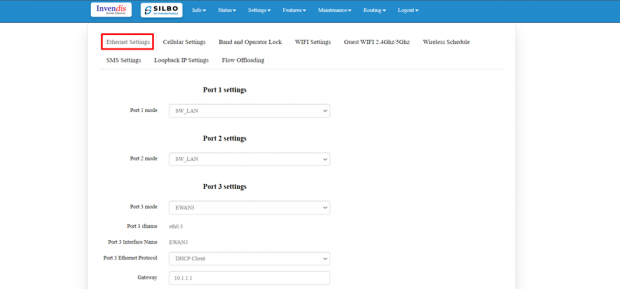
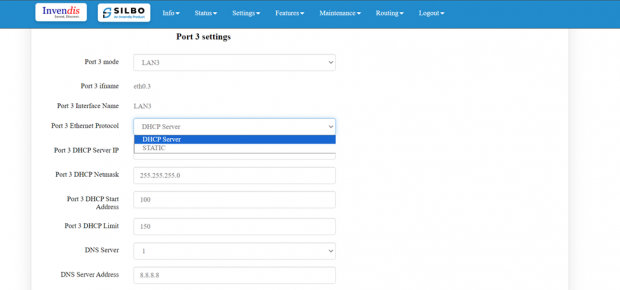
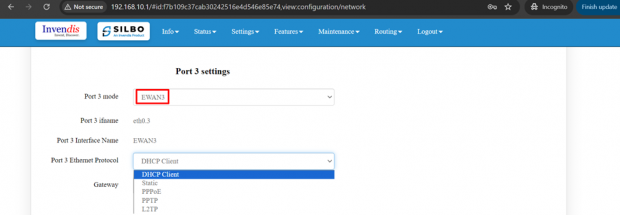
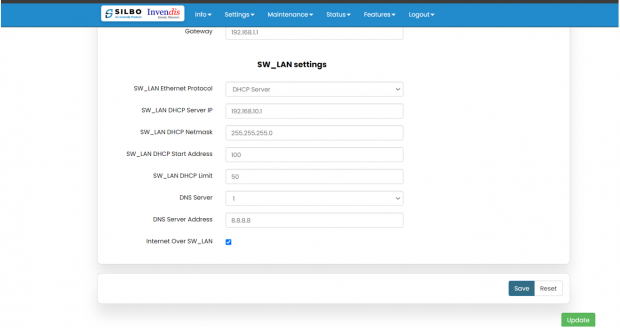
In this page it will display all the configured port that is attached with the device. For this device 3 ports are configured. Ethernet mode can be configured as WAN and as LAN as well. Ethernet LAN Connection settings can be configured as DHCP server or Static. | In this page it will display all the configured port that is attached with the device. For this device 3 ports are configured. Ethernet mode can be configured as WAN and as LAN as well. Ethernet LAN Connection settings can be configured as DHCP server or Static. | ||
| Line 472: | Line 474: | ||
After configuring all the required information, click on save. | After configuring all the required information, click on save. | ||
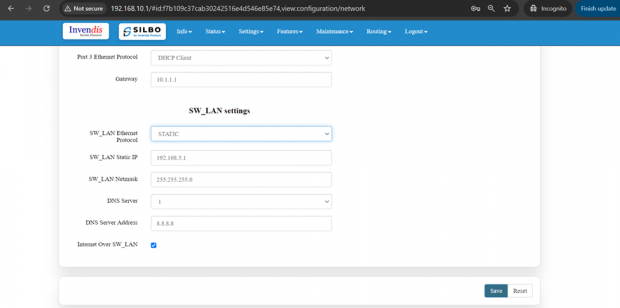
[[File: | '''Static option for SW_LAN Ethernet Protocol:''' | ||
[[File:Rs5x static ethernet protocol.png|frameless|620x620px]] | |||
Specification details are given below: | Specification details are given below: | ||
| Line 630: | Line 634: | ||
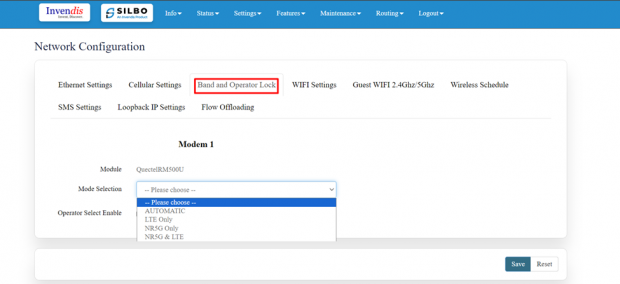
Bands available in the drop-down list | Bands available in the drop-down list | ||
[[File:Band and operator lock for 5G Router.png|frameless|620x620px]] | |||
Specification details are given below: | |||
{| class="wikitable" | |||
|SN | |||
|Field Name | |||
|Sample Value | |||
|Description | |||
|- | |||
|1 | |||
|Module | |||
|QuectelRM500U | |||
|The Quectel RM500U is a 5G module that supports both LTE and NR5G networks. | |||
|- | |||
|2 | |||
|Mode Selection | |||
|1.) Automatic | |||
2.) LTE only | |||
3.) NR5G only | |||
4.) NR5G and LTE | |||
|1.) The modem will automatically select the most appropriate network mode based on availability and signal strength. It will switch between LTE and NR5G as needed. | |||
2.) The modem will be locked to LTE (4G) networks only. It will not attempt to connect to NR5G networks, even if they are available. | |||
3.) The modem will be locked to NR5G (5G) networks only. | |||
4.) This mode typically allows for dual connectivity, where the modem can simultaneously use both LTE and NR5G for better performance. | |||
|- | |||
|3 | |||
|LTE Band Selection | |||
|Ex: LTE B1 | |||
|If custom band selection is enabled, users would typically be able to choose specific LTE bands that the modem will use. | |||
|- | |||
|4 | |||
|NR5G Band Selection | |||
|Ex: 5G B1 | |||
|The modem will automatically connect to the best available 5G band based on signal strength and network conditions. | |||
|} | |||
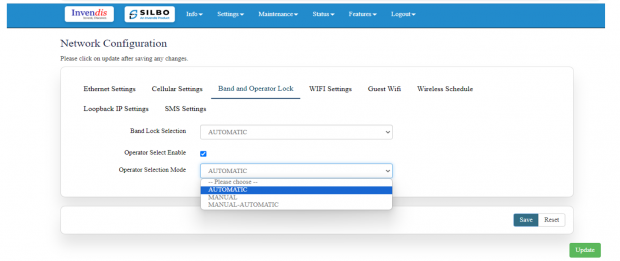
'''Operator Selection Mode:''' | |||
The user needs to click on the check box of the “operator select enable” to select the operator. | |||
Once the check box is clicked there will be a dropdown list of the operator modes from which the user needs to select the mode. The user needs to select the operator mode from the given dropdown list. | |||
[[File:Operator Selection Mode.png|frameless|620x620px]] | |||
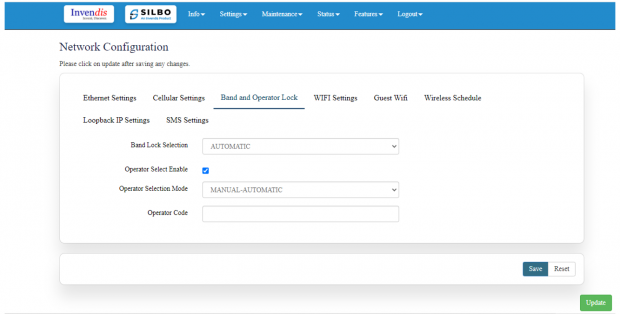
If the user selects the mode “Manual” or “Manual-Automatic” then one more text box will appear where the user must provide the operator code. | |||
[[File:Band lock and Operator Lock 1.png|frameless|620x620px]] | |||
After configuring all the required information, click on save. | |||
'''Wi-Fi Settings:''' | |||
Since this is a 5G Module device, there are 2 Wi-Fi settings available, | |||
1.) 2.4Ghz WIFI Settings | |||
2.) 5Ghz WIFI Settings | |||
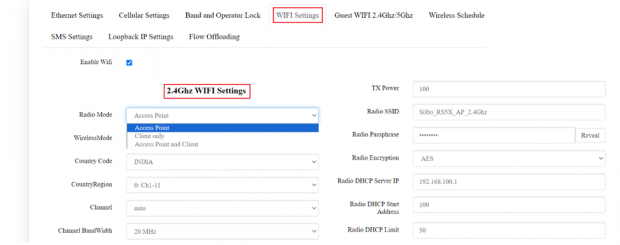
'''2.4Ghz WIFI Settings:''' | |||
It has 3 radio modes as shown, | |||
‘Access point’, ‘client only’ and ‘Access point and client’. | |||
[[File:2.4Ghz WIFI Settings for 5G router.png|frameless|620x620px]] | |||
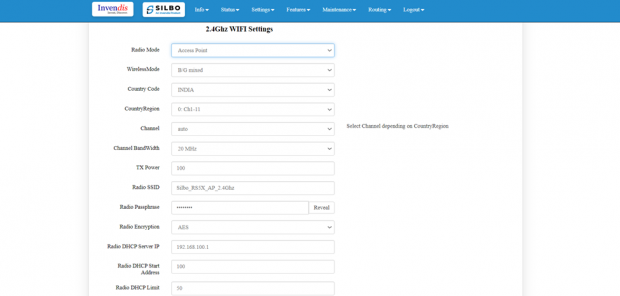
'''Access Point mode:''' In Access Point mode, a configuration in which a router, allows wireless devices to connect to a wired network by creating a Wi-Fi hotspot. | |||
[[File:Access Point mode for 5G router.png|frameless|620x620px]] | |||
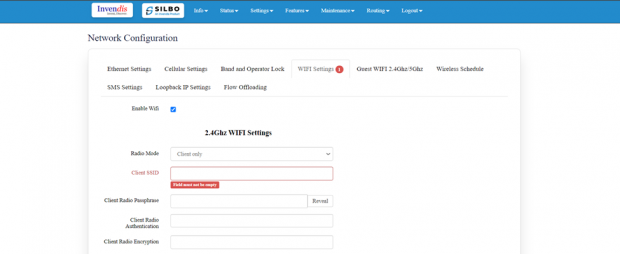
'''Client point:''' | |||
In client mode, the access point connects your wired devices to a wireless network. This mode is suitable when you have a wired device with an Ethernet port and no wireless capability, for example, a smart TV, Media Player, or Game console and you want to connect it to the internet wirelessly, select the Client Mode and give the Radio SSID & client passphrase. | |||
[[File:Client Point for 5G router.png|frameless|620x620px]] | |||
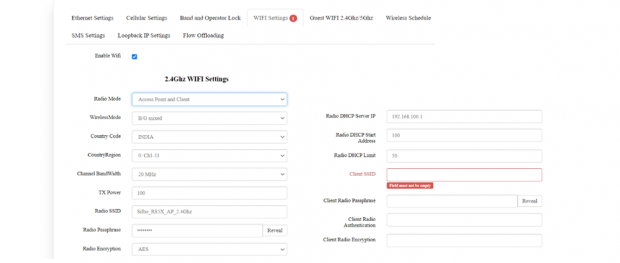
'''Access point and Client''': | |||
Select this option for both type of connection, give both SSID and passphrase. | |||
[[File:2.4 GHz Wifi settings for 5G Router .png|frameless|620x620px]] | |||
After configuring all the required information, click on save. | |||
Specification details are given below: | |||
{| class="wikitable" | |||
|SN | |||
|Field name | |||
|Sample value | |||
|Description | |||
|- | |||
|1 | |||
|Radio Mode | |||
|1.) Access point | |||
2.) Client only | |||
3.) Access point and Client | |||
|The user must select any radio mode based on the requirement as shown above. | |||
|- | |||
|2 | |||
|WirelessMode | |||
|1.) B/G Mixed | |||
2.) B Only | |||
3.) G Only | |||
4.) B/G/N Mode | |||
5.) N_in_2G mode” --, HE Wireless Mode | |||
|1.) This mode allows the access point to support both 802.11b('''2.4 GHz with a max data rate of 11 Mbps'''.) and 802.11g('''2.4 GHz with a high max data rate of 54 Mbps''') devices. | |||
2.) The access point will only support 802.11b devices. | |||
3.) The access point will only support 802.11g devices. | |||
4.) This mode allows the access point to support 802.11b, 802.11g, and 802.11n('''operates at both 2.4 GHz and 5 GHz''') devices. | |||
5.) The access point will only support 802.11n devices operating in the 2.4 GHz band. | |||
|- | |||
|3 | |||
|Country Code | |||
|INDIA | |||
|The region is set to India. | |||
|- | |||
|4 | |||
|CountryRegion | |||
|Ex: 0 (Ch1-11) | |||
|Select channels as per requirement. | |||
|- | |||
|5 | |||
|Channel | |||
|Ex: Auto | |||
|Select Channel depending on CountryRegion | |||
|- | |||
|6 | |||
|Channel BandWidth | |||
|Ex: 20 MHz | |||
|The bandwidth is set to 20 MHz, which is common for 2.4 GHz networks. | |||
|- | |||
|7 | |||
|TX Power | |||
|100 | |||
|Transmit power is set to maximum (100%), ensuring the strongest possible signal. | |||
|- | |||
|8 | |||
|Radio SSID | |||
|Silbo_RS5X_AP_2.4Ghz | |||
|Devices searching for available networks will see this name. | |||
|- | |||
|9 | |||
|Radio Passphrase | |||
|•••••••• | |||
|This is the password for connecting to the Wi-Fi network. | |||
|- | |||
|10 | |||
|Radio Encryption | |||
|AES | |||
|The access point uses AES (Advanced Encryption Standard) for securing wireless communications. | |||
|- | |||
|11 | |||
|Radio DHCP server IP | |||
|192.168.100.1 | |||
|This will be the default gateway IP for devices connecting to the network (can be changed). | |||
|- | |||
|12 | |||
|Radio DHCP start address | |||
|100 | |||
|The DHCP server will assign IP addresses starting from 192.168.100.100 (will differ if any changes). | |||
|- | |||
|13 | |||
|Radio DHCP limit | |||
|50 | |||
|The DHCP server can assign up to 50 IP addresses. | |||
|- | |||
|14 | |||
|Client SSID | |||
|Any device SSID | |||
|The SSID (Service Set Identifier) is the name of the Wi-Fi network you want the device to connect to. | |||
|- | |||
|15 | |||
|Client Radio Passphrase | |||
|•••••••• | |||
|This is the password required to connect to the Wi-Fi network. | |||
|- | |||
|16 | |||
|Client Radio Authentication | |||
| | |||
|This setting defines the type of authentication used by the Wi-Fi network. Leave it blank if not in use. | |||
|- | |||
|17 | |||
|Client Radio Encryption | |||
|Ex: AES | |||
|This determines the type of encryption used to secure data transmitted over the Wi-Fi network. | |||
|} | |||
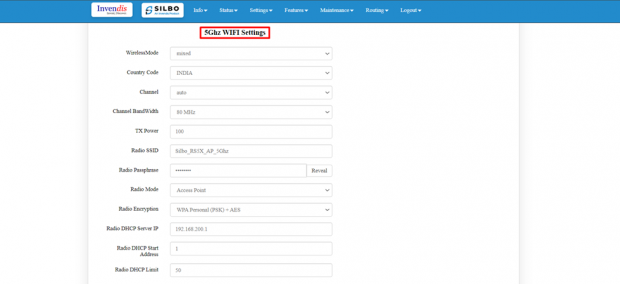
'''5Ghz WIFI Settings:''' | |||
[[File:5Ghz WIFI Settings for 5G Router.png|frameless|620x620px]] | |||
Specification details are given below: | |||
{| class="wikitable" | |||
|SN | |||
|Field Name | |||
|Sample Value | |||
|Description | |||
|- | |||
|1 | |||
|WirelessMode | |||
|mixed | |||
|This mode allows the access point to support multiple Wi-Fi standards, typically including 802.11a('''Operates on the 5 GHz band'''), 802.11n'''(supports both 2.4 GHz and 5 GHz'''), and 802.11ac ('''Designed specifically for the 5 GHz band'''). | |||
|- | |||
|2 | |||
|Country Code | |||
|INDIA | |||
|Setting this to "INDIA" ensures compliance with local regulations regarding the 5 GHz Wi-Fi spectrum. | |||
|- | |||
|3 | |||
|Channel | |||
|auto | |||
|The access point automatically selects the best available channel based on current Wi-Fi traffic and interference. | |||
|- | |||
|4 | |||
|Channel BandWidth | |||
|80 MHz | |||
|'''20 MHz''': The default width for most networks, offering the best compatibility. | |||
'''40 MHz''': Provides more bandwidth, suitable for less congested environments. | |||
'''80 MHz''': Offers the highest throughput but may suffer from interference in crowded environments. | |||
|- | |||
|5 | |||
|TX Power | |||
|100 | |||
|The transmit power is set to 100%, which is the maximum power output allowed by the device. | |||
|- | |||
|6 | |||
|Radio SSID | |||
|Silbo_RS5X_AP_5Ghz | |||
|This is the name that users will see when searching for available Wi-Fi networks. | |||
|- | |||
|7 | |||
|Radio Passphrase | |||
|•••••••• | |||
|This is the password required to connect to the Wi-Fi network. | |||
|- | |||
|8 | |||
|Radio Mode | |||
|Access Point | |||
|The device is set to operate as an access point, providing wireless connectivity to devices within its range. | |||
|- | |||
|9 | |||
|Radio Encryption | |||
|1. NONE | |||
2. WPA Personal (PSK) | |||
3. WPA Personal (PSK) + AES | |||
4. WPA Personal (PSK) + CCMP | |||
5. WPA Personal (PSK) + TKIP + CCMP | |||
6. WPA Personal (PSK) + TKIP + AES | |||
|1.) This option disables encryption on the Wi-Fi network. | |||
2.) This is a basic security option commonly used in home and small office networks. | |||
3.) This is the most recommended option for most networks. It provides strong security by combining the WPA Personal protocol with AES encryption. | |||
4.) This option is technically equivalent to WPA Personal (PSK) + AES, as CCMP is the mode in which AES operates under WPA2. | |||
5.) This is a backward-compatible option that can be used in networks where some older devices only support TKIP, while newer devices can take advantage of the more secure AES (CCMP). | |||
6.) Like the TKIP + CCMP option, this is intended for environments with mixed device capabilities. | |||
|- | |||
|10 | |||
|Radio DHCP Server IP | |||
|192.168.200.1 | |||
|This IP address will act as the default gateway for devices connecting to the Wi-Fi network. | |||
|- | |||
|11 | |||
|Radio DHCP Start Address | |||
|1 | |||
|The starting IP address in the DHCP range. The first device that connects will receive 192.168.200.1. | |||
|- | |||
|12 | |||
|Radio DHCP Limit | |||
|50 | |||
|The maximum number of IP addresses that the DHCP server can assign. In this case, it can assign up to 50 devices. | |||
|} | |||
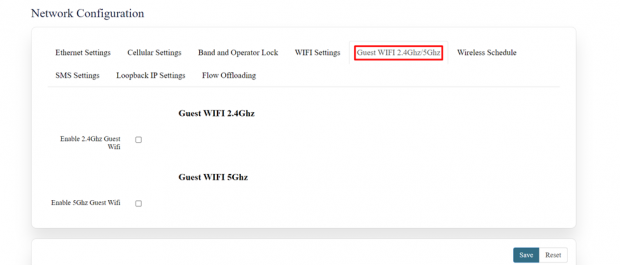
'''Guest WIFI 2.4Ghz/5Ghz:''' | |||
As shown below, this section has 2 modes, | |||
Enable 2.4Ghz Guest Wifi, Enable 5Ghz Guest Wifi | |||
[[File:Guest WIFI 2.4Ghz-5Ghz.png|frameless|620x620px]] | |||
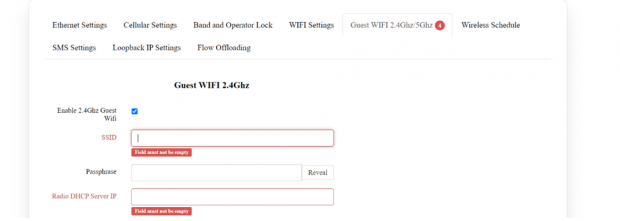
'''Enable 2.4Ghz Guest Wifi:''' | |||
[[File:Enable 2.4Ghz Guest Wifi of 5G.png|frameless|620x620px]] | |||
Specification details are given below: | |||
{| class="wikitable" | |||
|SN | |||
|Field Name | |||
|Sample Value | |||
|Description | |||
|- | |||
|1 | |||
|Enable 2.4Ghz Guest Wifi | |||
|Enable/Disable | |||
|Enable this option if you want to set up a 2.4Ghz Guest Wifi. | |||
|- | |||
|2 | |||
|SSID | |||
|Add SSID of a device | |||
|The SSID field must not be empty. You need to enter a name for the Guest Wi-Fi network. | |||
|- | |||
|3 | |||
|Passphrase | |||
|Ex: GuestAccess2024 | |||
|The passphrase is the password required to connect to the Guest Wi-Fi network. | |||
|- | |||
|4 | |||
|Radio DHCP Server IP | |||
|Ex: 192.168.13.30 | |||
|The DHCP Server IP field must not be empty. You must assign a valid IP address within the subnet range you intend to use for the Guest Wi-Fi network. | |||
|} | |||
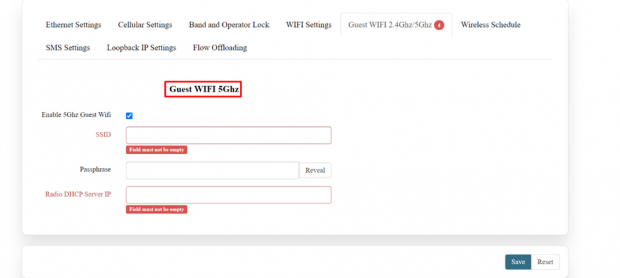
'''Enable 5Ghz Guest Wifi:''' | |||
[[File:Enable 5Ghz Guest Wifi of 5G router.png|frameless|620x620px]] | |||
Specification details are given below: | |||
{| class="wikitable" | |||
|SN | |||
|Field Name | |||
|Sample Value | |||
|Description | |||
|- | |||
|1 | |||
|Enable 5Ghz Guest Wifi | |||
|Enable/Disable | |||
|Enable this option if you want to set up a 5Ghz Guest Wifi. | |||
|- | |||
|2 | |||
|SSID | |||
|Ex: Guest_WiFi_5GHz | |||
|The SSID field must not be empty. You need to enter a name for the Guest Wi-Fi network. | |||
|- | |||
|3 | |||
|Passphrase | |||
|Ex: Guest5GAccess2024 | |||
|The passphrase is the password required to connect to the Guest Wi-Fi network. | |||
|- | |||
|4 | |||
|Radio DHCP Server IP | |||
|Ex: 192.168.11.20 | |||
|The DHCP Server IP field must not be empty. You must assign a valid IP address within the subnet range you intend to use for the Guest Wi-Fi network. | |||
|} | |||
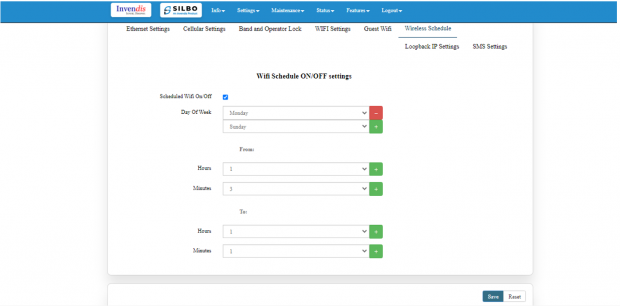
'''Wireless Schedule:''' | |||
Wi-Fi can be automatically withdrawn based on the configuration done in this section. | |||
The user can schedule the Wi-Fi’s accessibility time during a particular period. | |||
[[File:Wifi Schedule.png|frameless|620x620px]] | |||
The user can select more than one “day of the week” for scheduling the Wi-Fi working hours as shown above. | |||
After configuring all the required information, click on save. | |||
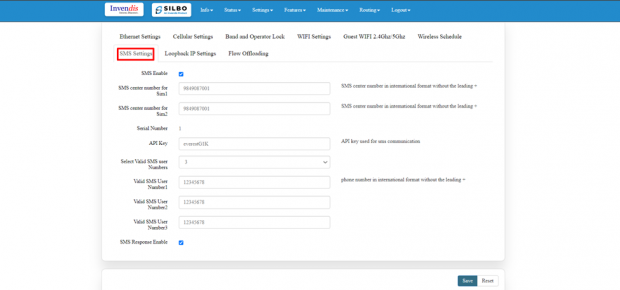
'''SMS Settings:''' | |||
User needs to enable SMS option in SMS settings page. | |||
This option is to validate the mobile numbers using which controlling commands could be sent to the router device. | |||
1 to 5 mobile numbers can be authenticated by choosing from “Select Valid SMS user numbers” and adding the mobile numbers below respectively. | |||
API key is the pass key used in the commands while sending SMS. | |||
Displayed in the below screen is the default API key which can be edited and changed as per choice. | |||
[[File:SMS Settings for 5G router.png|frameless|620x620px]] | |||
1.) Select valid user number max. 5 and add authorized phone number in the tab where you want to find the alert and click on '''‘SMS Response Enable’''', '''‘save’''' and '''‘update’''' button. | |||
2.) Now send SMS commands from the configured mobile number. | |||
3.) Once the commands are received from the user phone number the board will send acknowledgement as per the commands. | |||
4.) After that it will send the router’s status once it has rebooted and is operational again. | |||
Mentioned below are a few commands which can be sent from the configured mobile number to the router device. Below two commands are One for rebooting the router device and another to get the uptime. | |||
1) {"device":["passkey","API key"],"command":"reboot","arguments":"hardware"} | |||
2) {"device":["passkey ","API key"],"command":"uptime"} | |||
After configuring all the required information, click on save. | |||
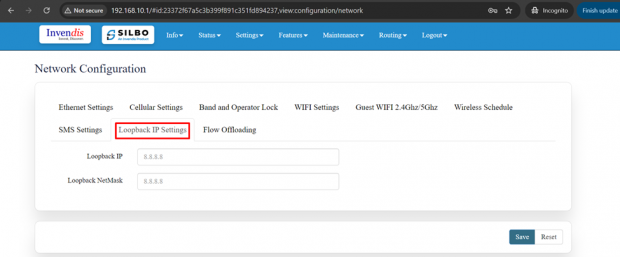
'''Loop back IP settings:''' | |||
The loopback IP address, often referred to as “localhost.” It is used to establish network connections within the same device for testing and troubleshooting purpose. | |||
[[File:Loop back IP settings for 5G Router.png|frameless|620x620px]] | |||
The loopback IP address, commonly represented as 127.0.0.1, is a special address used for testing network connectivity on a local machine. | |||
It allows a device to send network messages to itself without involving external networks, making it useful for troubleshooting and diagnostics. | |||
However, this IP can be changed as per requirement and to do that, Navigating to Setting>>Network configuration>> Loopback IP settings can be changed/updated. | |||
After configuring all the required information, click on save. | |||
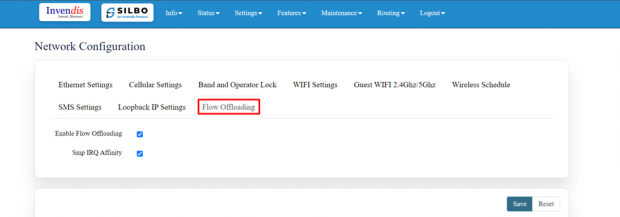
'''Flow Offloading:''' | |||
[[File:Flow Offloading.png|frameless|620x620px]] | |||
Specification details are given below: | |||
{| class="wikitable" | |||
|SN | |||
|Field Name | |||
|Sample Value | |||
|Description | |||
|- | |||
|1 | |||
|Enable Flow Offloading | |||
|Enable/Disable | |||
(Disable by default) | |||
|'''Hardware Flow Offloading''': If supported by your device, enabling flow offloading can significantly increase throughput by reducing the CPU load. | |||
'''Software Flow Offloading''': Even without specialized hardware, software-based flow offloading can help optimize network traffic processing. | |||
|- | |||
|2 | |||
|SMP IRQ Affinity | |||
|Enable/Disable | |||
(Disable by default) | |||
|'''SMP IRQ Affinity''': When enabled, this setting can bind specific IRQs to specific CPU cores, which can optimize the handling of interrupts and improve overall system performance. | |||
|} | |||
After configuring all the required information, click on save. | |||
=== 3.2 Internet === | |||
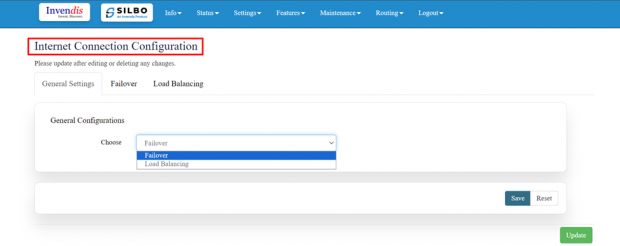
As shown below, this section has 3 categories, | |||
General settings | |||
Failover | |||
Load Balancing | |||
[[File:Internet configuration for 5G Router.png|frameless|620x620px]] | |||
'''General Settings:''' | |||
In general settings, select any one option from the drop-down menu which you wish to imply and click on save. | |||
Failover | |||
Load Balancing | |||
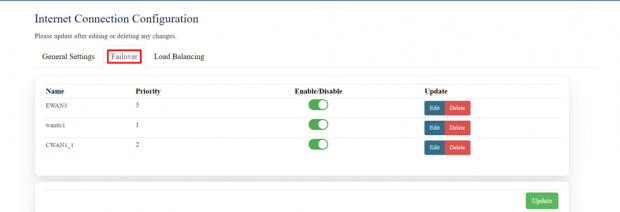
'''Failover:''' | |||
[[File:Failover Settings.png|frameless|620x620px]] | |||
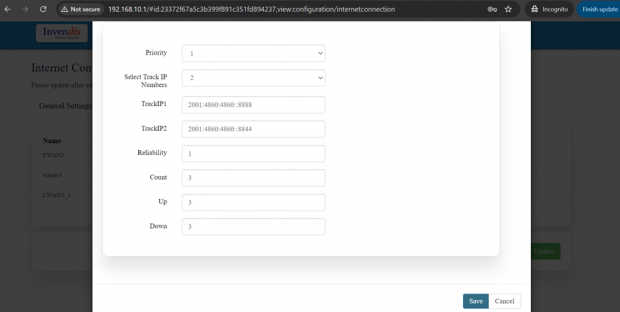
'''EDIT:''' | |||
[[File:Editing Failover Settings .png|frameless|620x620px]] | |||
The specifications details are below. | |||
{| class="wikitable" | |||
|SN | |||
|Field name | |||
|Sample value | |||
|Description | |||
|- | |||
|1 | |||
|Priority | |||
|Ex: 1 | |||
|Setting a priority of 1 means this connection has the highest priority and will be used before any others with a higher priority number. | |||
|- | |||
|2 | |||
|Select Track IP Numbers | |||
|2 | |||
|In this dropdown the user needs to select the track number for the Ips. This specifies the number of IP addresses that will be used for tracking the status of the connection. | |||
|- | |||
|3 | |||
|TrackIP1 | |||
|2001:4860:4860::8888 | |||
|'''TrackIP1''': 2001:4860:4860::8888 is an IPv6 address that corresponds to one of Google’s public DNS servers. | |||
|- | |||
|4 | |||
|TrackIP2 | |||
|2001:4860:4860::8844 | |||
|'''TrackIP2''': 2001:4860:4860::8844 is another Google public DNS server. | |||
|- | |||
|5 | |||
|Reliability | |||
|1 | |||
|If reliability is set to 1, it might mean the connection is considered reliable if it successfully pings at least one of the tracked IP addresses. | |||
|- | |||
|6 | |||
|Count | |||
|3 | |||
|Setting Count to 3 means the device will send three pings to each IP address to check for connectivity. | |||
|- | |||
|7 | |||
|Up | |||
|3 | |||
|If set to 3, the connection will be considered "up" only if all three pings are successful. | |||
|- | |||
|8 | |||
|Down | |||
|3 | |||
|If set to 3, the connection will be considered "down" if all three pings fail. | |||
|} | |||
Once the user is done with modification click on the save tab to save all the changes and then click on the update button. | |||
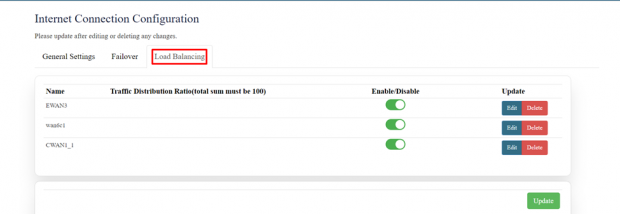
'''Load Balancing:''' | |||
Load balancing is a network management technique used to distribute traffic across multiple network connections or servers to optimize resource use, maximize throughput, minimize response time, and ensure reliability. | |||
'''Tasks of Load Balancing:''' | |||
'''Traffic Distribution''': | |||
'''Task''': Distributes network traffic evenly across multiple connections (e.g., multiple WAN links) or servers. | |||
'''Purpose''': This ensures that no single connection or server is overwhelmed with too much traffic, which could lead to congestion and slower performance. | |||
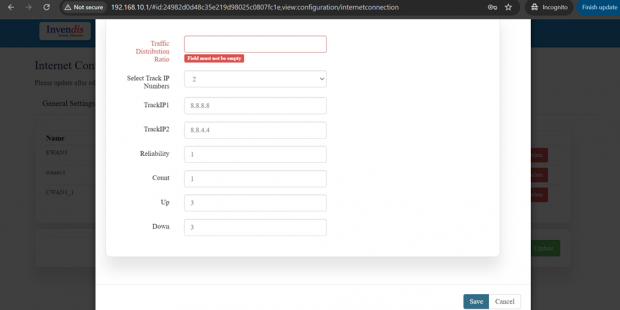
[[File:Load Balancing Dashboard.png|frameless|620x620px]] | |||
'''EDIT:''' | |||
[[File:Load Balancing Editing.png|frameless|620x620px]] | |||
Specification details are given below: | |||
{| class="wikitable" | |||
|SN | |||
|Field Name | |||
|Sample Value | |||
|Description | |||
|- | |||
|1 | |||
|Traffic Distribution Ratio | |||
|Ex: 60% | |||
|If you have two connections and set one to 60% and the other to 40%, traffic will be distributed accordingly. | |||
|- | |||
|2 | |||
|Select Track IP Numbers | |||
|2 | |||
|The system will track two IP addresses to determine if the network connection is active and reliable. | |||
|- | |||
|3 | |||
|TrackIP1 | |||
|8.8.8.8 | |||
|The system will ping this IPV4 IP address to check if the connection is up and working. You can even add any whitelisted IP. | |||
|- | |||
|4 | |||
|TrackIP2 | |||
|8.8.4.4 | |||
|The system will ping this IPV4 IP address to check if the connection is up and working. You can even add any whitelisted IP. | |||
|- | |||
|5 | |||
|Reliability | |||
|1 | |||
|With a reliability setting of 1, the connection might be considered reliable if at least one ping is successful. | |||
|- | |||
|6 | |||
|Count | |||
|1 | |||
|The system will send one ping to each tracked IP to check the connection's status. | |||
|- | |||
|7 | |||
|Up | |||
|3 | |||
|The system requires 3 successful pings for the connection to be marked as "up." | |||
|- | |||
|8 | |||
|Down | |||
|3 | |||
|If 3 pings fail, the system will mark the connection as "down," and it may switch to an alternate connection if available. | |||
|} | |||
Once the user is done with modification click on the save tab to save all the changes and then click on the update button. | |||
=== 3.3 VPN === | |||
VPN stands for '''Virtual Private Network''', it establishes a connection between the system and a remote server, which is owned by a VPN provider. | |||
Creating a point-to-point tunnel that encrypts the personal data, masks the IP address, and allows to block the required website to blocks via firewalls on the internet. | |||
Navigate to settings >= VPN, general settings and you will see all VPN options you wish to use. | |||
Refer the below figure. | |||
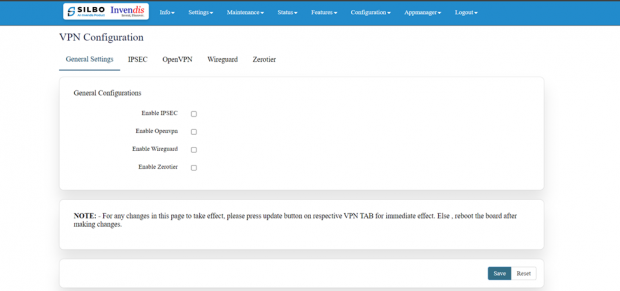
[[File:VPN Configuration General Settings.png|frameless|620x620px]] | |||
There are 5 types of setting available under VPN configuration. | |||
* General Settings | |||
* IPSEC | |||
* Open VPN | |||
* Wireguard | |||
* Zerotier | |||
'''General Settings:''' | |||
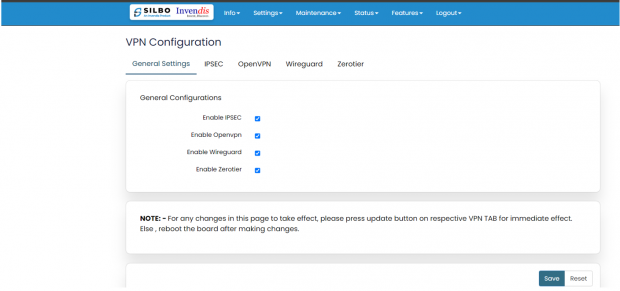
In this page the user must choose which type of VPN connection is required for the device. The user must select from IPSEC, Open VPN, Wireguard or Zerotier based on its requirement. If required, the user can select all the options. Click on save after selecting the option based on its requirement. | |||
[[File:VPN General Settings RC44.png|frameless|620x620px]] | |||
'''IPSEC:''' | |||
IPSEC VPN is used to create a VPN connection between local and remote networks. | |||
To use IPSEC VPN, the user should check that both local and remote routers support IPSEC VPN feature. | |||
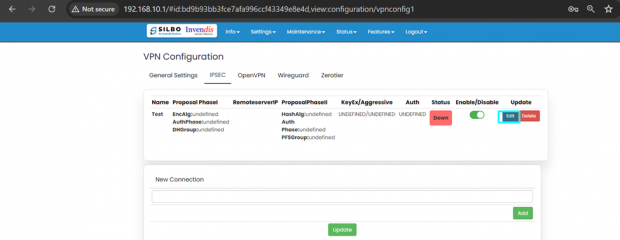
In this page the user can add/edit/delete the IPSEC VPN connection for the device. | |||
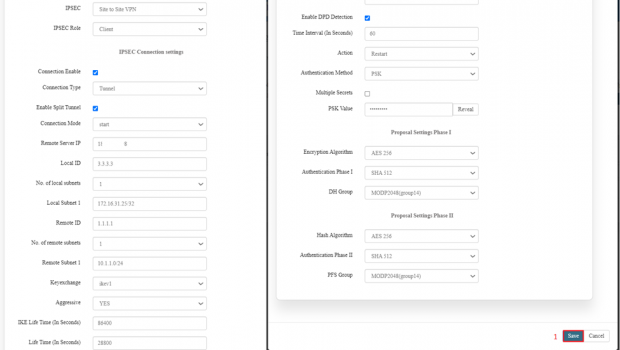
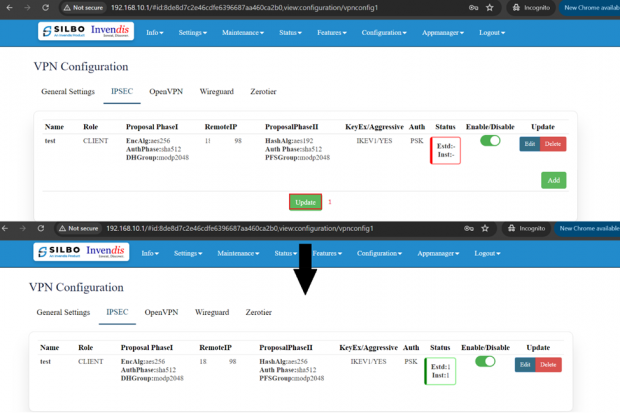
[[File:IPSec Config.png|frameless|620x620px]] | |||
The user needs to click on the update button once the required configuration is completed. | |||
In IPSEC the user needs to click on edit button to edit the configuration of an existing VPN connection. | |||
[[File:IAB44C Ipsec Edit Options.png|frameless|620x620px]] | |||
Click on update once done with configurations. | |||
The tunnel will show established, showing the connection has been made. | |||
[[File:VPN Configurtaion IPSEC .png|frameless|620x620px]] | |||
Detailed specifications are below: | |||
{| class="wikitable" | |||
|SN | |||
|Field name | |||
|Sample value | |||
|Description | |||
|- | |||
|1 | |||
|IPSEC | |||
|Site to Site VPN | |||
|In this dropdown the user should select the IPSEC connection type. | |||
|- | |||
|2 | |||
|IPSEC Role | |||
|Client/Server | |||
|In this dropdown box the user needs to select the IPSEC role. The device is acting as a client in the VPN setup (in this example). | |||
|- | |||
|3 | |||
|Connection Type | |||
|Tunnel | |||
|In this dropdown the user needs to select the connection type. The user should select on the connection enable check box. | |||
|- | |||
|4 | |||
|Connection mode | |||
|Route/add/'''start'''/trap | |||
|In this drop down list the user should select the mode for the connection. In this example '''start''' is selected which means the VPN connection is initiated automatically. | |||
|- | |||
|5 | |||
|Remote Server IP | |||
|******** | |||
|The IP address of the remote VPN server. | |||
|- | |||
|6 | |||
|Local ID | |||
|3.3.3.3 | |||
|The user needs to set the local id. It is the identification for the local VPN client. | |||
|- | |||
|7 | |||
|No. of local subnets | |||
|1 | |||
|In this dropdown the user needs to select how many subnets will be connected. | |||
|- | |||
|8 | |||
|Local Subnet 1 | |||
|172.16.31.25/32 | |||
|In this text box the user needs to put the specific local subnet included in the VPN. | |||
|- | |||
|9 | |||
|Remote id | |||
|1.1.1.1 | |||
|In this text box the user needs to put the id of the remote connection. It is the identification for the remote VPN server. | |||
|- | |||
|10 | |||
|No of remote subnet | |||
|1 | |||
|In this dropdown the user needs to select how many subnets it will be connected remotely. | |||
|- | |||
|11 | |||
|Remote subnet | |||
|10.1.1.0/24 | |||
|In this text box the user needs to put the address of the remote subnet. The specific remote subnet included in the VPN. | |||
|- | |||
|12 | |||
|Key exchange | |||
|Ikev1 | |||
|In this dropdown the user should select the which key exchange version to be selected. | |||
|- | |||
|13 | |||
|Aggressive | |||
|Yes/No | |||
|In this dropdown the user should select either yes or no. | |||
|- | |||
|14 | |||
|IKE Lifetime (In Seconds) | |||
|86400 | |||
|The lifetime of the IKE phase in seconds (1 day). | |||
|- | |||
|15 | |||
|Lifetime (in seconds) | |||
|28800 | |||
|The lifetime of the IPsec SA (Security Association) in seconds (8 hours). | |||
|- | |||
|16 | |||
|Enable DPD Detection | |||
|'''1''' | |||
0 | |||
|Indicates whether Dead Peer Detection is enabled to detect a lost connection. Enable this option as per server-side settings. | |||
|- | |||
|17 | |||
|Time Interval (In Seconds) | |||
|60 | |||
|This option is available only if DPD Detection is enabled. The time interval is the interval for DPD checks. | |||
|- | |||
|18 | |||
|Action | |||
|'''Restart'''/clear/hold/ | |||
trap/start | |||
|'''Restart''': Action to take when DPD detects a lost connection (restart the connection). Select as per server-side setting. | |||
|- | |||
|19 | |||
|Authentication Method | |||
|'''PSK''' | |||
|'''PSK''': Pre-shared key is used for authentication. Select this option for authentication as per sever side setting. | |||
|- | |||
|20 | |||
|Multiple Secrets | |||
|1/'''0''' | |||
|Indicates whether multiple PSK secrets are used. Enable only if required. | |||
|- | |||
|21 | |||
|PSK Value | |||
|****** | |||
|Pre-shared key value (masked for security). | |||
|} | |||
{| class="wikitable" | |||
|'''Proposal settings Phase I''' | |||
{| class="wikitable" | |||
|22 | |||
| colspan="2" |'''Encryption Algorithm''' | |||
| colspan="3" |AES 128 | |||
AES 192 | |||
'''AES 256''' | |||
3DES | |||
|'''AES 256''': Encryption algorithm for Phase I. Select as per server-side configuration. Both server and client should have same configuration. | |||
|- | |||
|23 | |||
| colspan="2" |Authentication Phase I | |||
| colspan="3" |SHA1 | |||
MD5 | |||
SHA 256 | |||
SHA 384 | |||
'''SHA 512''' | |||
|'''SHA 512''': Authentication algorithm for Phase I. | |||
Select as per server-side configuration. Both server and client should have same configuration. | |||
|- | |||
|24 | |||
| colspan="2" |DH Group | |||
| colspan="3" |MODP768(group1) | |||
MODP1024(group2) | |||
MODP1536(group5) | |||
'''MODP2048(group14)''' | |||
MODP3072(group15) | |||
MODP4096(group16) | |||
|'''MODP2048(group14):''' Diffie-Hellman group for key exchange. | |||
Select as per server-side configuration. Both server and client should have same configuration. | |||
|- | |||
| colspan="7" |'''Proposal settings Phase II''' | |||
|- | |||
| colspan="2" |25 | |||
| colspan="2" |Hash Algorithm | |||
|AES 128 | |||
AES 192 | |||
'''AES 256''' | |||
3DES | |||
| colspan="2" |'''AES 256''': Encryption algorithm for Phase II. Select as per server-side configuration. Both server and client should have same configuration. | |||
|- | |||
| colspan="2" |26 | |||
| colspan="2" |Authentication Phase II | |||
|SHA1 | |||
MD5 | |||
SHA 256 | |||
SHA 384 | |||
'''SHA 512''' | |||
| colspan="2" |'''SHA 512''': Authentication algorithm for Phase II. | |||
Select as per server-side configuration. Both server and client should have same configuration. | |||
|- | |||
| colspan="2" |27 | |||
| colspan="2" |PFS Group | |||
|MODP768(group1) | |||
MODP1024(group2) | |||
MODP1536(group5) | |||
'''MODP2048(group14)''' | |||
MODP3072(group15) | |||
MODP4096(group16) | |||
| colspan="2" |'''MODP2048(group14):''' Perfect Forward Secrecy group. | |||
Select as per server-side configuration. Both server and client should have same configuration. | |||
|} | |||
|} | |||
'''Open VPN:''' | |||
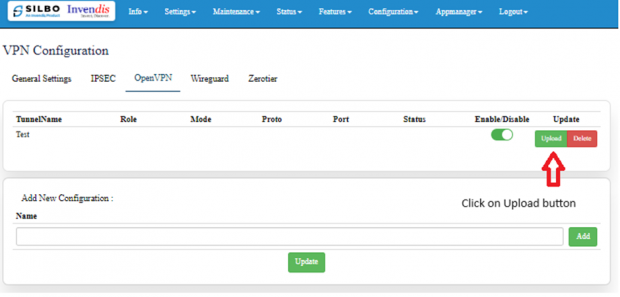
To use the VPN feature, the user should enable OpenVPN Server on the router, and install and run VPN client software on the remote device. | |||
[[File:Open VPN Certificate.png|frameless|620x620px]] | |||
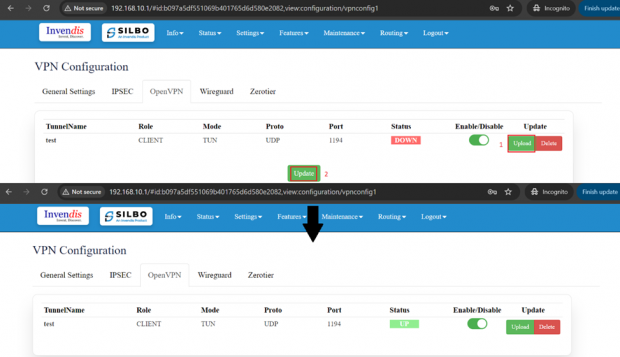
The user needs to “upload” the respective certificate from a valid path and then click on the “Update.” | |||
Once the OpenVPN connection starts the user will get an option to enable/disable the VPN connection as and when required. Here we have established a TUN connection. | |||
By clicking on the enable/disable button, the user can start/stop the VPN connection. | |||
[[File:Open VPN Dashboard V2.png|frameless|620x620px]] | |||
VPN TUN has been established. Same way VPN TAP can also be established. | |||
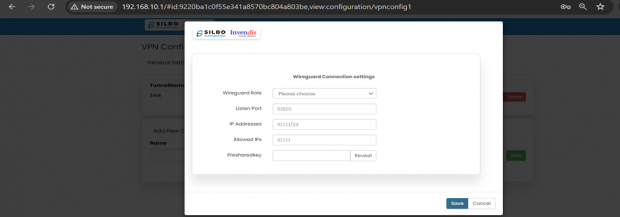
'''WireGuard:''' | |||
'''WireGuard''' is simple, fast, lean, and modern VPN that utilizes secure and trusted cryptography. | |||
Click on “Edit” to start configurations as needed. | |||
[[File:Wire Guard RC44.png|frameless|620x620px]] | |||
'''EDIT:''' | |||
[[File:RS5X Wireguard config.png|frameless|620x620px]] | |||
Specification details are given below: | |||
{| class="wikitable" | |||
|SN | |||
|Field name | |||
|Sample value | |||
|Description | |||
|- | |||
|1 | |||
|Wireguard Role | |||
|Client/Server | |||
|In this dropdown box the user needs to select the wireguard role. | |||
|- | |||
|2 | |||
|Listen Port | |||
|51820 | |||
|The UDP port on which the WireGuard client listens for incoming connections. | |||
|- | |||
|3 | |||
|IP Addresses | |||
|10.0.0.1/24 | |||
|The IP address and subnet mask assigned to the WireGuard client's interface. This address is used within the VPN. | |||
|- | |||
|4 | |||
|Allowed IPs | |||
|10.1.1.1 | |||
|The IP address of the allowed peer(s) that can connect to this WireGuard client. This might need adjustment based on the actual peer IPs used in the network. | |||
|- | |||
|5 | |||
|Endpoint HostIP | |||
|10.1.1.1 | |||
|The IP address of the WireGuard server (the endpoint to which the client connects). | |||
|- | |||
|6 | |||
|Preshared key | |||
|***** | |||
|The actual pre-shared key value shared between the client and the server. This option appears only if you have enabled preshared key. | |||
|} | |||
Save and update the page after configuration has been done. | |||
'''Zerotier:''' | |||
ZeroTier is a tool that lets you create your own private network over the internet. | |||
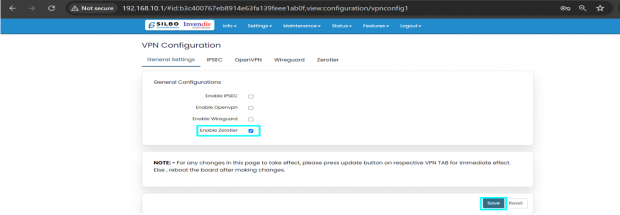
Go to ZeroTier Central and sign up for a free account. In ZeroTier Central, click on "Create a Network". This will generate a unique 16-digit network ID for your new network. | |||
Go to settings => VPN, in general settings, enable ZeroTier and save. | |||
[[File:Zerotier Settings RC44.png|frameless|620x620px]] | |||
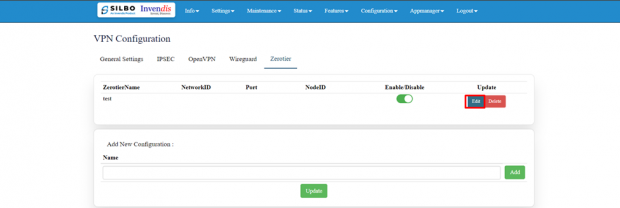
Copy and paste the unique 16-digit network ID in the edit section. | |||
[[File:Zero tier Unique ID.png|frameless|620x620px]] | |||
[[File:Zerotier Dashboard.png|frameless|620x620px]] | |||
Click on the save button after the required configuration. | |||
{| class="wikitable" | |||
|SN | |||
|Field name | |||
|Sample value | |||
|Description | |||
|- | |||
|1 | |||
|NetworkID | |||
|Ad2769hfkw2345f4 | |||
|In this dropdown box the user needs to paste the unique 16-digit network id. | |||
|- | |||
|2 | |||
|Listen Port | |||
|9993 | |||
|Default | |||
|} | |||
=== 3.4 Firewall === | |||
A firewall is a layer of security between the network and the Internet. | |||
Since a router is the main connection from a network to the Internet, the firewall function is merged into this device. | |||
Every network should have a firewall to protect its privacy. | |||
To configure a Firewall, navigate to settings <= firewall, | |||
[[File:RS5X Firewall.png|frameless|620x620px]] | |||
There are 6 types of setting available under firewall. | |||
* General Settings | |||
* Port forwards | |||
* Traffic Rules | |||
* SNAT traffic Rules | |||
* Parental Control | |||
* Zone Forwarding | |||
'''General Settings:''' | |||
General settings are subdivided into 2 parts, | |||
1.) General settings | |||
In general settings, the settings that are made are default settings and can be changed according to user’s preference. | |||
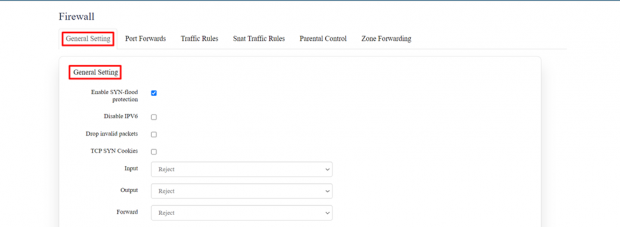
[[File:RS5X General firewall settings.png|frameless|620x620px]] | |||
Specification details are below: | |||
{| class="wikitable" | |||
|SN | |||
|Field Name | |||
|Sample Value | |||
|Description | |||
|- | |||
|1 | |||
|Enable SYN-flood protection | |||
|Enabled | |||
|This is enabled by default; setting can be changed if required. | |||
|- | |||
|2 | |||
|Disable IPV6 | |||
|Disabled | |||
|This is enabled by default; setting can be changed if required. | |||
|- | |||
|3 | |||
|Drop invalid packets | |||
|Disabled | |||
|This is enabled by default; setting can be changed if required. | |||
|- | |||
|4 | |||
|TCP SYN Cookies | |||
|Disabled | |||
|This is enabled by default; setting can be changed if required. | |||
|- | |||
|5 | |||
|Input | |||
|Reject/Accept | |||
|By default, the setting is ‘Reject’ but this needs to be changed to ‘Accept’ compulsory. | |||
|- | |||
|6 | |||
|Output | |||
|Reject/Accept | |||
|By default, the setting is ‘Reject’ but this needs to be changed to ‘Accept’ compulsory. | |||
|- | |||
|7 | |||
|Forward | |||
|Reject/Accept | |||
|By default, the setting is ‘Reject’ but this needs to be changed to ‘Accept’ compulsory. | |||
|} | |||
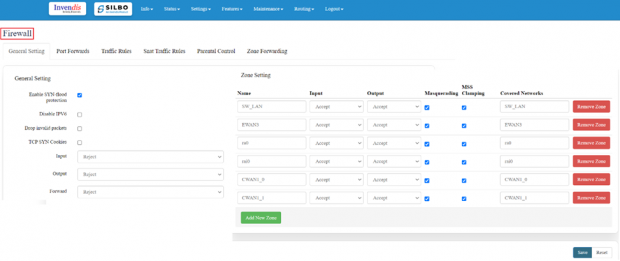
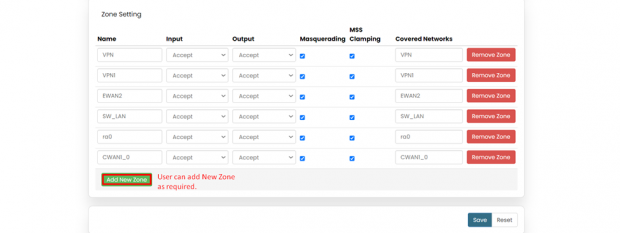
2.) Zone settings | |||
In zone settings, there’s an option to add “New Zone”, according to user’s requirement. | |||
[[File:Firewall Zone Settings.png|frameless|620x620px]] | |||
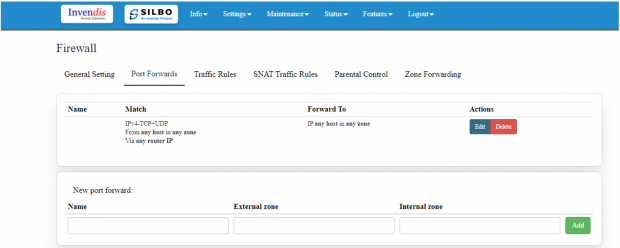
'''Port Forwards:''' | |||
Port forwarding is a feature in a router or gateway that allows external devices to access services on a private network. | |||
It maps an external port on the router to an internal IP address and port on the local network, enabling applications such as gaming servers, web servers, or remote desktop connections to be accessed from outside the network. | |||
This helps in directing incoming traffic to the correct device within a local network based on the port number, enhancing connectivity and accessibility. | |||
[[File:Firewall Port Forward.png|frameless|620x620px]] | |||
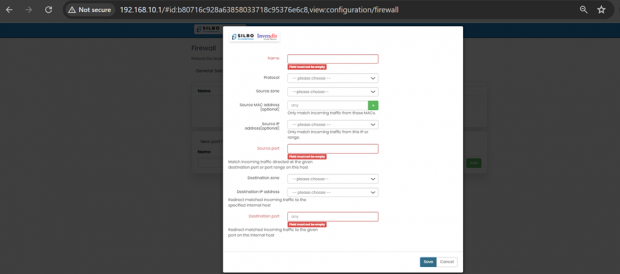
'''EDIT:''' | |||
[[File:Firewall Configuration 2.png|frameless|620x620px]] | |||
Click on the save button after the required configuration. | |||
{| class="wikitable" | |||
|SN | |||
|Field name | |||
|Sample value | |||
|Description | |||
|- | |||
|1 | |||
|Name | |||
|Example: <code>Web_Server_Forward</code> | |||
|Field must not be empty. Provide a name for the rule to easily identify it. | |||
|- | |||
|2 | |||
|Protocol | |||
|Example: <code>TCP+UDP</code> | |||
|Select the protocol for the rule. | |||
Options typically include TCP+UDP, TCP, UDP, ICMP, Custom. | |||
|- | |||
|3 | |||
|Source zone | |||
|Example: <code>SW_LAN</code> | |||
|Select the source zone where the traffic is originating from. Options typically include EWAN2,SW_LAN,CWAN1,CWAN1_0,CWAN1_1,VPN | |||
|- | |||
|4 | |||
|Source MAC address [optional] | |||
|Example: <code>any</code> | |||
|'''any''': Leave as <code>any</code> if you don't want to specify a MAC address. | |||
|- | |||
|5 | |||
|Source IP address[optional] | |||
|Example: Leave blank if not needed. | |||
|Optionally specify an IP address or range. | |||
|- | |||
|6 | |||
|Source port | |||
|Example: <code>80, 443</code> (if matching traffic for web server ports) | |||
|Specify the source port or port range. | |||
|- | |||
|7 | |||
|Destination zone | |||
|Example: <code>SW_LAN</code> | |||
|Select the destination zone where the traffic is heading to. | |||
|- | |||
|8 | |||
|Destination IP address | |||
|Leave blank if not needed. | |||
|Optionally specify the destination IP address or range. | |||
|- | |||
|9 | |||
|Destination port | |||
|Example: <code>80</code> (if redirecting to a web server port) | |||
|Specify the destination port or port range. | |||
|} | |||
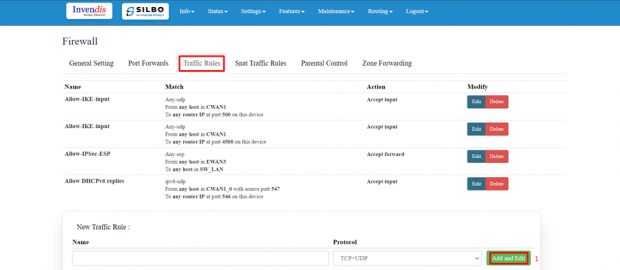
'''Traffic Rule:''' | |||
"Traffic rules" refer to the policies and regulations that govern the flow of data packets within a network. | |||
To allow new traffic, click on “Add and Edit” in “New Traffic Rule”. | |||
[[File:RS5X Traffic Rules.png|frameless|620x620px]] | |||
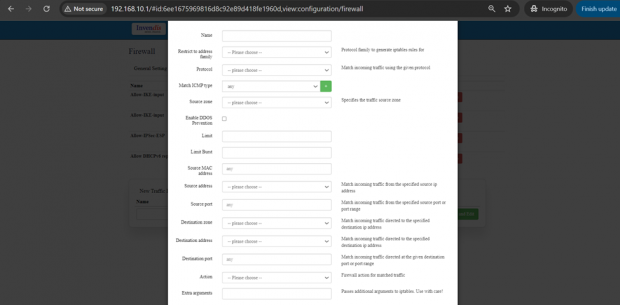
'''EDIT:''' | |||
[[File:RS5X Traffic rules edit.png|frameless|620x620px]] | |||
Specification details are below: | |||
{| class="wikitable" | |||
|SN | |||
|Field name | |||
|Sample value | |||
|Description | |||
|- | |||
|1 | |||
|Name | |||
|Example: Allow_HTTP_and_HTTPS | |||
|Field must not be empty: Provide a descriptive name for the traffic rule. | |||
|- | |||
|2 | |||
|Restrict to Address Family | |||
|1. Options: IPv4, IPv6 | |||
2. Example: IPv4 if dealing with typical internet traffic. | |||
|Select the address family to generate iptables rules for. | |||
|- | |||
|3 | |||
|Protocol | |||
|Example: TCP+UDP | |||
|TCP+UDP: Match incoming traffic using the given protocol. | |||
|- | |||
|4 | |||
|Match ICMP Type | |||
|Example: any | |||
|Match all ICMP types if set to any. Specific types can be chosen if needed. | |||
|- | |||
|5 | |||
|Source Zone | |||
|Example: LAN | |||
|Specifies the traffic source zone. | |||
|- | |||
|6 | |||
|Enable DDoS Prevention | |||
|Example: ‘Checked’ if you want to enable DDoS prevention measures | |||
|Enable or disable Distributed Denial of Service (DDoS) prevention. | |||
|- | |||
|7 | |||
|Limit | |||
|Example: 10/minute to limit matches to 10 times per minute. | |||
|Maximum average matching rate; specified as a number, with an optional /second, /minute, /hour, or /day suffix. | |||
|- | |||
|8 | |||
|Limit Burst | |||
| | |||
|Defines how many packets or connections can exceed the rate limit before the limiting mechanism kicks in. | |||
|- | |||
|9 | |||
|Source MAC Address | |||
|Example: any | |||
|any: Match traffic from any MAC address or specify a particular MAC address. | |||
|- | |||
|10 | |||
|Source Address | |||
|Example: 192.168.1.0/24 | |||
|Match incoming traffic from the specified source IP address or range. | |||
|- | |||
|11 | |||
|Source Port | |||
|Example: any if all source ports should be matched | |||
|any: Match incoming traffic from the specified source port or port range. | |||
|- | |||
|12 | |||
|Destination Zone | |||
|Example: WAN | |||
|Specifies the traffic destination zone. | |||
|- | |||
|13 | |||
|Destination address | |||
|'''Options''': Any, or a specific IP address/subnet. | |||
|The IP address or range to which the incoming traffic is directed. | |||
|- | |||
|14 | |||
|Destination port | |||
|'''Options''': Any, or a specific port/port range. | |||
|Used to allow or block traffic to specific services, like permitting only HTTP (port 80) traffic. | |||
|- | |||
|15 | |||
|Action | |||
|Example: ACCEPT | |||
|Options: ACCEPT, DROP, REJECT. Specify the action to take for matched traffic. | |||
|- | |||
|16 | |||
|Extra arguments | |||
|Example: --log-prefix "Blocked: " to add a log prefix to log messages for this rule. | |||
|Passes additional arguments to iptables. Use with care as it can significantly alter rule behaviour. | |||
|} | |||
Click on save once configured. | |||
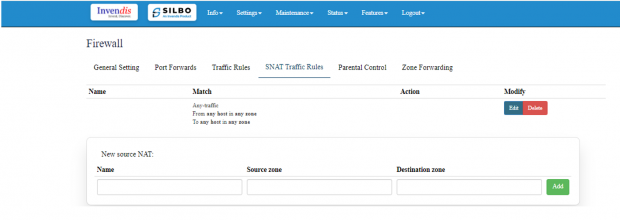
'''SNAT Traffic Rule:''' | |||
For configuring SNAT (Source Network Address Translation) traffic rules, you can control how outbound traffic from your local network is translated to a different IP address as it exits the network. | |||
To add new source NAT, | |||
Click on “ADD” in “New Source NAT:” | |||
[[File:SNAT Traffic Rule.png|frameless|620x620px]] | |||
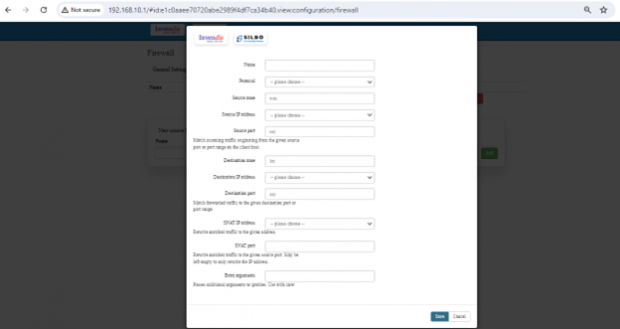
'''EDIT:''' | |||
[[File:SNAT Traffic Rule Edit.png|frameless|620x620px]] | |||
Specification details are below: | |||
{| class="wikitable" | |||
|SN | |||
|Field name | |||
|Sample value | |||
|Description | |||
|- | |||
|1 | |||
|Name | |||
|Example: SNAT_WAN_to_LAN | |||
|'''Field must not be empty''': Provide a unique and descriptive name for the SNAT rule. | |||
|- | |||
|2 | |||
|Protocol | |||
|Example: TCP+UDP | |||
|'''TCP+UDP''': Select the protocols that the SNAT rule will apply to. | |||
|- | |||
|3 | |||
|Source Zone | |||
|Example: wan | |||
|'''wan''': Specifies the source zone from which the traffic originates. | |||
|- | |||
|4 | |||
|Source IP Address | |||
|Example: any or a specific range like 192.168.1.0/24 | |||
|'''-- please choose --''': Specify the source IP address or range. Leave empty if the rule applies to any source IP. | |||
|- | |||
|5 | |||
|Source Port | |||
|Example: any | |||
|'''any''': Specify the source port or port range from which the traffic originates. | |||
|- | |||
|6 | |||
|Destination Zone | |||
|Example: lan | |||
|'''lan''': Specifies the destination zone to which the traffic is directed. | |||
|- | |||
|7 | |||
|Destination IP Address | |||
|Example: any or a specific IP like 192.168.1.100 | |||
|'''-- please choose --''': Specify the destination IP address or range. Leave empty if the rule applies to any destination IP. | |||
|- | |||
|8 | |||
|Destination port | |||
|Example: any | |||
|'''any''': Specify the destination port or port range to which the traffic is directed. | |||
|- | |||
|9 | |||
|SNAT IP Address | |||
|Example: 203.0.113.5 (an external IP address) | |||
|'''-- please choose --''': Specify the IP address to which the source IP should be translated. | |||
|- | |||
|10 | |||
|SNAT Port | |||
|Example: Leave empty if not needed, or specify a port like ‘12345’ | |||
|Optionally, rewrite matched traffic to a specific source port. Leave empty to only rewrite the IP address. | |||
|- | |||
|11 | |||
|Extra Arguments | |||
|Example: --log-prefix "SNAT_traffic: " (to add a log prefix to log messages for this rule) | |||
|Pass additional arguments to iptables. Use with care as it can significantly alter rule behaviour. | |||
|} | |||
Click on save once configured. | |||
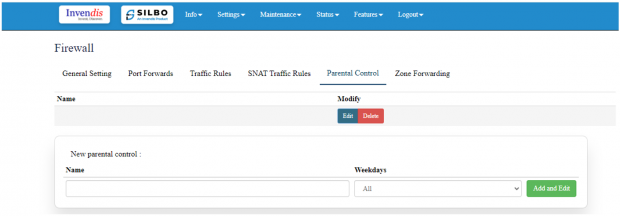
'''Parental Control:''' | |||
For configuring parental control rules, you want to set restrictions based on time, source, and destination zones, as well as specific devices. | |||
To add parental control in firewall, | |||
Click on “Add and Edit” in “New parental control:” field. | |||
[[File:Parental Control.png|frameless|620x620px]] | |||
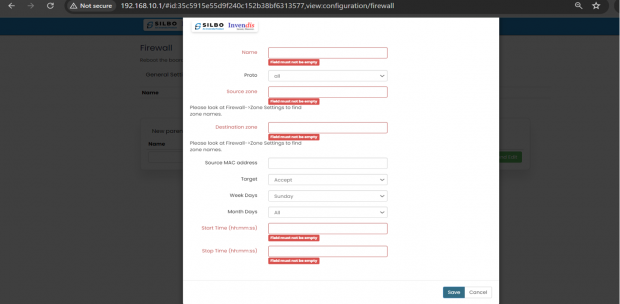
'''EDIT:''' | |||
[[File:Parental Control Edit Options RC44.png|frameless|620x620px]] | |||
Specification details are given below: | |||
{| class="wikitable" | |||
|SN | |||
|Field Name | |||
|Sample Value | |||
|Description | |||
|- | |||
|1 | |||
|Name | |||
|Example: Parental_Control_Sunday | |||
|'''Field must not be empty''': Provide a unique and descriptive name for the parental control rule. | |||
|- | |||
|2 | |||
|Proto | |||
|all | |||
|'''all''': This specifies that the rule will apply to all protocols. | |||
|- | |||
|3 | |||
|Source Zone | |||
|Example: lan | |||
|'''Field must not be empty''': Please look at Firewall->Zone Settings to find zone names. | |||
|- | |||
|4 | |||
|Destination Zone | |||
|Example: wan | |||
|'''Field must not be empty''': Please look at Firewall->Zone Settings to find zone names. | |||
|- | |||
|5 | |||
|Source MAC Address | |||
|Example: 00:1A:2B:3C:4D:5E | |||
|'''Field''': Enter the MAC address of the device you want to apply the parental control rule to. This is useful for restricting specific devices. | |||
|- | |||
|6 | |||
|Target | |||
|Example: Reject | |||
|'''Accept''': This specifies the action to take. For parental controls, you might want to use ‘Reject’ or ‘Drop’ to block traffic. | |||
|- | |||
|7 | |||
|Weekdays | |||
|Example: Sunday | |||
|'''Sunday''': Specify the days of the week when the rule should be active. | |||
|- | |||
|8 | |||
|Month Days | |||
|Example: All | |||
|'''All:''' Specify the days of the month when the rule should be active. | |||
|- | |||
|9 | |||
|Start Time (hh:mm:ss) | |||
|Example: 18:00:00 (6:00 PM) | |||
|'''Field must not be empty:''' Specify the start time when the rule should begin to apply. | |||
|- | |||
|10 | |||
|Stop Time (hh:mm:ss) | |||
|Example: 22:00:00 (10:00 PM) | |||
|'''Field must not be empty:''' Specify the stop time when the rule should end. | |||
|} | |||
Click on save once configured. | |||
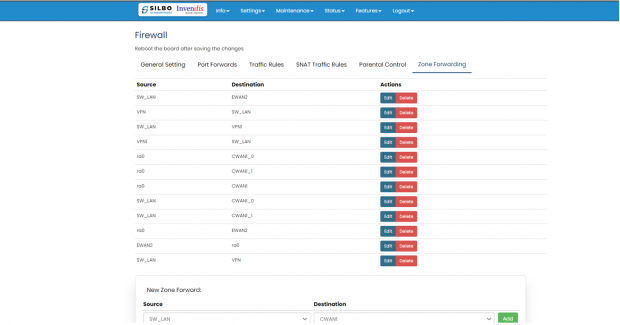
'''Zone Forwarding:''' | |||
Zone forwarding in network configuration allows traffic to be directed from one zone to another. | |||
To ADD new zone, | |||
Click on “Add” in “New Zone Forward:” field. | |||
[[File:Zone Forwarding RC44.png|frameless|620x620px]] | |||
'''EDIT:''' | |||
[[File:Zone Forwarding Edit Options.png|frameless|620x620px]] | |||
Specification details are below: | |||
{| class="wikitable" | |||
|SN | |||
|Field Name | |||
|Sample Value | |||
|Description | |||
|- | |||
|1 | |||
|Source Zone | |||
|Example options: CWAN (1,2,3), EWAN (1,2,3), VPN & custom. | |||
|'''--please choose--''': Select the source zone from which the traffic originates. | |||
|- | |||
|2 | |||
|Destination Zone | |||
|Example options: SW_LAN, EWAN3 & custom. | |||
|'''--please choose--''': Select the destination zone to which the traffic is directed. | |||
|} | |||
Click on save once configured. | |||
=== 3.5 Traffic Shaping === | |||
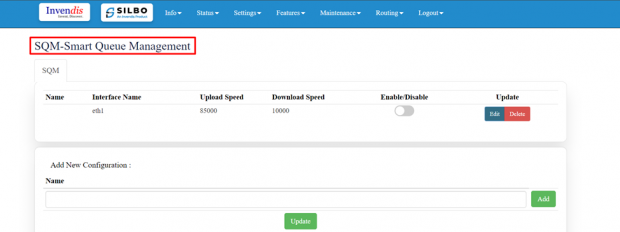
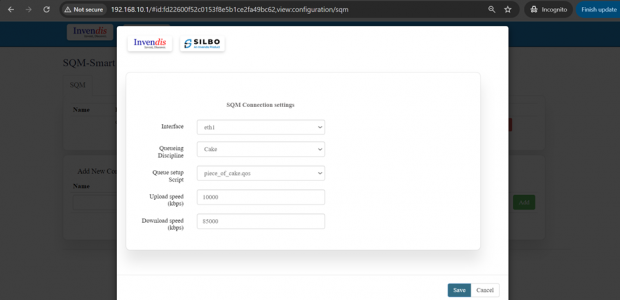
Traffic shaping also known as SQM (Smart Queue Management). | |||
The combination of the correct interface, queueing discipline, setup script, and accurate | |||
upload/download speed value allows SQM to effectively reduce latency, manage congestion, and | |||
improve overall network performance. | |||
[[File:Traffic Shaping.png|frameless|620x620px]] | |||
'''EDIT:''' | |||
[[File:Traffic Shaping Edit Options.png|frameless|620x620px]] | |||
Specification details are given below: | |||
{| class="wikitable" | |||
|SN | |||
|Field Name | |||
|Sample Value | |||
|Description | |||
|- | |||
|1 | |||
|Interface | |||
|'''Options''': | |||
eth0.1 | |||
eth0.5 | |||
ra0 (WiFi 2.4 GHz) | |||
wlan0 (WiFi 5 GHz) | |||
eth1 | |||
|You choose the interface corresponding to the connection you want to manage, whether it's a wired connection (eth0.x, eth1) or a wireless one (ra0, wlan0). | |||
|- | |||
|2 | |||
|Queueing Discipline | |||
|'''Options''': | |||
Cake | |||
fq_code | |||
|You select the appropriate qdisc based on your needs; Cake is often preferred for its advanced features and ease of configuration. | |||
|- | |||
|3 | |||
|Queue Setup Script | |||
|'''Options''': | |||
piece_of_cake.qos | |||
layer_Cake.qos | |||
|Choose the script that best suits your network environment; layer_Cake.qos provides more features, while piece_of_cake.qos is easier to use. | |||
|- | |||
|4 | |||
|Upload Speed (kbps) | |||
|10000 kbps | |||
|This field specifies the maximum upload speed in kilobits per second that your connection can handle. | |||
|- | |||
|5 | |||
|Download Speed (kbps) | |||
|85000 kbps | |||
|This field specifies the maximum download speed in kilobits per second that your connection can handle. | |||
|} | |||
Click on save once configured. | |||
=== 3.6 Loopback Rule === | |||
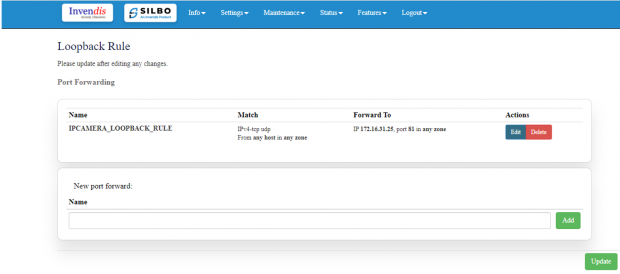
In this page the user can configure the port where he wants to forward the traffic to. Here the user can add/edit/delete different ports as per the requirement. | |||
[[File:Loopback Rule.png|frameless|620x620px]] | |||
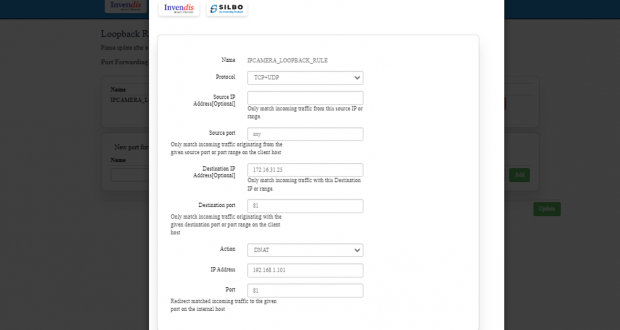
The user should click on ‘add’ and then ‘edit’ to do the required changes in the port and enter the valid information in each section to configure the port for forwarding. | |||
'''EDIT:''' | |||
[[File:Loopback Rule edit.png|frameless|620x620px]] | |||
Specification details are given below: | |||
{| class="wikitable" | |||
|SN | |||
|Field Name | |||
|Sample Value | |||
|Description | |||
|- | |||
|1 | |||
|Name | |||
|Example: loopback | |||
|Provide a descriptive name for the rule. | |||
|- | |||
|2 | |||
|Protocol | |||
|Example: TCP+UDP | |||
|'''TCP+UDP''': Select the protocols that the rule will apply to. | |||
|- | |||
|3 | |||
|Source IP Address [Optional] | |||
|Example: any or a specific IP range like 192.168.1.0/24 | |||
|Optionally specify the source IP address or range. Leave empty if the rule should apply to any source IP. | |||
|- | |||
|4 | |||
|Source Port [Optional] | |||
|Example: any | |||
|'''any''': Specify the source port or port range from which the traffic originates. any allows traffic from all ports. | |||
|- | |||
|5 | |||
|Destination IP Address | |||
|Example: 172.16.31.25 | |||
|Only match incoming traffic with this Destination IP or range. Typically, this is 127.0.0.1. | |||
|- | |||
|6 | |||
|Destination Port | |||
|Example: 81 | |||
|Only match incoming traffic originating with the given destination port or port range on the client host. | |||
|- | |||
|7 | |||
|Action | |||
|Example: DNAT | |||
|This specifies the action to take either DNAT or SNAT. | |||
|- | |||
|8 | |||
|Internal IP Address | |||
|Example: 192.168.1.100 | |||
|'''Field must not be empty''': Specify the internal IP address to which the traffic should be redirected. | |||
|- | |||
|9 | |||
|Internal Port | |||
|Example: 81 | |||
|Redirect matched incoming traffic to the given port on the internal host. | |||
|} | |||
Once the user is done with the required configurations, user should click save button and then click on update to save the changes. | |||
=== 3.7 Remote Monitoring === | |||
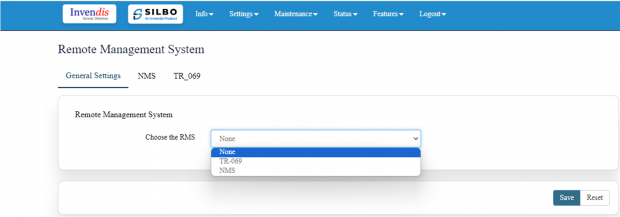
In this page the user can select which equipment needs to be monitored remotely. | |||
Once the user selects the type of RMS click on save. | |||
[[File:Remote Monitoring.png|frameless|620x620px]] | |||
'''NMS:''' | |||
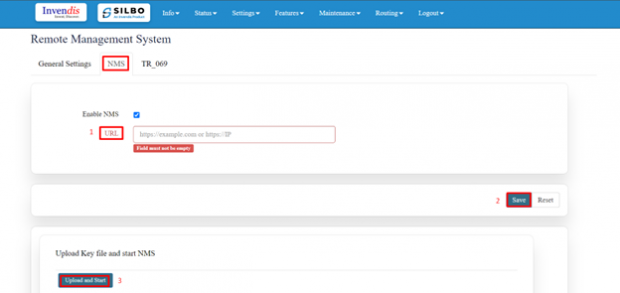
In this page the user should type the server IP or domain name in the URL then click on save. | |||
Click on upload and start (Once key is uploaded and this option is clicked, NMS automatically starts, and this router device gets registered with the NMS server provided). | |||
[[File:Remote Management System NMS Configuration.png|frameless|620x620px]] | |||
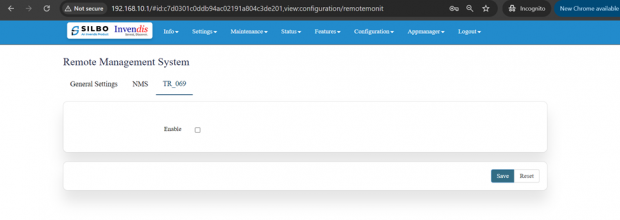
'''TR_069:''' | |||
To enable the TR_069 the user needs to click on the enable check box. | |||
[[File:TR 069.png|frameless|620x620px]] | |||
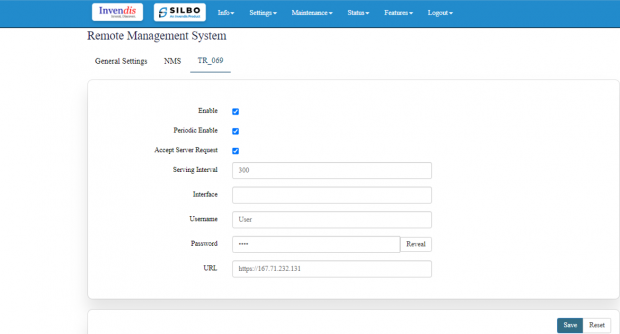
Once the user clicks on the check box of enable it will display all the required filed to configured. | |||
[[File:Remote Monitoring Tr-069.png|frameless|620x620px]] | |||
Specification details are given below: | |||
{| class="wikitable" | |||
|SN | |||
|Field Name | |||
|Sample Value | |||
|Description | |||
|- | |||
|1 | |||
|Enable TR-069 | |||
|Enable/Disable | |||
|When enabled, the device can be remotely managed and configured by a service provider using a TR-069 server. | |||
|- | |||
|2 | |||
|Periodic Enable | |||
|Enable/Disable | |||
|It ensures that the device regularly checks in with the management server for updates, configuration changes, or status reports. | |||
|- | |||
|3 | |||
|Accept Server Request | |||
|Enable/Disable | |||
|By accepting server requests, the device can be managed in real-time, allowing the server to push updates, configurations, or commands to the device. | |||
|- | |||
|4 | |||
|Serving Interval | |||
|300 | |||
|A value of 300 seconds means the device will check in with the ACS (auto-configuration servers) every 5 minutes. | |||
|- | |||
|5 | |||
|Interface | |||
|This can be something like eth0 or wan. | |||
|This specifies the network interface used for TR-069 communication. | |||
|- | |||
|6 | |||
|Username | |||
|Example: User | |||
|The username used to authenticate with the ACS. | |||
|- | |||
|7 | |||
|Password | |||
|•••• | |||
|The password used to authenticate with the ACS. | |||
|- | |||
|8 | |||
|URL | |||
|<nowiki>https://167.71.232.131</nowiki> | |||
|The URL of the ACS. This is where the CPE (customer-premises equipment) will send its requests and where it will receive configurations and updates from. | |||
|} | |||
The user should fill all the required fields and click on the save button. | |||
=== 3.8 Tunnel === | |||
Tunnels are a method of transporting data across a network using protocols which are not supported by that network. | |||
It is further categorised into 2 sections, | |||
1.) General Settings | |||
2.) GRE Tunnel | |||
[[File:Tunnel Configuration General Settings.png|frameless|620x620px]] | |||
'''General Settings:''' | |||
In this page the user needs to enable GRE tunnel to send the data. | |||
[[File:Tunnel Configuration General Settings Enablling.png|frameless|620x620px]] | |||
Once the user enables GRE tunnel then click the save button. | |||
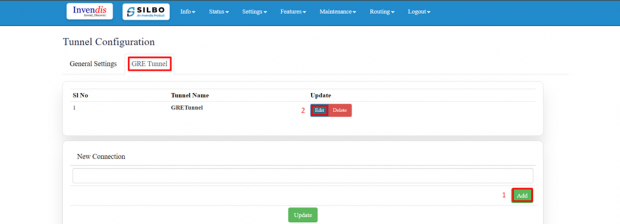
'''GRE Tunnel:''' | |||
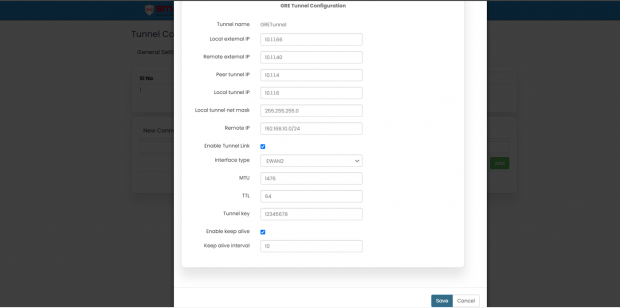
A GRE (Generic Routing Encapsulation) tunnel configuration involves setting up a virtual point-to-point connection between two endpoints over an IP network. | |||
Here the user can add/edit/delete the details of the tunnel. | |||
[[File:5G Router GRE Configuration.png|frameless|620x620px]] | |||
'''EDIT:''' | |||
[[File:GRE Tunnel.png|frameless|620x620px]] | |||
Specification details are given below: | |||
{| class="wikitable" | |||
|SN | |||
|Field Name | |||
|Sample Value | |||
|Description | |||
|- | |||
|1 | |||
|Tunnel name | |||
|Example: GRETunnel | |||
|'''GRETunnel''': The name of the GRE tunnel. | |||
|- | |||
|2 | |||
|Local external IP | |||
|Example: 10.1.1.66 | |||
|The IP address of the local endpoint that will initiate the GRE tunnel. | |||
|- | |||
|3 | |||
|Remote external IP | |||
|Example: 10.1.1.40 | |||
|The IP address of the remote endpoint that will terminate the GRE tunnel. | |||
|- | |||
|4 | |||
|Peer tunnel IP | |||
|Example: 10.1.1.4 | |||
|The IP address of the peer's tunnel interface. | |||
|- | |||
|5 | |||
|Local tunnel IP | |||
|Example: 10.1.1.6 | |||
|The IP address of the local tunnel interface. | |||
|- | |||
|6 | |||
|Local tunnel net mask | |||
|Example: 255.255.255.0 | |||
|The subnet mask of the local tunnel interface. | |||
|- | |||
|7 | |||
|Remote IP | |||
|Example: 192.168.10.0/24 | |||
|The remote network that is reachable through the GRE tunnel. | |||
|- | |||
|8 | |||
|Enable Tunnel Link | |||
|Check to enable | |||
|Enable or disable the GRE tunnel link. | |||
|- | |||
|9 | |||
|Interface type | |||
|Example: EWAN2 | |||
|'''EWAN2''': The type of network interface used for the GRE tunnel. | |||
|- | |||
|10 | |||
|MTU | |||
|Example: 1476 | |||
|'''1476''': Maximum Transmission Unit size for the GRE tunnel. | |||
|- | |||
|11 | |||
|TTL | |||
|Example: 64 | |||
|'''64''': Time To Live value for the packets within the GRE tunnel. | |||
|- | |||
|12 | |||
|Tunnel key | |||
|Example: 12345678 | |||
|'''12345678''': A unique key used to identify the GRE tunnel. | |||
|- | |||
|13 | |||
|Enable keep alive | |||
|Check to enable | |||
|Enable or disable the keep-alive feature to monitor the tunnel's status. | |||
|- | |||
|14 | |||
|Keep alive interval | |||
|Example: 10 | |||
|'''10''': Interval in seconds for the keep-alive packets. | |||
|} | |||
Once the required update is done then click on update to save the changes. | |||
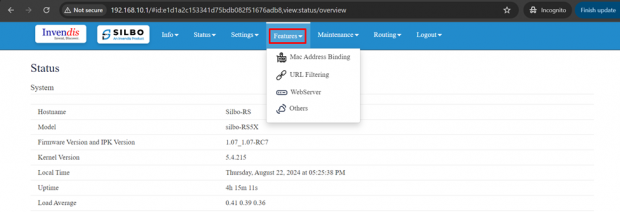
== 4. Features == | |||
In this module the user can see all the features that the router has. | |||
This module includes the below features. | |||
* Mac Address Binding | |||
* URL Filtering | |||
* Web Server | |||
* Others | |||
[[File:RS5X Features .png|frameless|620x620px]] | |||
=== 4.1 Mac Address Binding === | |||
MAC address binding is a configuration that binds a specific MAC address to a specific IP address. This ensures that a particular device on the network always receives the same IP address from the DHCP server, which can be useful for network management, security, and ensuring consistent network behaviour. | |||
[[File:Mac Address Edit.png|frameless|620x620px]] | |||
Specification details are given below: | |||
{| class="wikitable" | |||
|SN | |||
|Field Name | |||
|Sample Value | |||
|Description | |||
|- | |||
|1 | |||
|Device Name | |||
|Ex: Macbinding1 | |||
|A user-defined name for the binding configuration. | |||
|- | |||
|2 | |||
|MAC Address | |||
|Ex: 48:9e:bd:da:45:91 | |||
|The unique identifier for the network interface of the device to which the IP address will be bound. | |||
|- | |||
|3 | |||
|IP Address | |||
|Ex: 192.168.10.55 | |||
|The IP address that will be consistently assigned to the device with the specified MAC address. | |||
|} | |||
By applying this configuration, the DHCP server will always assign the IP address 192.168.10.55 to the device with the MAC address 48:9e:bd:da:45:91, ensuring consistency and stability in network addressing for that device. | |||
* Once the user modifies the MAC address /IP Address then click on the save button to save the changes done. | |||
* The user can click on the deleted button to delete an existing configured device. | |||
* Post all the changes the user needs to click on the update to reflect all the changes in the application. | |||
Click on save tab once changes have been made. | |||
=== 4.2 URL Filtering === | |||
In this submodule the user should provide the URL which needs to be blocked for the device. By implementing URL filtering with the specified URL, you can control and restrict access to certain websites, thereby improving network security and managing user access. | |||
[[File:URL Filtering.png|frameless|620x620px]] | |||
To add the new URL for blocking, click on the Add New button. | |||
Once the user clicks on the Add New button a new pop will appear in that page write the URL and click on the save. | |||
The user can select the status of that URL while defining the URL. | |||
[[File:Url Update.png|frameless|620x620px]] | |||
To edit / delete the existing URL the user needs to click on the edit /deleted button respectively. | |||
[[File:URL Filtering .png|frameless|620x620px]] | |||
Click on “save” after the changes are done as per the need. | |||
=== 4.3 Web Server === | |||
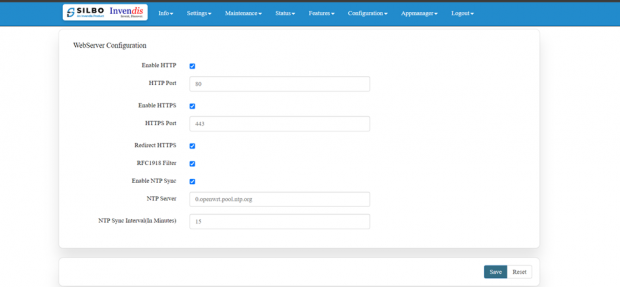
This configuration will allow your device to serve web traffic securely over HTTPS, keep its system time synchronized, and ensure that all HTTP traffic is redirected to HTTPS for better security. | |||
[[File:Webserver Configuration Editing.png|frameless|620x620px]] | |||
Specification details are given below: | |||
{| class="wikitable" | |||
|SN | |||
|Field Name | |||
|Sample Value | |||
|Description | |||
|- | |||
|1 | |||
|Enable HTTP | |||
|'''HTTP Port:''' 80 | |||
Enable or disable the HTTP server. | |||
|Port 80 is the default port for HTTP traffic. It is used to serve web pages over an unencrypted connection. | |||
|- | |||
|2 | |||
|Enable HTTPS | |||
|'''HTTPS Port:''' 443 | |||
Enable or disable the HTTPS server. | |||
|Port 443 is the default port for HTTPS traffic. It is used to serve web pages over an encrypted connection. | |||
|- | |||
|3 | |||
|Redirect HTTPS | |||
|Option to redirect HTTP traffic to HTTPS. | |||
|When enabled, all HTTP requests will be automatically redirected to the HTTPS port to ensure secure communication. | |||
|- | |||
|4 | |||
|RFC1918 Filter | |||
|Enable/Disable | |||
|When enabled, this filter can block traffic from private IP ranges (e.g., 192.168.x.x, 10.x.x.x) from being routed through the public internet, enhancing network security. | |||
|- | |||
|5 | |||
|Enable NTP Sync | |||
|Enable or disable NTP synchronization. | |||
|Synchronizes the device’s system clock with an external NTP server to maintain accurate time. | |||
|- | |||
|6 | |||
|NTP Server | |||
|0.openwrt.pool.ntp.org | |||
|The address of the NTP server used for time synchronization. The openwrt.pool.ntp.org server is a public NTP server pool. | |||
|- | |||
|7 | |||
|NTP Sync Interval (In Minutes) | |||
|15 | |||
|The interval at which the device will sync its clock with the NTP server, set to every 15 minutes in this case. | |||
|} | |||
=== 4.4 Others === | |||
In this page the user will get to do all the other miscellaneous configuration with respect to the device based on the required parameters. Each utility serves a specific purpose, providing various functionalities for managing and troubleshooting network configurations and statuses. | |||
[[File:RS5X misc.png|frameless|620x620px]] | |||
Specification details are given below: | |||
{| class="wikitable" | |||
|SN | |||
|Field Name | |||
|Sample Value | |||
|Description | |||
|- | |||
|1 | |||
|Set Date | |||
|Date and time fields (day, month, year, hour, minute, second) | |||
|Sets the system date and time to the specified values. | |||
|- | |||
|2 | |||
|Get Date | |||
|System | |||
|Retrieves and displays the current system date and time. | |||
|- | |||
|3 | |||
|IP Rule Show | |||
|Command ‘Get’ | |||
|Displays the current IP rules configured on the device. | |||
|- | |||
|4 | |||
|Advanced Static Routes | |||
|Command ‘Run’ | |||
|Used to manually define routing paths for network traffic. | |||
|- | |||
|5 | |||
|ipsec status all | |||
|Command ‘Get’ | |||
|Displays the status of all IPsec connections. | |||
|- | |||
|6 | |||
|iPerf3 Client | |||
|IP address (e.g., 192.168.10.100) | |||
|Runs an iPerf3 client to measure network performance. | |||
|- | |||
|7 | |||
|iPerf3 Server | |||
|Command ‘Run’ | |||
|Runs an iPerf3 server to measure network performance. | |||
|- | |||
|8 | |||
|Ping | |||
|IP address or domain (e.g., 8.8.8.8) | |||
|Sends ICMP echo requests to the specified address to check connectivity. | |||
|- | |||
|9 | |||
|traceroute | |||
|IP address or domain (e.g., 8.8.8.8) | |||
|Traces the route packets take to reach the specified address. | |||
|- | |||
|10 | |||
|ReadSIMInfo | |||
|SIM1 | |||
SIM2 | |||
|Reads and displays information about the SIM card installed in the device. | |||
|- | |||
|11 | |||
|NTP Sync | |||
|Command ‘Sync’ | |||
|Synchronizes the system time with the configured NTP server. | |||
|- | |||
|12 | |||
|ReadLogFiles | |||
|Log file identifier | |||
|Reads and displays the specified log file | |||
|- | |||
|13 | |||
|Download Files | |||
|File or database identifier | |||
|Initiates a download of the specified file or database. | |||
|- | |||
|14 | |||
|Restart Power | |||
|Command ‘Restart’ | |||
|Restarts the power of the device. | |||
|- | |||
|15 | |||
|Restart Modem1 | |||
|Command ‘Restart’ | |||
|Restarts the modem. | |||
|- | |||
|16 | |||
|Run AT Command | |||
|Enter AT command | |||
|Executes the specified AT command on the modem. | |||
|- | |||
|17 | |||
|Scan Network operators for modem1 (Takes >3 mins) | |||
|Command ‘Scan’ | |||
|Initiates a scan for available network operators. | |||
|- | |||
|18 | |||
|Network operator list for modem1 (First Perform Scan Network Operators) | |||
|Command ‘Show’ | |||
|Displays the list of network operators detected in the previous scan. | |||
|- | |||
|19 | |||
|Show Board Configuration | |||
|Command ‘Show’ | |||
|Displays the current board configuration. | |||
|- | |||
|20 | |||
|Switch SIM to Secondary (Takes >2 mins) | |||
|Command ‘Run’ | |||
|Switches the active SIM to the secondary SIM card. | |||
|- | |||
|21 | |||
|Send test SMS | |||
|Phone number (e.g., +911234567890) message text (e.g., "Hello how are you?") | |||
|Sends a test SMS to the specified phone number. | |||
|- | |||
|22 | |||
|ReadlatestSMS | |||
|Command ‘Read’ | |||
|Reads the most recent SMS received by the device. | |||
|- | |||
|23 | |||
|Enable ssh (Admin) | |||
|Command ‘Run’ | |||
|Enables SSH access for the admin user. | |||
|- | |||
|24 | |||
|Disable ssh (Admin) | |||
|Command ‘Run’ | |||
|Disables SSH access for the admin user. | |||
|- | |||
|25 | |||
|Output | |||
|Any value | |||
|Displays output for all the above actions. | |||
|} | |||
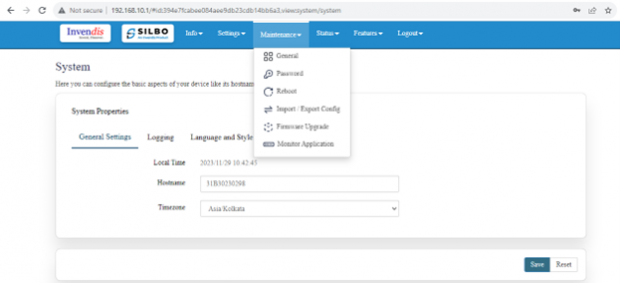
== 5.Maintenance == | |||
In this module the user can configure/upgrade/modify the settings related to system, password, firmware and monitoring. | |||
It includes below 6 submodules. | |||
* General | |||
* Password | |||
* Reboot | |||
* Import and Export config | |||
* Firmware upgrade | |||
* Monitor Application | |||
[[File:Maintenance System.png|frameless|620x620px]] | |||
=== 5.1 General === | |||
Here you can configure the basic aspects of router like its hostname or the time zone. | |||
It is further sub-divided into, | |||
1.) General Settings | |||
2.) Logging | |||
3.) Language and Style | |||
'''General Settings:''' | |||
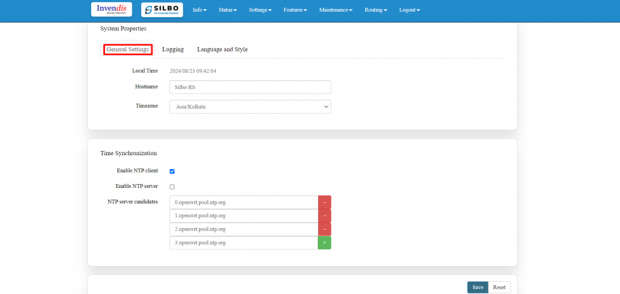
The System Properties section allows you to manage the general settings of your network device, including time settings, logging, hostname, and language preferences. | |||
[[File:Maintenance General settings 5G router.png|frameless|620x620px]] | |||
Specification details are given below: | |||
{| class="wikitable" | |||
|SN | |||
|Field Name | |||
|Sample Value | |||
|Description | |||
|- | |||
|1 | |||
|Local Time | |||
|2024/08/23 09:44:47 | |||
|The current local date and time set on the device. | |||
|- | |||
|2 | |||
|Hostname | |||
|Silbo-RS | |||
|The hostname of the device, which is used to identify it on the network. | |||
|- | |||
|3 | |||
|Time zone | |||
|Asia/Kolkata | |||
|The time zone setting of the device, which determines the local time. | |||
|} | |||
'''Time Synchronization:''' | |||
{| class="wikitable" | |||
|SN | |||
|Field Name | |||
|Sample Value | |||
|Description | |||
|- | |||
|1 | |||
|Enable NTP Client | |||
|Enable/Disable | |||
|When enabled, the device periodically syncs its clock with an external NTP server, ensuring the local time remains accurate. | |||
|- | |||
|2 | |||
|Enable NTP Server | |||
|Enable/Disable | |||
|When enabled, the device acts as an NTP server, allowing other devices on the network to sync their time with it. | |||
|- | |||
|3 | |||
|NTP Server Candidates | |||
|0.openwrt.pool.ntp.org | |||
1.openwrt.pool.ntp.org | |||
2.openwrt.pool.ntp.org | |||
3.openwrt.pool.ntp.org | |||
|Provides multiple server options to ensure redundancy and reliability in time synchronization. If one server is unavailable, the device can try another in the list. | |||
You can add or remove any. | |||
|} | |||
Once the user configures the required details then click on save tab. | |||
'''Logging:''' | |||
Here the user can configure the basic aspects of your device related to system. | |||
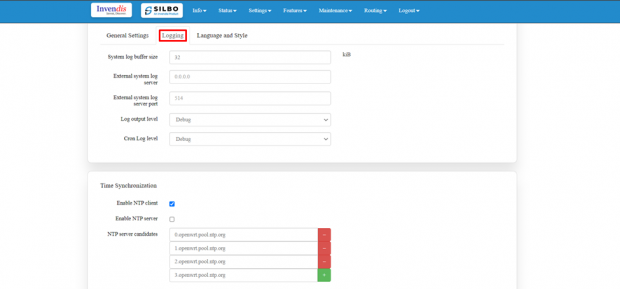
The system log configuration provided specifies how the device handles and stores log information, including buffer size, external log server details, and log detail levels. | |||
[[File:Maintenance logging 5G router.png|frameless|620x620px]] | |||
Specification details are given below: | |||
{| class="wikitable" | |||
|SN | |||
|Field Name | |||
|Sample Value | |||
|Description | |||
|- | |||
|1 | |||
|System log buffer size | |||
|Example: 32 kiB | |||
|The size of the memory buffer allocated (0-32) for storing system logs before they are either written to a file or sent to an external server. | |||
|- | |||
|2 | |||
|External system log server | |||
|Example: 0.0.0.0 | |||
|The IP address of an external server where logs can be sent. | |||
|- | |||
|3 | |||
|External system log server port | |||
|Example: 514 | |||
|The port used to send logs to the external log server. Port 514 is the default port for syslog. | |||
|- | |||
|4 | |||
|Log output level | |||
|1.) Debug | |||
2.) Info | |||
3.) Notice | |||
4.) Warning | |||
5.) Error | |||
6.) Critical | |||
7.) Alert | |||
8.) Emergency | |||
|'''Debug''': Logs all messages, including detailed debugging information. This is the most verbose setting and can be useful for troubleshooting specific issues. | |||
'''Info''': Logs informational messages, which may include normal operational messages. | |||
'''Notice''': Logs normal but significant conditions that aren't errors. | |||
'''Warning''': Logs warning conditions that indicate potential issues. | |||
'''Error''': Logs error conditions that indicate problems. | |||
'''Critical''': Logs critical conditions that require immediate attention. | |||
'''Alert''': Logs alert conditions that require urgent attention. | |||
'''Emergency''': Logs only the most severe conditions that indicate the system is unusable. | |||
|- | |||
|5 | |||
|Cron Log level | |||
|1.) Debug | |||
2.) Normal | |||
3.) Warning | |||
|'''Debug''': Use for detailed troubleshooting. | |||
'''Normal''': Use for typical monitoring. | |||
'''Warning''': Use to track only issues and errors. | |||
|} | |||
'''Time Synchronization:''' | |||
{| class="wikitable" | |||
|SN | |||
|Field Name | |||
|Sample Value | |||
|Description | |||
|- | |||
|1 | |||
|Enable NTP Client | |||
|Enable/Disable | |||
|When enabled, the device periodically syncs its clock with an external NTP server, ensuring the local time remains accurate. | |||
|- | |||
|2 | |||
|Enable NTP Server | |||
|Enable/Disable | |||
|When enabled, the device acts as an NTP server, allowing other devices on the network to sync their time with it. | |||
|- | |||
|3 | |||
|NTP Server Candidates | |||
|0.openwrt.pool.ntp.org | |||
1.openwrt.pool.ntp.org | |||
2.openwrt.pool.ntp.org | |||
3.openwrt.pool.ntp.org | |||
|Provides multiple server options to ensure redundancy and reliability in time synchronization. If one server is unavailable, the device can try another in the list. | |||
You can add or remove any. | |||
|} | |||
Once the user configures the required details then click on save tab. | |||
'''Language and Style:''' | |||
Here the user can configure the basic aspects of your device related to language. | |||
[[File:Maintenance Language and style 5G router.png|frameless|620x620px]] | |||
'''Time Synchronization:''' | |||
{| class="wikitable" | |||
|SN | |||
|Field Name | |||
|Sample Value | |||
|Description | |||
|- | |||
|1 | |||
|Enable NTP Client | |||
|Enable/Disable | |||
|When enabled, the device periodically syncs its clock with an external NTP server, ensuring the local time remains accurate. | |||
|- | |||
|2 | |||
|Enable NTP Server | |||
|Enable/Disable | |||
|When enabled, the device acts as an NTP server, allowing other devices on the network to sync their time with it. | |||
|- | |||
|3 | |||
|NTP Server Candidates | |||
|0.openwrt.pool.ntp.org | |||
1.openwrt.pool.ntp.org | |||
2.openwrt.pool.ntp.org | |||
3.openwrt.pool.ntp.org | |||
|Provides multiple server options to ensure redundancy and reliability in time synchronization. If one server is unavailable, the device can try another in the list. | |||
You can add or remove any. | |||
|} | |||
Once the user configures the required details then click on save tab. | |||
=== 5.2 Password === | |||
In this module the user can set the password for the admin credentials. | |||
Specifies the password for the guest account. | |||
If the user enters a plaintext password here, it will get replaced with a crypted password on save. | |||
The new password will be effective once the user logs out and log in again. | |||
[[File:Admin Password Setup.png|frameless|620x620px]] | |||
Save the page once you have changed the password. | |||
=== 5.3 Reboot === | |||
In this module the user can reboot the device remotely. | |||
First option is to directly reboot the device without enabling the maintenance reboot tab. | |||
Click on “Reboot Now” at the bottom of the screen to start the reboot process. | |||
[[File:Reboot Dashboard enable.png|frameless|620x620px]] | |||
To start maintenance reboot process first the user needs to fill all the required fields. | |||
Need to select the type of reboot for the device whether it needs to be Hardware or Software reboot. | |||
[[File:Reboot Dashboard.png|frameless|602x602px]] | |||
Specification details are given below: | |||
{| class="wikitable" | |||
|SN | |||
|Field Name | |||
|Sample Value | |||
|Description | |||
|- | |||
|1 | |||
|Enable Maintenance Reboot | |||
|Enable/Disable | |||
|Indicates whether the maintenance reboot feature is enabled or not. | |||
|- | |||
|2 | |||
|Type | |||
|Maintenance Reboot | |||
|Specifies the type of reboot being scheduled. | |||
|- | |||
|3 | |||
|Reboot Type | |||
|Software/Hardware | |||
|'''Hardware''': A hardware reboot involves restarting the entire device as if it were powered off and on again. | |||
'''Software''': A software reboot involves restarting the operating system without powering off the hardware. | |||
|- | |||
|4 | |||
|Minutes | |||
|Example: 59 | |||
|The minute at which the reboot should occur (0-59). | |||
|- | |||
|5 | |||
|Hours | |||
|Example: 22 (10 PM) | |||
|The hour at which the reboot should occur (0-23, in 24-hour format). | |||
|- | |||
|6 | |||
|Day Of Month | |||
|Example: All | |||
|Specifies which days of the month the reboot should occur (1-31). "All" means it will occur every day. | |||
|- | |||
|7 | |||
|Month | |||
|Example: All | |||
|Specifies which months the reboot should occur (1-12). "All" means it will occur every month. | |||
|- | |||
|8 | |||
|Day Of Week | |||
|Example: All | |||
|Specifies which days of the week the reboot should occur (0-6, where 0 is Sunday). "All" means it will occur every day of the week. | |||
|} | |||
Once the user fills all the required given parameters click on the save. | |||
=== 5.4 Import and Export === | |||
In this section, User can Import & Export Configuration files of the Device. | |||
[[File:Import and Export.png|frameless|620x620px]] | |||
Click “Export Config” to export device configuration & settings to a text file, | |||
Click “Import Config” to import device configuration & settings from a previously exported text file. | |||
[[File:Import window.png|frameless|620x620px]] | |||
The user needs to select on the “choose file”, upload the required file and click on apply. | |||
=== 5.5 Firmware Upgrade === | |||
The user can upgrade with the latest software for the existing firmware. | |||
[[File:Firmware Upgrade .png|frameless|620x620px]] | |||
Click on the '''flash image''' and chose the path where the sys-upgrade file is kept and then click on flash image, it will upgrade to the latest software once the reboot is done. | |||
This option will completely reset the device to default settings. | |||
[[File:Flash Image.png|frameless|620x620px]] | |||
Click on the '''Retain Config and flash''' and chose the path where the sys-upgrade file is kept and then click on Retain Config and flash, it will upgrade to the latest software once the reboot is done. | |||
This refers to updating the firmware (flashing) of a device while preserving the current configuration settings. | |||
[[File:Retain Config and flash .png|frameless|620x620px]] | |||
Click on the '''Factory Reset''' for the complete reset of the device. | |||
[[File:Factory Reset.png|frameless|620x620px]] | |||
=== 5.6 Monitor Application === | |||
In this section, the monitor application is divided into major 2 configurations which is further sub-divided into 4 editable options, | |||
1.) Modem 1 Local Monitor Application: | |||
2.) Modem 1 Remote Monitor Application: | |||
[[File:Monitor Application Dashboard.png|frameless|620x620px]] | |||
'''Modem 1 Local Monitor Application:''' | |||
[[File:Modem 1 Local Monitor Application-.png|frameless|620x620px]] | |||
Specification details are given below: | |||
{| class="wikitable" | |||
|SN | |||
|Field Name | |||
|Sample Value | |||
|Description | |||
|- | |||
|1 | |||
|Enable Router Local Ping Check Application | |||
|Enable/Disable | |||
|Turns on the functionality to perform ping checks on specified IP addresses. | |||
|- | |||
|2 | |||
|Time Interval for Check (In minutes) | |||
|'''Example:''' 10 minutes | |||
|Frequency at which the ping checks are performed. | |||
|- | |||
|3 | |||
|Select No of IP addresses to ping | |||
|'''Example:''' 1 | |||
|Number of IP addresses that will be pinged. | |||
|- | |||
|4 | |||
|IP Address 1 | |||
|'''Example:''' 8.8.8.8 | |||
|The IP address to ping. | |||
|- | |||
|5 | |||
|No. of Retries | |||
|'''Example:''' 5 | |||
|Number of times to retry pinging an IP address if the initial ping fails. | |||
|- | |||
|6 | |||
|Failure Criteria in (%) | |||
|'''Example:''' 80% (If 4 out of 5 pings fail, it’s considered a failure) | |||
|Percentage of failed pings required to consider the ping check a failure. | |||
|- | |||
|7 | |||
|Action On Failure | |||
|'''Options:''' Restart IPsec, Restart Board, Restart Modem | |||
|Action to be taken if the ping check fails according to the criteria. | |||
|- | |||
|8 | |||
|Enable Second Level Action | |||
|Enable/Disable | |||
|Option to enable a secondary action if the primary action fails multiple times. | |||
|- | |||
|9 | |||
|Second Level Action Threshold | |||
|'''Example:''' 2 | |||
|Number of failures required to trigger the secondary action. | |||
|- | |||
|10 | |||
|Second Level Action | |||
|'''Example:''' Restart Board (Reboots the entire hardware board) | |||
|The action to be taken if the second level action threshold is met. | |||
|} | |||
Save the details once made necessary changes. | |||
'''Modem 1 Remote Monitor Application:''' | |||
[[File:Modem 1 Remote Monitor Application.png|frameless|620x620px]] | |||
Specification details are given below: | |||
{| class="wikitable" | |||
|SN | |||
|Field Name | |||
|Sample Value | |||
|Description | |||
|- | |||
|1 | |||
|Enable Router Remote Ping Check Application | |||
|Enable/Disable | |||
|Activates the ping check functionality to monitor router performance. | |||
|- | |||
|2 | |||
|Time Interval for Check (In minutes) | |||
|'''Example:''' 10 minutes | |||
|How frequently the ping checks are performed. | |||
|- | |||
|3 | |||
|Select No of IP Addresses to Ping | |||
|'''Example:''' 1 (Please select the appropriate number based on your requirements) | |||
|Choose the number of IP addresses to ping. This typically involves selecting from a list or entering multiple addresses. | |||
|- | |||
|4 | |||
|No. of Retries | |||
|'''Example:''' 3 | |||
|Number of retries if a ping fails. | |||
|- | |||
|5 | |||
|Failure Criteria in (%) | |||
|'''Example:''' 80% (If 80% of the pings fail, it’s deemed a failure) | |||
|Percentage of failed pings required to consider the ping check as failed. | |||
|- | |||
|6 | |||
|Action On Failure | |||
|'''Options:''' Restart IPsec, Restart Board, Restart Modem | |||
|The action taken if the ping check fails according to the criteria. | |||
|- | |||
|7 | |||
|Enable Second Level Action | |||
|Enable/Disable | |||
|Option to enable an additional action if the primary action fails. | |||
|- | |||
|8 | |||
|Second Level Action Threshold | |||
|'''Example:''' Specify the number of failures, such as 4 | |||
|Number of times the primary action must fail before the secondary action is triggered. | |||
|- | |||
|9 | |||
|Second Level Action | |||
|'''Example:''' Restart Board | |||
|The action to be taken if the second level action threshold is met. | |||
|} | |||
Save the details once made necessary changes. | |||
== 6. Routing == | |||
Routing refers to the process of determining the path that data packets take from their source to their destination across networks. | |||
This section is divided into 5 sections, | |||
* Static Routing | |||
* BGP (Border Gateway Protocol) | |||
* OSPF (Open Shortest Path First) | |||
* Dynamic Custom File | |||
* Routing Debug | |||
[[File:Routing.png|frameless|620x620px]] | |||
=== 6.1 Static Routing === | |||
In this submodule the user can configure the parameters related to routing of the device like Target address, Networks address etc. Routing configurations allow network packets to be directed between different subnets and networks. | |||
It is further divided into 2 sections, | |||
'''Static IPV4 Routes''' | |||
'''Advanced Static IPV4 Routes''' | |||
'''Static IPV4 Routes:''' | |||
Click on ‘Add’ to add a new interface. | |||
[[File:RS5X Static IPV4 Routes.png|frameless|620x620px]] | |||
'''EDIT:''' | |||
To edit the existing device the user needs to click on the edit option. | |||
Once the changes are done click on the save button to save all the changes. | |||
Click on the deleted button to delete the existing device detail. | |||
[[File:Static IPV4 Routes Editing.png|frameless|620x620px]] | |||
Specification details are given below: | |||
{| class="wikitable" | |||
|SN | |||
|Field Name | |||
|Sample Value | |||
|Description | |||
|- | |||
|1 | |||
|Interface | |||
|Ex: eth0.1 | |||
|The network interface to be used for this route. Select the one to use from dropdown. | |||
|- | |||
|2 | |||
|Target | |||
|Ex: 192.168.20.0 | |||
|The destination subnet to which traffic should be routed. | |||
|- | |||
|3 | |||
|IPv4 Netmask | |||
|255.255.255.0 | |||
|The subnet mask for the target network. | |||
|- | |||
|4 | |||
|Metric | |||
|0 | |||
|The priority of the route. | |||
Lower values indicate higher priority. | |||
|- | |||
|5 | |||
|IPv4 Gateway | |||
|Ex: 192.168.10.1 | |||
|The gateway IP address to be used for routing traffic to the target subnet. | |||
|- | |||
|6 | |||
|Route Type | |||
|Unicast | |||
|Standard route for individual destination IP addresses. | |||
Custom changes can be made. | |||
|} | |||
Click on save once configuration changes have been made. | |||
'''Advanced Static IPV4 Routes:''' | |||
This is further divided into 2 sections, | |||
Routing Tables | |||
Routing Rules for IPV4 | |||
'''Routing Tables:''' | |||
Adding a new table in static routing allows you to define specific routes for traffic within a network. | |||
Click on ‘Add’ to add a new Table. | |||
[[File:Routing Tables.png|frameless|620x620px]] | |||
'''EDIT:''' | |||
[[File:Editing Route Tables.png|frameless|620x620px]] | |||
Specification details are given below: | |||
{| class="wikitable" | |||
|SN | |||
|Field Name | |||
|Sample Value | |||
|Description | |||
|- | |||
|1 | |||
|ID of Table | |||
|Ex: 1 | |||
|A unique identifier for the routing table. Multiple tables can be used to define different sets of routing rules, providing flexibility in how traffic is managed. | |||
|- | |||
|2 | |||
|Name of Table | |||
|Ex: Route | |||
|A descriptive name for the routing table, making it easier to manage and identify different tables. | |||
|- | |||
|3 | |||
|Target | |||
|Ex: 192.168.10.0 | |||
|Specifies the destination network or IP address that the route is intended for. | |||
|- | |||
|4 | |||
|IPv4 Netmask | |||
|255.255.255.0 | |||
|Defines the subnet mask for the target network. | |||
|- | |||
|5 | |||
|Metric | |||
|Ex: 0 | |||
|Indicates the priority of the route. A lower metric value means a higher priority. Routes with lower metrics are preferred over those with higher metrics. | |||
|- | |||
|6 | |||
|IPv4 Gateway | |||
|Ex: 10.1.1.1 | |||
|Specifies the next hop or gateway IP address through which the traffic to the target network should be routed. | |||
|- | |||
|7 | |||
|Route Type | |||
|1.) Unicast | |||
2.) Custom | |||
|'''Unicast''': Standard route where packets are sent to a single destination IP address. | |||
'''Custom''': Enables advanced routing configurations or specific protocols that might not be covered by default. | |||
|} | |||
'''Routing Rules for IPV4:''' | |||
Click on ‘Add’ to add a new interface. | |||
[[File:Routing Rules for IPV4.png|frameless|620x620px]] | |||
'''EDIT:''' | |||
To edit the existing device the user needs to click on the edit option. | |||
Once the changes are done click on the save button to save all the changes. | |||
Click on the deleted button to delete the existing device detail. | |||
[[File:Routing Rules for IPV4 Editing.png|frameless|620x620px]] | |||
Specification details are given below: | |||
{| class="wikitable" | |||
|SN | |||
|Field Name | |||
|Sample Value | |||
|Description | |||
|- | |||
|1 | |||
|Interface | |||
|Ex: ra0 | |||
|Select the specific network interface on the router through which traffic enters or exits. | |||
|- | |||
|2 | |||
|To | |||
|Ex: 192.168.10.1 | |||
|The destination IP address or network. In this case, 192.168.10.1 is the target IP address for routing traffic. | |||
|- | |||
|3 | |||
|IPv4 Netmask | |||
|Ex: 255.255.255.192 | |||
|Defines the subnet mask, which helps determine the size of the network. | |||
|- | |||
|4 | |||
|Table ID | |||
|Ex: 1 | |||
|Identifies which routing table this rule applies to. | |||
|- | |||
|5 | |||
|From | |||
|Ex: 192.168.100.1 | |||
|Specifies the source IP address or network from which the traffic originates. In this case, the traffic is coming from 192.168.100.1. | |||
|- | |||
|6 | |||
|Priority | |||
|Ex:20 | |||
|Determines the order in which routing rules are evaluated. Lower numbers have higher priority. If two rules conflict, the one with the lower priority number will be applied first. | |||
|- | |||
|7 | |||
|Outgoing Interface | |||
|1.) fwmark | |||
2.) iif (Incoming Interface) | |||
3.) oif (Outgoing Interface) | |||
4.) lookup | |||
5.) blackhole | |||
6.) prohibited | |||
7.) unreachable | |||
|1.) This allows you to create rules that apply only to traffic that has been marked in a specific way by the firewall. | |||
2.) This is often used to create rules based on the interface through which traffic is received. | |||
3.) This allows you to control the flow of traffic based on the desired outgoing interface. | |||
4.) It tells the router to check the specific routing table ID mentioned to determine how to route the traffic. | |||
5.) This is used when you want to block traffic without notifying the sender. | |||
6.) Like blackhole but sends an ICMP unreachable message to the sender, indicating that the route is prohibited. | |||
7.) Causes the router to send an ICMP unreachable message to the source IP, notifying that the destination is unreachable. | |||
|} | |||
=== 6.2 BGP === | |||
BGP is crucial for the operation of the internet, allowing routers to exchange information and find the best paths for data to travel across multiple networks globally. | |||
This section is divided into 5 sub sections, | |||
* Status | |||
* General settings | |||
* Instance | |||
* Peers | |||
* Peer Group | |||
[[File:BGP Dashboard.png|frameless|620x620px]] | |||
The ‘'''Status'''’ section will show the status of the connections made. | |||
'''General Settings:''' | |||
[[File:BGP General Settings.png|frameless|620x620px]] | |||
Specification details are given below: | |||
{| class="wikitable" | |||
|SN | |||
|Field Name | |||
|Sample Value | |||
|Description | |||
|- | |||
|1 | |||
|Enable BGP | |||
|Enable/Disable | |||
|This setting is used to turn on BGP functionality on the router. Once enabled, the router can participate in BGP routing, exchange routing information with other BGP peers. | |||
|- | |||
|2 | |||
|Enable vty | |||
|Enable/Disable | |||
|vty refers to the Virtual Terminal lines on a router, which allow remote users to connect to the router using protocols like Telnet or SSH. | |||
|- | |||
|3 | |||
|Password | |||
|***** | |||
|The password is set to secure access to the router's vty lines. | |||
|} | |||
Click on save and update once changes have been made. | |||
'''Instance:''' | |||
In configuring BGP on a router, the "BGP Instance" section is critical as it defines the unique settings for BGP operations on that particular router. | |||
[[File:Instance.png|frameless|620x620px]] | |||
Specification details are given below: | |||
{| class="wikitable" | |||
|SN | |||
|Field Name | |||
|Sample Value | |||
|Description | |||
|- | |||
|1 | |||
|AS | |||
|Ex: 12 | |||
|BGP uses AS numbers to maintain separation between different networks and to prevent routing loops. | |||
This field must not be empty because it is essential for BGP to function correctly. | |||
|- | |||
|2 | |||
|Router ID | |||
|Ex: 192.168.10.12 | |||
|The Router ID is a unique identifier for the BGP instance within an AS. It helps distinguish between multiple routers within the same AS. | |||
|- | |||
| | |||
| | |||
| | |||
| | |||
|- | |||
|3 | |||
|Network Import Check | |||
|Enable/Disable | |||
|This option enables or disables checking if a route exists in the local routing table before it is advertised to BGP peers. | |||
|- | |||
|4 | |||
|Advertise Networks | |||
|Ex: 192.168.10.0/24 | |||
|This field is used to specify which networks should be advertised to BGP peers. | |||
|- | |||
|5 | |||
|Redistribute Options | |||
|1.) None | |||
2.) Kernel Added Routes | |||
3.) Connected Routes | |||
4.) OSPF Routes | |||
5.) NHRP Routes | |||
6.) Static Routes | |||
|'''None''': No routes are redistributed. | |||
'''Kernel Added Routes''': Routes that are added by the kernel are redistributed. | |||
'''Connected Routes''': Directly connected routes are redistributed. | |||
'''OSPF Routes''': Routes learned through OSPF are redistributed into BGP. | |||
'''NHRP Routes:''' Routes discovered through NHRP will be advertised to BGP peers. | |||
'''Static Routes:''' Any static routes defined by an administrator will be advertised to BGP peers. | |||
|- | |||
|6 | |||
|Deterministic MED | |||
|Enable/Disable | |||
|This option, when enabled, ensures that the router uses a deterministic method to select the best path when there are multiple routes with the same AS path length but different MED values. | |||
|} | |||
Click on save and update once changes have been made. | |||
'''Peers:''' | |||
These are other routers with which your router establishes a BGP session to exchange routing information. Peers can be within the same organization or with external networks. | |||
[[File:BGP Peers.png|frameless|620x620px]] | |||
'''EDIT:''' | |||
To edit the existing device the user needs to click on the edit option. | |||
Once the changes are done click on the save button to save all the changes. | |||
Click on the deleted button to delete the existing device detail. | |||
[[File:BGP Peers Edit .png|frameless|620x620px]] | |||
Specification details are given below: | |||
{| class="wikitable" | |||
|SN | |||
|Field Name | |||
|Sample Value | |||
|Description | |||
|- | |||
|1 | |||
|Name | |||
|Ex: Route | |||
|This is an identifier that helps you distinguish between different peers or configurations. | |||
|- | |||
|2 | |||
|AS | |||
|Ex: 12 | |||
|BGP uses AS numbers to differentiate between different networks. | |||
|- | |||
|3 | |||
|IP Address | |||
|Ex: 10.1.1.0 | |||
|Specifies the IP address of the BGP peer. | |||
|- | |||
|4 | |||
|Update Source | |||
|Ex: loopback | |||
|Name of the Loopback Interface | |||
|- | |||
|5 | |||
|EBGP MultiHop | |||
|Ex: 5 | |||
|The TTL (Time to Live) value that allows BGP to establish a session with a peer multiple hops away. The value 5 means the BGP peer is up to 5 hops away. | |||
|- | |||
|6 | |||
|Password | |||
|***** | |||
|Both peers must have the same password configured to establish a secure BGP session. | |||
|- | |||
|7 | |||
|Weight | |||
|Ex: 100 | |||
|A higher weight is preferred, and 100 is a common value for prioritizing routes from this peer. | |||
|- | |||
|8 | |||
|Default Originate | |||
|Enable/Disable | |||
|This setting would be enabled if you want your router to advertise a default route (0.0.0.0/0) to the BGP peer, indicating that your router can be used as a default gateway. | |||
|- | |||
|9 | |||
|Next Hop Self | |||
|Enable/Disable | |||
|This option would be enabled if you want your router to advertise its own IP address as the next hop for routes sent to the BGP peer. | |||
|- | |||
|10 | |||
|Inbound Soft Reconfiguration | |||
|Enable/Disable | |||
|When enabled, this allows for BGP policy changes without resetting the session. | |||
|- | |||
|11 | |||
|Hold Time | |||
|Ex: 180 (seconds) | |||
|The maximum time the router will wait before considering the peer is unreachable. | |||
|- | |||
|12 | |||
|Keepalive Time | |||
|Ex: 60 (seconds) | |||
|It is typically set to one-third of the Hold Time to ensure the peer is still responsive. | |||
|- | |||
|13 | |||
|Connect Retry Time | |||
|Ex:120 (seconds) | |||
|The time the router waits before retrying a connection to the BGP peer if the session fails. | |||
|} | |||
'''Peer Groups:''' | |||
Peer groups allow you to group several peers together and apply the same routing policies to them, simplifying the management of BGP configurations. | |||
[[File:Peer Group.png|frameless|620x620px]] | |||
'''EDIT:''' | |||
To edit the existing device the user needs to click on the edit option. | |||
Once the changes are done click on the save button to save all the changes. | |||
Click on the deleted button to delete the existing device detail. | |||
[[File:Edit Peers Group.png|frameless|620x620px]] | |||
Specification details are given below: | |||
{| class="wikitable" | |||
|SN | |||
|Field Name | |||
|Sample Value | |||
|Description | |||
|- | |||
|1 | |||
|Name | |||
|Ex: Route | |||
|This is an identifier that helps you distinguish between different peers or configurations. | |||
|- | |||
|2 | |||
|AS | |||
|Ex: 12 | |||
|BGP uses AS numbers to differentiate between different networks. | |||
|- | |||
|3 | |||
|Neighbor Address | |||
|192.168.1.2 | |||
|This is the IP address of the BGP neighbor (peer) you're establishing a session with. | |||
|- | |||
|4 | |||
|Password | |||
|**** | |||
|Both peers must have the same password configured to establish a secure session. | |||
|- | |||
|5 | |||
|Weight | |||
|Ex: 100 | |||
|A higher weight is preferred. 100 is a common value used to prioritize routes from this peer. | |||
|- | |||
|6 | |||
|Inbound Soft Reconfiguration | |||
|Enable/Disable | |||
|When enabled, this allows for BGP policy changes without resetting the session. | |||
|- | |||
|7 | |||
|Hold Time | |||
|Ex: 180 (seconds) | |||
|The maximum time the router will wait before considering the peer is unreachable. | |||
|- | |||
|8 | |||
|Keepalive Time | |||
|Ex: 60 (seconds) | |||
|It is typically set to one-third of the Hold Time to ensure the peer is still responsive. | |||
|- | |||
|9 | |||
|Connect Retry Time | |||
|Ex:120 (seconds) | |||
|The time the router waits before retrying a connection to the BGP peer if the session fails. | |||
|} | |||
Click on save and update once changes have been made. | |||
=== 6.3 OSPF === | |||
OSPF (Open Shortest Path First) is a '''link-state''' protocol, which means it builds a complete map (or topology) of the network and uses that map to calculate the shortest path to each destination. | |||
This section is divided into 5 sub sections, | |||
* Status | |||
* General settings | |||
* Instance | |||
* Network and Area | |||
* Interface | |||
[[File:OSPF Dashboard.png|frameless|620x620px]] | |||
The ‘'''Status'''’ section will show the status of the connections made. | |||
'''General Settings:''' | |||
[[File:OSPF General Settings.png|frameless|620x620px]] | |||
Specification details are given below: | |||
{| class="wikitable" | |||
|SN | |||
|Field Name | |||
|Sample Value | |||
|Description | |||
|- | |||
|1 | |||
|Enable OSPF | |||
|Enable/Disable | |||
|When you enable OSPF, the router starts participating in OSPF processes, such as exchanging routing information with other OSPF-enabled routers and calculating the shortest path to each network. | |||
|- | |||
|2 | |||
|Enable vty | |||
|Enable/Disable | |||
|vty refers to the Virtual Terminal lines on a router, which allow remote users to connect to the router using protocols like Telnet or SSH. | |||
|- | |||
|3 | |||
|Password | |||
|***** | |||
|The password is set to secure access to the router's vty lines. | |||
|} | |||
Click on save and update once changes have been made. | |||
'''Instance:''' | |||
This setup enables a well-structured and efficient OSPF deployment, ensuring that the right routes are advertised while keeping the OSPF process streamlined by controlling where OSPF traffic is generated. | |||
[[File:OSPF Instance.png|frameless|620x620px]] | |||
Specification details are given below: | |||
{| class="wikitable" | |||
|SN | |||
|Field Name | |||
|Sample Value | |||
|Description | |||
|- | |||
|1 | |||
|Router ID | |||
|Ex: 192.168.10.12 | |||
|The Router ID identifies the OSPF router uniquely in the network. | |||
|- | |||
|2 | |||
|Passive Interfaces | |||
|1.) None | |||
2.) Loopback | |||
3.) Eth 0.5 | |||
4.) custom | |||
|'''None''': No interface is set as passive. | |||
'''loopback''': Marks the loopback interface as passive. | |||
'''eth 0.5''': Marks the eth0.5 interface as passive. | |||
'''custom''': Allows you to specify a custom interface name. | |||
Passive interfaces are used when you want to advertise a network in OSPF but do not want to establish OSPF neighbour relationships on that interface, reducing unnecessary OSPF traffic. | |||
|- | |||
|3 | |||
|Redistribute Options | |||
|1.) None | |||
2.) Kernel Added Routes | |||
3.) Connected Routes | |||
4.) NHRP Routes | |||
5.) Static Routes | |||
6.) BGP | |||
|'''None''': No routes are redistributed. | |||
'''Kernel Added Routes''': Routes that are added by the kernel are redistributed. | |||
'''Connected Routes''': Directly connected routes are redistributed. | |||
'''NHRP Routes:''' Routes discovered through NHRP will be advertised to BGP peers. | |||
'''Static Routes:''' Any static routes defined by an administrator will be advertised to BGP peers. | |||
'''BGP:''' Redistributes routes from Border Gateway Protocol (BGP) into OSPF. | |||
|} | |||
Click on save and update once changes have been made. | |||
'''Network and Area:''' | |||
[[File:OSPF Network and Area.png|frameless|620x620px]] | |||
'''EDIT:''' | |||
To edit the existing device the user needs to click on the edit option. | |||
Once the changes are done click on the save button to save all the changes. | |||
Click on the deleted button to delete the existing device detail. | |||
[[File:OSPF Network and Area Editing.png|frameless|620x620px]] | |||
Specification details are given below: | |||
{| class="wikitable" | |||
|SN | |||
|Field Name | |||
|Sample Value | |||
|Description | |||
|- | |||
|1 | |||
|Name | |||
|Ex: Network | |||
|A descriptive name that helps identify the connection | |||
|- | |||
|2 | |||
|Network | |||
|Ex: 192.168.25.0/24 | |||
|This network will be advertised by OSPF to other OSPF routers in the same area. | |||
|- | |||
|3 | |||
|Area | |||
|Ex: 0.0.0.0 | |||
|OSPF areas help segment large networks to reduce routing overhead. Area 0.0.0.0 is the backbone area, and all other areas typically connect through this area. | |||
|} | |||
'''Interface:''' | |||
The interface determines the physical or logical port through which the connection will be routed. | |||
[[File:OSPF Interface.png|frameless|620x620px]] | |||
'''EDIT:''' | |||
To edit the existing device the user needs to click on the edit option. | |||
Once the changes are done click on the save button to save all the changes. | |||
Click on the deleted button to delete the existing device detail. | |||
[[File:OSPF Interface Editing.png|frameless|620x620px]] | |||
Specification details are given below: | |||
{| class="wikitable" | |||
|SN | |||
|Field Name | |||
|Sample Value | |||
|Description | |||
|- | |||
|1 | |||
|Name | |||
|Ex: Route | |||
|This name helps distinguish between different connections within the router's configuration. | |||
|- | |||
|2 | |||
|Interface | |||
|1.) Loopback | |||
2.) Eth0.5 | |||
3.) Custom | |||
|'''Loopback''': Typically used for internal routing within the router, often for the router's own identification (127.0.0.1). | |||
'''Eth0.5''': Refers to a physical or virtual Ethernet interface on the router | |||
'''Custom''': Allows you to specify a different or specialized interface, depending on your network setup. | |||
|- | |||
|3 | |||
|Priority | |||
|Ex: 10, 20 | |||
|A lower priority number (e.g., 10) means this route will be preferred over others with a higher number (e.g., 20) when routing decisions are made. | |||
|- | |||
|4 | |||
|Cost | |||
|Ex: 10 | |||
|The cost can be based on bandwidth, where faster links have lower costs. | |||
For example, 10 might be assigned to a high-speed interface, while 100 might be assigned to a slower one. | |||
|- | |||
|5 | |||
|Hello Interval | |||
|Ex: 10secs | |||
|Adjusting the Hello Interval can impact OSPF neighbour formation and stability. | |||
Default is usually 10 seconds for broadcast and point-to-point networks. | |||
|- | |||
|6 | |||
|Dead Interval | |||
|Ex: 40secs | |||
|This interval determines how long OSPF waits before considering a neighbour lost. | |||
Default is usually 40 seconds (four times the Hello Interval). | |||
|- | |||
|7 | |||
|Retransmit Interval | |||
|Ex: 5secs | |||
|It should be set according to the network's performance and reliability. | |||
|- | |||
|8 | |||
|Network Type | |||
|1.) Broadcast | |||
2.) Non-broadcast | |||
3.) Point-to-point | |||
4.) Point-to-multipoint | |||
|'''Broadcast''': For Ethernet or other broadcast-capable networks where a DR/BDR is elected. | |||
'''Non-broadcast''': For networks that don't support broadcasting, like Frame Relay, where neighbours must be manually configured. | |||
'''Point-to-point''': For direct connections between two routers with no need for a DR/BDR. | |||
'''Point-to-multipoint''': For networks with multiple connections that don’t require a DR/BDR. | |||
The choice of network type should match the physical and logical topology of the network. | |||
|- | |||
|9 | |||
|Authentication | |||
|1.) None | |||
2.) General key | |||
3.) MD5 | |||
|'''None:''' No authentication is used. | |||
'''General key:''' Uses a simple password (plaintext). | |||
'''MD5:''' Uses MD5 hash-based authentication, which is more secure. | |||
|} | |||
Save and update the page once configured. | |||
=== 6.4 Dynamic Routing Custom File Upload === | |||
Dynamic Routing Custom File Upload allows you to select and upload a custom configuration file for dynamic routing settings (e.g., OSPF, BGP). | |||
Enable “Upload Custom File” | |||
Upload Custom File: | |||
* '''Purpose''': Finalizes the selection and prepares the file for uploading to the router. | |||
* '''Expected Action''': Click "Upload" after selecting your file. | |||
* '''Explanation''': This action uploads the file to the router, making it available for the router to use or store in its configuration directory. | |||
[[File:Dynamic Routing Custom File Upload.png|frameless|620x620px]] | |||
[[File:Dynamic Routing Custom File Uploading.png|frameless|620x620px]] | |||
Once you upload and apply the configuration, the router will update its routing tables or other related settings based on the contents of the custom file. | |||
'''Use Case:''' | |||
If you're managing a complex network and need to implement specific dynamic routing protocols or settings not available through the standard router interface, you can upload a custom file with the exact configurations required. | |||
Save and update the page once configured. | |||
=== 6.5 Routing Debug === | |||
The "Routing Debug" section provides various utilities and commands to diagnose and monitor routing protocols like BGP (Border Gateway Protocol) and OSPF (Open Shortest Path First). | |||
[[File:Routing Debug.png|frameless|620x620px]] | |||
Specification details are given below: | |||
{| class="wikitable" | |||
|SN | |||
|Field Name | |||
|Sample Value | |||
|Description | |||
|- | |||
|1 | |||
|Show BGP Summary | |||
|Command ‘RUN’ | |||
|Displays a summary of the BGP sessions, including the status of each BGP neighbour. | |||
|- | |||
|2 | |||
|Show BGP Running Config | |||
|Command ‘RUN’ | |||
|Displays the current running configuration for BGP. | |||
|- | |||
|3 | |||
|Show IP BGP | |||
|Command ‘RUN’ | |||
|Shows the current BGP routing table. | |||
|- | |||
|4 | |||
|Refresh BGP Table | |||
|Command ‘RUN’ | |||
|Refreshes the BGP routing table, which can be useful after making changes to BGP configuration. | |||
|- | |||
|5 | |||
|Show BGP Neighbors | |||
|Ex: 10.1.1.120 | |||
|Displays detailed information about the BGP neighbor with the specified IP address. | |||
|- | |||
|6 | |||
|Show Received Routes | |||
|Ex: 10.1.1.120 | |||
|Shows the routes received from the specified BGP neighbor. | |||
|- | |||
|7 | |||
|Run Custom BGP Command | |||
|Ex: show ip bgp summary | |||
|Allows you to run any custom BGP command to gather specific information. | |||
|- | |||
|8 | |||
|Show OSPF Neighbors | |||
|router-id | |||
|Displays the list of OSPF neighbors and their statuses. | |||
|- | |||
|9 | |||
|Show OSPF Route | |||
|Command ‘RUN’ | |||
|Displays the OSPF routing table, showing routes learned through OSPF. | |||
|- | |||
|10 | |||
|Show OSPF Database | |||
|Command ‘RUN’ | |||
|Shows the OSPF link-state database, which contains all the LSA (Link-State Advertisements) information. | |||
|- | |||
|11 | |||
|Show IP Route | |||
|Command ‘RUN’ | |||
|A list of all routes in the routing table, including destination networks, next hops, and metrics. | |||
|- | |||
|12 | |||
|Show IP Rule | |||
|Command ‘RUN’ | |||
|Shows IP rules that determine routing decisions based on specific criteria. | |||
|- | |||
|13 | |||
|Show IP Route Table | |||
|Enter a specific command | |||
|Displays the content of a specific routing table. | |||
|- | |||
|14 | |||
|Show IP Route Get | |||
|Ex: 10.1.1.10 (destination IP address) | |||
|Information on the route to the destination, including the next hop and outgoing interface. | |||
|- | |||
|15 | |||
|Flush IP Routes Cache | |||
|Command ‘RUN’ | |||
|Clears the IP route cache, forcing the router to rebuild the cache with fresh data. | |||
|- | |||
|16 | |||
|Output | |||
|Results | |||
|The results of the executed commands and utilities are displayed. | |||
|} | |||
= 7.Logout = | |||
Click on log out option to exit the application. | |||
[[File:Logout.png|frameless|620x620px]] | |||
Latest revision as of 12:10, 28 April 2025
Connecting with the device to the System (Laptop/Desktop)
To log in to SILBO_RS5X by connecting the router to your laptop or desktop via LAN or using Wi-Fi, please follow the steps below.
Connecting via LAN:
Connect your laptop's LAN port to one of the router's LAN interfaces. Ensure that you select any LAN interface (there are 2 available) while making sure the WAN interface is not used.
How to connect with the SILBO_RS5X application
Once the LAN connection is established between the device and the laptop or the desktop
Please open the command prompt and ping to get the IP config of that device.
Type the command Ipconfig
It will provide the Ip address/url of that device through which the application can be accessed.
Log In
Open the web browser and type the IP address in the URL.
It will show the log in page of the application.
Give the valid credentials for the username and password to login to the application page.
Once the user credentials are provided it will direct to the landing page of the application.
The “Status” landing page shows all the detailed specification of the device like system, memory storage and connection tracking etc.
The application is divided in to 8 Modules.
- Info
- Settings
- Maintenance
- Status
- Features
- Logout
1. Info
The “Info” module provides the information about the devices to the user.
It provides all the specification related to the hardware, firmware, Networks and the Connection uptimes.
It has 3 submodules.
- Overview
- System Log
- Kernel Log
1.1 Overview
In overview module it displays all the specification categorically of a device like System, Memory, storage, Connection tracking, DHCP Lease.
System:
In this section it displays the hardware configured specification of the device.
The specifications details are as follows,
| SN | Field name | Sample value | Description |
| 1 | Hostname | Silbo-RS | This field displays the router serial number of the device |
| 2 | Model | silbo-RS5X | This field displays the model number of the device |
| 3 | Firmware Version and IPK Version | 1.07_1.07-RC7 | This field displays the firmware version and IPK version |
| 4 | Kernel Version | 5.4.215 | This field displays the kernel version of the device |
| 5 | Local Time | Monday, August 19, 2024 at 11:17:10 AM | This field displays the local time |
| 6 | Uptime | 2d 12h 54m 23s | This field displays the uptime of the device |
| 7 | Load Average | 0.36 0.37 0.33 | This field displays the average load |
Memory:
In this section it displays the memory configured specification of the device.
The specifications details are as follows.
| SN | Field name | Sample value | Description |
| 1 | Total Available | 68676 kB / 124208 kB (55%) | This field displays the total availability of memory space in the device |
| 2 | Free | 59344 kB / 124208 kB (47%) | This field displays the Free memory space in the device |
| 3 | Cached | 312 kB / 124208 kB (0%) | This field displays the Cached memory space in the device |
| 4 | Buffered | 9332 kB / 124208 kB (7%) | This field displays the Buffered memory space in the device |
Storage:
In this section it displays the status of storage as root and temporary usage specification of the device.
The specifications details are as follows.
| SN | Field name | Sample value | Description |
| 1 | Root Usage | 796 kB / 15488 kB (5%) | This field displays the total root usage of the device |
| 2 | Temporary Usage | 312 kB / 62104 kB (0%) | This field displays the total temporary usage of the device |
Network:
In this section you can check as to whether you are connected to IPV4 or IPV6 Network.
Since this a 5G Module, both 4G and 5G Network can be latched.
IPV4 = 4G Network
IPV6 = 5G Network
Connection Tracking:
In this section it displays the status of connection tracking for the device.
The specifications details are as follows.
| SN | Field Value | Sample Value | Description |
| 1 | Active Connections | 48/16384 (0%) | This field displays the active connection of the device. |
DHCP Leases:
In this section it displays the DHCP lease of the temporary assignment of an IP address to a device on the network.
The specifications details are below.
| SN | Field name | Sample value | Description |
| 1 | Host Name | KermaniK-LT | This field displays the configured Host Name/Username for that device. |
| 2 | IPv4-Address | 192.168.10.147 | This field displays the IP address of the device. |
| 3 | MAC-Address | 34:73:5a:bb: ab:7a | This field displays the MAC-Address of the device. |
| 4 | Lease time remaining | 11h 53m 49s | This field displays the lease time remaining for the device. |
1.2 System Log
This page provides on screen System logging information. In this page the user gets to view the system logs.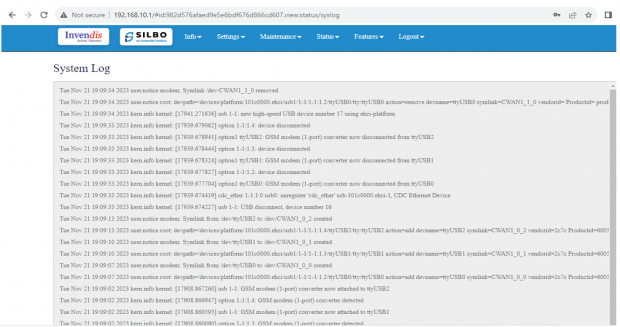
1.3 Kernel Log
This page provides on screen Kernel logging information.
In this page the user gets to view the Kernel logs.
2. Status
In this module the user can view the status of the router device with respect to the network, Wan, modem etc.
It has 4 submodules.
- Interfaces
- Internet
- Modem
- Routes
2.1 Interfaces
Each network device (interface) is associated with specific traffic statistics, uptime, and status. Active interfaces are operational, while inactive interfaces are not currently transmitting data.
Looking on the network status the user can check if the cellular, Wi-Fi, Ewan, VPN etc is up.
2.2 Internet
In this submodule the user can view the status of the internet connections.
To see the latest status of the internet connection the user needs to click on the refresh button.
2.3 Modem
This modem status page provides comprehensive information about the cellular connection's network operator, technology, mode, and various signal quality metrics.
2.4 Routes
This configuration shows how the router directs traffic between different networks and interfaces, ensuring proper communication within the local network and to external networks via the default gateway.
ARP Table: Maps IP addresses to MAC addresses for devices on the network, helping in identifying which device is on which interface.
IPv4 Routes: This shows which network is directly connected on which interface.
Example: Network 192.168.10.0/24 is directly connected on interface eth0.1.
IPv6 Routes: Similar routes as IPv4, but this time listed under IPv6 routing rules.
Example: Local networks 192.168.10.0/24 and 192.168.100.0/24 are managed through eth0.1 and ra0, respectively.
3. Settings
In this “Setting” module the user can Configure/update all the required parameters related to Network, Internet, VPN, Firewall, Traffic Shaping, Loopback Rule, Remote monitoring, Tunnel as per requirement.
IT consist of 8 submodules.
- Network
- Internet
- VPN
- Firewall
- Traffic Shaping
- Loopback Rule
- Remote Monitoring
- Tunnel
3.1 Network
In this section the user does all the setting related configuration with reference to network like Ethernet Settings, Cellular Settings, Band lock and Operator Lock, Wi-Fi Settings, Guest Wi-Fi etc.
Ethernet Settings:
In this page it will display all the configured port that is attached with the device. For this device 3 ports are configured. Ethernet mode can be configured as WAN and as LAN as well. Ethernet LAN Connection settings can be configured as DHCP server or Static.
For port 3 setting,
Kindly select the option LAN3 for Port 3 mode LAN/WAN. Based on the option selected the field will also change. The user needs to configure all the required field and click on save.
| SN | Field name | Sample value | Description |
| 1 | Port 3 mode LAN/WAN | LAN3 | This field displays the port mode selection |
| 2 | Port 3 Ethernet Protocol [LAN Eth0.1] | DHCP Server
Static |
This field displays the Ethernet mode selection |
| 3 | Port 3 DHCP Server IP
Port 3 Static IP |
192.168.4.1
5.6.7.8 |
This field displays DHCP server and static IP configured. |
| 4 | Port 3 DHCP and Static Netmask | 255.255.255.0 | This field displays DHCP server and static Netmask address configured |
| 5 | Port 3 DHCP Start Address | 100 | This field displays DHCP server start address configured |
| 6 | Port 3 DHCP Limit | 50 | This field displays DHCP server limit |
Kindly select the option EWAN3 for Port 3 mode LAN/WAN. Based on the option selected the field will also change. The user needs to configure all the required field and click on the save to save the required fields.
The specifications details are below.
| SN | Field name | Sample value | Description |
| 1 | Port 3 mode WAN | EWAN3 | This field displays the port mode selection |
| 2
|
Ethernet Protocol Port 3 WAN | 1.) DHCP client
2.) Static 3.) PPPoE 4.) PPTP 5.) L2TP |
1.) Automatically obtains IP address and network configuration from a DHCP server.
2.) Manually set a fixed IP address and network configuration. 3.) Point-to-Point Protocol over Ethernet, used for connecting to DSL services. 4.) Point-to-Point Tunnelling Protocol, used for establishing VPN connections. 5.) Layer 2 Tunnelling Protocol, another VPN protocol option. |
| 3 | Gateway | 192.168.1.1 | This field displays gateway address configured |
Click on the save once all the configuration is done and click on the update button to update all the information.
SW_LAN settings,
In this part the user can configure the setting for SW_LAN
The specifications details are below.
| SN | Field name | Sample value | Description |
| 1 | SW_LAN Ethernet Protocol | DHCP Server | This field displays the Ethernet mode selection |
| 2 | SW_LAN DHCP Server IP | 192.168.10.1 | This field displays DHCP server IP configured. |
| 3 | SW_LAN DHCP Netmask | 255.255.255.0 | This field displays DHCP server Netmask address configured |
| 4 | SW_LAN DHCP Start Address | 100 | This field displays DHCP server start address configured |
| 5 | SW_LAN DHCP Limit | 50 | This field displays DHCP server limit |
| 6 | DNS Server | 1 | This filed display number of DSN server availability |
| 7 | DNS Server Address | 8.8.8.8 | This filed display the DSN server address. |
After configuring all the required information, click on save.
Static option for SW_LAN Ethernet Protocol:
Specification details are given below:
| SN | Field name | Sample value | Description |
| 1 | SW_LAN Ethernet Protocol | Static | This field displays the Ethernet mode selection |
| 2 | SW_LAN static IP | 192.168.5.1 | This field displays static server IP configured. |
| 3 | SW_LAN Netmask | 255.255.255.0 | This field displays static server Netmask address configured |
| 4 | DNS Server | 1 | This filed display number of DSN server availability |
| 5 | DNS Server Address | 8.8.8.8 | This filed display the DNS server address. |
After configuring all the required information, click on save.
Cellular Setting:
In this page, the user needs to configure the various details with respect to the SIM.
select single cellular single sim where the user must configure the APN details of the sim used for the router device. The Configurations can be done based on the SIM usage, with respect to IPV4 or IPV6.
Specification details are given below:
| SN | Field name | Sample value | Description |
| 1 | Cellular Enable | Checkbox | Check this box to enable cellular functionality. |
| 2 | Cellular Operation Mode | 1.) Single Cellular with Dual Sim
2.) Single Cellular with Single SIM |
1.) This mode allows you to use one cellular modem with two SIM cards.
2.) This mode allows you to use one cellular modem with single SIM card. |
| 3 | Cellular Modem 1 | QuectelRM500U | This field displays the modem name. |
| 4 | Choose SIM 1 APN Mode | 1.) Auto
2.) Manual |
1.) Choose Auto for regular SIM to detect APN name automatically.
2.) Choose manual to enter the APN settings manually in case of M2M SIM cards. |
| 5 | SIM 1 Access Point Name | jionet | Enter the APN provided by your cellular service provider in case of M2M sim. For regular sim cards APN name will be displayed automatically. |
| 6 | SIM 1 PDP Type | IPV6 | Choose the PDP type, which is typically either IPv4 (4G) or IPv6 (5G) depending on the sim card. |
| 7 | Enable 464xlat for Sim1 | Enable/ Disable | In case of 5G jio sim cards, this option needs to be enabled. |
| 8 | SIM 1 Username | Enter the username if required by the APN. Leave blank if not required. | |
| 9 | SIM 1 Password | Enter the password if required by the APN. Leave blank if not required. | |
| 10 | SIM 1 Authentication Protocol | None | Choose the authentication protocol. Options typically include None, PAP, CHAP, PAP/CHAP. |
| 11 | Choose SIM 2 APN Mode | 1.) Auto
2.) Manual |
1.) Choose Auto for regular SIM to detect APN name automatically.
2.) Choose manual to enter the APN settings manually in case of M2M SIM cards. |
| 12 | SIM 2 Access Point Name | www | Enter the APN provided by your cellular service provider in case of M2M sim. For regular sim cards APN name will be displayed automatically. |
| 13 | SIM 2 PDP Type | IPV4 | Choose the PDP type, which is typically either IPv4 (4G) or IPv6 (5G) depending on the sim card. |
| 14 | SIM 2 Username | Enter the username if required by the APN. Leave blank if not required. | |
| 15 | SIM 2 Password | Enter the password if required by the APN. Leave blank if not required. | |
| 16 | Enable 464xlat for Sim2 | Enable/ Disable | In case of 5G jio sim cards, this option needs to be enabled. |
| 17 | SIM 2 Authentication Protocol | None | Choose the authentication protocol. Options typically include None, PAP, or CHAP. |
| 18 | Primary SIM Switchback Time | 10 min | The system should switch back to the primary SIM if it becomes available. |
Band lock and Operator Lock:
In this page, the user needs to configure the lock band and operator based on the service provider.
Bands available in the drop-down list
Specification details are given below:
| SN | Field Name | Sample Value | Description |
| 1 | Module | QuectelRM500U | The Quectel RM500U is a 5G module that supports both LTE and NR5G networks. |
| 2 | Mode Selection | 1.) Automatic
2.) LTE only 3.) NR5G only 4.) NR5G and LTE |
1.) The modem will automatically select the most appropriate network mode based on availability and signal strength. It will switch between LTE and NR5G as needed.
2.) The modem will be locked to LTE (4G) networks only. It will not attempt to connect to NR5G networks, even if they are available. 3.) The modem will be locked to NR5G (5G) networks only. 4.) This mode typically allows for dual connectivity, where the modem can simultaneously use both LTE and NR5G for better performance. |
| 3 | LTE Band Selection | Ex: LTE B1 | If custom band selection is enabled, users would typically be able to choose specific LTE bands that the modem will use. |
| 4 | NR5G Band Selection | Ex: 5G B1 | The modem will automatically connect to the best available 5G band based on signal strength and network conditions. |
Operator Selection Mode:
The user needs to click on the check box of the “operator select enable” to select the operator.
Once the check box is clicked there will be a dropdown list of the operator modes from which the user needs to select the mode. The user needs to select the operator mode from the given dropdown list.
If the user selects the mode “Manual” or “Manual-Automatic” then one more text box will appear where the user must provide the operator code.
After configuring all the required information, click on save.
Wi-Fi Settings:
Since this is a 5G Module device, there are 2 Wi-Fi settings available,
1.) 2.4Ghz WIFI Settings
2.) 5Ghz WIFI Settings
2.4Ghz WIFI Settings:
It has 3 radio modes as shown,
‘Access point’, ‘client only’ and ‘Access point and client’.
Access Point mode: In Access Point mode, a configuration in which a router, allows wireless devices to connect to a wired network by creating a Wi-Fi hotspot.
Client point:
In client mode, the access point connects your wired devices to a wireless network. This mode is suitable when you have a wired device with an Ethernet port and no wireless capability, for example, a smart TV, Media Player, or Game console and you want to connect it to the internet wirelessly, select the Client Mode and give the Radio SSID & client passphrase.
Access point and Client:
Select this option for both type of connection, give both SSID and passphrase.
After configuring all the required information, click on save.
Specification details are given below:
| SN | Field name | Sample value | Description |
| 1 | Radio Mode | 1.) Access point
2.) Client only 3.) Access point and Client |
The user must select any radio mode based on the requirement as shown above. |
| 2 | WirelessMode | 1.) B/G Mixed
2.) B Only 3.) G Only 4.) B/G/N Mode 5.) N_in_2G mode” --, HE Wireless Mode |
1.) This mode allows the access point to support both 802.11b(2.4 GHz with a max data rate of 11 Mbps.) and 802.11g(2.4 GHz with a high max data rate of 54 Mbps) devices.
2.) The access point will only support 802.11b devices. 3.) The access point will only support 802.11g devices. 4.) This mode allows the access point to support 802.11b, 802.11g, and 802.11n(operates at both 2.4 GHz and 5 GHz) devices. 5.) The access point will only support 802.11n devices operating in the 2.4 GHz band. |
| 3 | Country Code | INDIA | The region is set to India. |
| 4 | CountryRegion | Ex: 0 (Ch1-11) | Select channels as per requirement. |
| 5 | Channel | Ex: Auto | Select Channel depending on CountryRegion |
| 6 | Channel BandWidth | Ex: 20 MHz | The bandwidth is set to 20 MHz, which is common for 2.4 GHz networks. |
| 7 | TX Power | 100 | Transmit power is set to maximum (100%), ensuring the strongest possible signal. |
| 8 | Radio SSID | Silbo_RS5X_AP_2.4Ghz | Devices searching for available networks will see this name. |
| 9 | Radio Passphrase | •••••••• | This is the password for connecting to the Wi-Fi network. |
| 10 | Radio Encryption | AES | The access point uses AES (Advanced Encryption Standard) for securing wireless communications. |
| 11 | Radio DHCP server IP | 192.168.100.1 | This will be the default gateway IP for devices connecting to the network (can be changed). |
| 12 | Radio DHCP start address | 100 | The DHCP server will assign IP addresses starting from 192.168.100.100 (will differ if any changes). |
| 13 | Radio DHCP limit | 50 | The DHCP server can assign up to 50 IP addresses. |
| 14 | Client SSID | Any device SSID | The SSID (Service Set Identifier) is the name of the Wi-Fi network you want the device to connect to. |
| 15 | Client Radio Passphrase | •••••••• | This is the password required to connect to the Wi-Fi network. |
| 16 | Client Radio Authentication | This setting defines the type of authentication used by the Wi-Fi network. Leave it blank if not in use. | |
| 17 | Client Radio Encryption | Ex: AES | This determines the type of encryption used to secure data transmitted over the Wi-Fi network. |
5Ghz WIFI Settings:
Specification details are given below:
| SN | Field Name | Sample Value | Description |
| 1 | WirelessMode | mixed | This mode allows the access point to support multiple Wi-Fi standards, typically including 802.11a(Operates on the 5 GHz band), 802.11n(supports both 2.4 GHz and 5 GHz), and 802.11ac (Designed specifically for the 5 GHz band). |
| 2 | Country Code | INDIA | Setting this to "INDIA" ensures compliance with local regulations regarding the 5 GHz Wi-Fi spectrum. |
| 3 | Channel | auto | The access point automatically selects the best available channel based on current Wi-Fi traffic and interference. |
| 4 | Channel BandWidth | 80 MHz | 20 MHz: The default width for most networks, offering the best compatibility.
40 MHz: Provides more bandwidth, suitable for less congested environments. 80 MHz: Offers the highest throughput but may suffer from interference in crowded environments. |
| 5 | TX Power | 100 | The transmit power is set to 100%, which is the maximum power output allowed by the device. |
| 6 | Radio SSID | Silbo_RS5X_AP_5Ghz | This is the name that users will see when searching for available Wi-Fi networks. |
| 7 | Radio Passphrase | •••••••• | This is the password required to connect to the Wi-Fi network. |
| 8 | Radio Mode | Access Point | The device is set to operate as an access point, providing wireless connectivity to devices within its range. |
| 9 | Radio Encryption | 1. NONE
2. WPA Personal (PSK) 3. WPA Personal (PSK) + AES 4. WPA Personal (PSK) + CCMP 5. WPA Personal (PSK) + TKIP + CCMP 6. WPA Personal (PSK) + TKIP + AES |
1.) This option disables encryption on the Wi-Fi network.
2.) This is a basic security option commonly used in home and small office networks. 3.) This is the most recommended option for most networks. It provides strong security by combining the WPA Personal protocol with AES encryption. 4.) This option is technically equivalent to WPA Personal (PSK) + AES, as CCMP is the mode in which AES operates under WPA2. 5.) This is a backward-compatible option that can be used in networks where some older devices only support TKIP, while newer devices can take advantage of the more secure AES (CCMP). 6.) Like the TKIP + CCMP option, this is intended for environments with mixed device capabilities. |
| 10 | Radio DHCP Server IP | 192.168.200.1 | This IP address will act as the default gateway for devices connecting to the Wi-Fi network. |
| 11 | Radio DHCP Start Address | 1 | The starting IP address in the DHCP range. The first device that connects will receive 192.168.200.1. |
| 12 | Radio DHCP Limit | 50 | The maximum number of IP addresses that the DHCP server can assign. In this case, it can assign up to 50 devices. |
Guest WIFI 2.4Ghz/5Ghz:
As shown below, this section has 2 modes,
Enable 2.4Ghz Guest Wifi, Enable 5Ghz Guest Wifi
Enable 2.4Ghz Guest Wifi:
Specification details are given below:
| SN | Field Name | Sample Value | Description |
| 1 | Enable 2.4Ghz Guest Wifi | Enable/Disable | Enable this option if you want to set up a 2.4Ghz Guest Wifi. |
| 2 | SSID | Add SSID of a device | The SSID field must not be empty. You need to enter a name for the Guest Wi-Fi network. |
| 3 | Passphrase | Ex: GuestAccess2024 | The passphrase is the password required to connect to the Guest Wi-Fi network. |
| 4 | Radio DHCP Server IP | Ex: 192.168.13.30 | The DHCP Server IP field must not be empty. You must assign a valid IP address within the subnet range you intend to use for the Guest Wi-Fi network. |
Enable 5Ghz Guest Wifi:
Specification details are given below:
| SN | Field Name | Sample Value | Description |
| 1 | Enable 5Ghz Guest Wifi | Enable/Disable | Enable this option if you want to set up a 5Ghz Guest Wifi. |
| 2 | SSID | Ex: Guest_WiFi_5GHz | The SSID field must not be empty. You need to enter a name for the Guest Wi-Fi network. |
| 3 | Passphrase | Ex: Guest5GAccess2024 | The passphrase is the password required to connect to the Guest Wi-Fi network. |
| 4 | Radio DHCP Server IP | Ex: 192.168.11.20 | The DHCP Server IP field must not be empty. You must assign a valid IP address within the subnet range you intend to use for the Guest Wi-Fi network. |
Wireless Schedule:
Wi-Fi can be automatically withdrawn based on the configuration done in this section.
The user can schedule the Wi-Fi’s accessibility time during a particular period.
The user can select more than one “day of the week” for scheduling the Wi-Fi working hours as shown above.
After configuring all the required information, click on save.
SMS Settings:
User needs to enable SMS option in SMS settings page.
This option is to validate the mobile numbers using which controlling commands could be sent to the router device.
1 to 5 mobile numbers can be authenticated by choosing from “Select Valid SMS user numbers” and adding the mobile numbers below respectively.
API key is the pass key used in the commands while sending SMS.
Displayed in the below screen is the default API key which can be edited and changed as per choice.
1.) Select valid user number max. 5 and add authorized phone number in the tab where you want to find the alert and click on ‘SMS Response Enable’, ‘save’ and ‘update’ button.
2.) Now send SMS commands from the configured mobile number.
3.) Once the commands are received from the user phone number the board will send acknowledgement as per the commands.
4.) After that it will send the router’s status once it has rebooted and is operational again.
Mentioned below are a few commands which can be sent from the configured mobile number to the router device. Below two commands are One for rebooting the router device and another to get the uptime.
1) {"device":["passkey","API key"],"command":"reboot","arguments":"hardware"}
2) {"device":["passkey ","API key"],"command":"uptime"}
After configuring all the required information, click on save.
Loop back IP settings:
The loopback IP address, often referred to as “localhost.” It is used to establish network connections within the same device for testing and troubleshooting purpose.
The loopback IP address, commonly represented as 127.0.0.1, is a special address used for testing network connectivity on a local machine.
It allows a device to send network messages to itself without involving external networks, making it useful for troubleshooting and diagnostics.
However, this IP can be changed as per requirement and to do that, Navigating to Setting>>Network configuration>> Loopback IP settings can be changed/updated.
After configuring all the required information, click on save.
Flow Offloading:
Specification details are given below:
| SN | Field Name | Sample Value | Description |
| 1 | Enable Flow Offloading | Enable/Disable
(Disable by default) |
Hardware Flow Offloading: If supported by your device, enabling flow offloading can significantly increase throughput by reducing the CPU load.
Software Flow Offloading: Even without specialized hardware, software-based flow offloading can help optimize network traffic processing. |
| 2 | SMP IRQ Affinity | Enable/Disable
(Disable by default) |
SMP IRQ Affinity: When enabled, this setting can bind specific IRQs to specific CPU cores, which can optimize the handling of interrupts and improve overall system performance. |
After configuring all the required information, click on save.
3.2 Internet
As shown below, this section has 3 categories,
General settings
Failover
Load Balancing
General Settings:
In general settings, select any one option from the drop-down menu which you wish to imply and click on save.
Failover
Load Balancing
Failover:
EDIT:
The specifications details are below.
| SN | Field name | Sample value | Description |
| 1 | Priority | Ex: 1 | Setting a priority of 1 means this connection has the highest priority and will be used before any others with a higher priority number. |
| 2 | Select Track IP Numbers | 2 | In this dropdown the user needs to select the track number for the Ips. This specifies the number of IP addresses that will be used for tracking the status of the connection. |
| 3 | TrackIP1 | 2001:4860:4860::8888 | TrackIP1: 2001:4860:4860::8888 is an IPv6 address that corresponds to one of Google’s public DNS servers. |
| 4 | TrackIP2 | 2001:4860:4860::8844 | TrackIP2: 2001:4860:4860::8844 is another Google public DNS server. |
| 5 | Reliability | 1 | If reliability is set to 1, it might mean the connection is considered reliable if it successfully pings at least one of the tracked IP addresses. |
| 6 | Count | 3 | Setting Count to 3 means the device will send three pings to each IP address to check for connectivity. |
| 7 | Up | 3 | If set to 3, the connection will be considered "up" only if all three pings are successful. |
| 8 | Down | 3 | If set to 3, the connection will be considered "down" if all three pings fail. |
Once the user is done with modification click on the save tab to save all the changes and then click on the update button.
Load Balancing:
Load balancing is a network management technique used to distribute traffic across multiple network connections or servers to optimize resource use, maximize throughput, minimize response time, and ensure reliability.
Tasks of Load Balancing:
Traffic Distribution:
Task: Distributes network traffic evenly across multiple connections (e.g., multiple WAN links) or servers.
Purpose: This ensures that no single connection or server is overwhelmed with too much traffic, which could lead to congestion and slower performance.
EDIT:
Specification details are given below:
| SN | Field Name | Sample Value | Description |
| 1 | Traffic Distribution Ratio | Ex: 60% | If you have two connections and set one to 60% and the other to 40%, traffic will be distributed accordingly. |
| 2 | Select Track IP Numbers | 2 | The system will track two IP addresses to determine if the network connection is active and reliable. |
| 3 | TrackIP1 | 8.8.8.8 | The system will ping this IPV4 IP address to check if the connection is up and working. You can even add any whitelisted IP. |
| 4 | TrackIP2 | 8.8.4.4 | The system will ping this IPV4 IP address to check if the connection is up and working. You can even add any whitelisted IP. |
| 5 | Reliability | 1 | With a reliability setting of 1, the connection might be considered reliable if at least one ping is successful. |
| 6 | Count | 1 | The system will send one ping to each tracked IP to check the connection's status. |
| 7 | Up | 3 | The system requires 3 successful pings for the connection to be marked as "up." |
| 8 | Down | 3 | If 3 pings fail, the system will mark the connection as "down," and it may switch to an alternate connection if available. |
Once the user is done with modification click on the save tab to save all the changes and then click on the update button.
3.3 VPN
VPN stands for Virtual Private Network, it establishes a connection between the system and a remote server, which is owned by a VPN provider.
Creating a point-to-point tunnel that encrypts the personal data, masks the IP address, and allows to block the required website to blocks via firewalls on the internet.
Navigate to settings >= VPN, general settings and you will see all VPN options you wish to use.
Refer the below figure.
There are 5 types of setting available under VPN configuration.
- General Settings
- IPSEC
- Open VPN
- Wireguard
- Zerotier
General Settings:
In this page the user must choose which type of VPN connection is required for the device. The user must select from IPSEC, Open VPN, Wireguard or Zerotier based on its requirement. If required, the user can select all the options. Click on save after selecting the option based on its requirement.
IPSEC:
IPSEC VPN is used to create a VPN connection between local and remote networks.
To use IPSEC VPN, the user should check that both local and remote routers support IPSEC VPN feature.
In this page the user can add/edit/delete the IPSEC VPN connection for the device.
The user needs to click on the update button once the required configuration is completed.
In IPSEC the user needs to click on edit button to edit the configuration of an existing VPN connection.
Click on update once done with configurations.
The tunnel will show established, showing the connection has been made.
Detailed specifications are below:
| SN | Field name | Sample value | Description |
| 1 | IPSEC | Site to Site VPN | In this dropdown the user should select the IPSEC connection type. |
| 2 | IPSEC Role | Client/Server | In this dropdown box the user needs to select the IPSEC role. The device is acting as a client in the VPN setup (in this example). |
| 3 | Connection Type | Tunnel | In this dropdown the user needs to select the connection type. The user should select on the connection enable check box. |
| 4 | Connection mode | Route/add/start/trap | In this drop down list the user should select the mode for the connection. In this example start is selected which means the VPN connection is initiated automatically. |
| 5 | Remote Server IP | ******** | The IP address of the remote VPN server. |
| 6 | Local ID | 3.3.3.3 | The user needs to set the local id. It is the identification for the local VPN client. |
| 7 | No. of local subnets | 1 | In this dropdown the user needs to select how many subnets will be connected. |
| 8 | Local Subnet 1 | 172.16.31.25/32 | In this text box the user needs to put the specific local subnet included in the VPN. |
| 9 | Remote id | 1.1.1.1 | In this text box the user needs to put the id of the remote connection. It is the identification for the remote VPN server. |
| 10 | No of remote subnet | 1 | In this dropdown the user needs to select how many subnets it will be connected remotely. |
| 11 | Remote subnet | 10.1.1.0/24 | In this text box the user needs to put the address of the remote subnet. The specific remote subnet included in the VPN. |
| 12 | Key exchange | Ikev1 | In this dropdown the user should select the which key exchange version to be selected. |
| 13 | Aggressive | Yes/No | In this dropdown the user should select either yes or no. |
| 14 | IKE Lifetime (In Seconds) | 86400 | The lifetime of the IKE phase in seconds (1 day). |
| 15 | Lifetime (in seconds) | 28800 | The lifetime of the IPsec SA (Security Association) in seconds (8 hours). |
| 16 | Enable DPD Detection | 1
0 |
Indicates whether Dead Peer Detection is enabled to detect a lost connection. Enable this option as per server-side settings. |
| 17 | Time Interval (In Seconds) | 60 | This option is available only if DPD Detection is enabled. The time interval is the interval for DPD checks. |
| 18 | Action | Restart/clear/hold/
trap/start |
Restart: Action to take when DPD detects a lost connection (restart the connection). Select as per server-side setting. |
| 19 | Authentication Method | PSK | PSK: Pre-shared key is used for authentication. Select this option for authentication as per sever side setting. |
| 20 | Multiple Secrets | 1/0 | Indicates whether multiple PSK secrets are used. Enable only if required. |
| 21 | PSK Value | ****** | Pre-shared key value (masked for security). |
Proposal settings Phase I
| |||||||||||||||||||||||||||||||||||||||||||||||||
Open VPN:
To use the VPN feature, the user should enable OpenVPN Server on the router, and install and run VPN client software on the remote device.
The user needs to “upload” the respective certificate from a valid path and then click on the “Update.”
Once the OpenVPN connection starts the user will get an option to enable/disable the VPN connection as and when required. Here we have established a TUN connection.
By clicking on the enable/disable button, the user can start/stop the VPN connection.
VPN TUN has been established. Same way VPN TAP can also be established.
WireGuard:
WireGuard is simple, fast, lean, and modern VPN that utilizes secure and trusted cryptography.
Click on “Edit” to start configurations as needed.
EDIT:
Specification details are given below:
| SN | Field name | Sample value | Description |
| 1 | Wireguard Role | Client/Server | In this dropdown box the user needs to select the wireguard role. |
| 2 | Listen Port | 51820 | The UDP port on which the WireGuard client listens for incoming connections. |
| 3 | IP Addresses | 10.0.0.1/24 | The IP address and subnet mask assigned to the WireGuard client's interface. This address is used within the VPN. |
| 4 | Allowed IPs | 10.1.1.1 | The IP address of the allowed peer(s) that can connect to this WireGuard client. This might need adjustment based on the actual peer IPs used in the network. |
| 5 | Endpoint HostIP | 10.1.1.1 | The IP address of the WireGuard server (the endpoint to which the client connects). |
| 6 | Preshared key | ***** | The actual pre-shared key value shared between the client and the server. This option appears only if you have enabled preshared key. |
Save and update the page after configuration has been done.
Zerotier:
ZeroTier is a tool that lets you create your own private network over the internet.
Go to ZeroTier Central and sign up for a free account. In ZeroTier Central, click on "Create a Network". This will generate a unique 16-digit network ID for your new network.
Go to settings => VPN, in general settings, enable ZeroTier and save.
Copy and paste the unique 16-digit network ID in the edit section.
Click on the save button after the required configuration.
| SN | Field name | Sample value | Description |
| 1 | NetworkID | Ad2769hfkw2345f4 | In this dropdown box the user needs to paste the unique 16-digit network id. |
| 2 | Listen Port | 9993 | Default |
3.4 Firewall
A firewall is a layer of security between the network and the Internet.
Since a router is the main connection from a network to the Internet, the firewall function is merged into this device.
Every network should have a firewall to protect its privacy.
To configure a Firewall, navigate to settings <= firewall,
There are 6 types of setting available under firewall.
- General Settings
- Port forwards
- Traffic Rules
- SNAT traffic Rules
- Parental Control
- Zone Forwarding
General Settings:
General settings are subdivided into 2 parts,
1.) General settings
In general settings, the settings that are made are default settings and can be changed according to user’s preference.
Specification details are below:
| SN | Field Name | Sample Value | Description |
| 1 | Enable SYN-flood protection | Enabled | This is enabled by default; setting can be changed if required. |
| 2 | Disable IPV6 | Disabled | This is enabled by default; setting can be changed if required. |
| 3 | Drop invalid packets | Disabled | This is enabled by default; setting can be changed if required. |
| 4 | TCP SYN Cookies | Disabled | This is enabled by default; setting can be changed if required. |
| 5 | Input | Reject/Accept | By default, the setting is ‘Reject’ but this needs to be changed to ‘Accept’ compulsory. |
| 6 | Output | Reject/Accept | By default, the setting is ‘Reject’ but this needs to be changed to ‘Accept’ compulsory. |
| 7 | Forward | Reject/Accept | By default, the setting is ‘Reject’ but this needs to be changed to ‘Accept’ compulsory. |
2.) Zone settings
In zone settings, there’s an option to add “New Zone”, according to user’s requirement.
Port Forwards:
Port forwarding is a feature in a router or gateway that allows external devices to access services on a private network.
It maps an external port on the router to an internal IP address and port on the local network, enabling applications such as gaming servers, web servers, or remote desktop connections to be accessed from outside the network.
This helps in directing incoming traffic to the correct device within a local network based on the port number, enhancing connectivity and accessibility.
EDIT:
Click on the save button after the required configuration.
| SN | Field name | Sample value | Description |
| 1 | Name | Example: Web_Server_Forward
|
Field must not be empty. Provide a name for the rule to easily identify it. |
| 2 | Protocol | Example: TCP+UDP
|
Select the protocol for the rule.
Options typically include TCP+UDP, TCP, UDP, ICMP, Custom. |
| 3 | Source zone | Example: SW_LAN
|
Select the source zone where the traffic is originating from. Options typically include EWAN2,SW_LAN,CWAN1,CWAN1_0,CWAN1_1,VPN |
| 4 | Source MAC address [optional] | Example: any
|
any: Leave as any if you don't want to specify a MAC address.
|
| 5 | Source IP address[optional] | Example: Leave blank if not needed. | Optionally specify an IP address or range. |
| 6 | Source port | Example: 80, 443 (if matching traffic for web server ports)
|
Specify the source port or port range. |
| 7 | Destination zone | Example: SW_LAN
|
Select the destination zone where the traffic is heading to. |
| 8 | Destination IP address | Leave blank if not needed. | Optionally specify the destination IP address or range. |
| 9 | Destination port | Example: 80 (if redirecting to a web server port)
|
Specify the destination port or port range. |
Traffic Rule:
"Traffic rules" refer to the policies and regulations that govern the flow of data packets within a network.
To allow new traffic, click on “Add and Edit” in “New Traffic Rule”.
EDIT:
Specification details are below:
| SN | Field name | Sample value | Description |
| 1 | Name | Example: Allow_HTTP_and_HTTPS | Field must not be empty: Provide a descriptive name for the traffic rule. |
| 2 | Restrict to Address Family | 1. Options: IPv4, IPv6
2. Example: IPv4 if dealing with typical internet traffic. |
Select the address family to generate iptables rules for. |
| 3 | Protocol | Example: TCP+UDP | TCP+UDP: Match incoming traffic using the given protocol. |
| 4 | Match ICMP Type | Example: any | Match all ICMP types if set to any. Specific types can be chosen if needed. |
| 5 | Source Zone | Example: LAN | Specifies the traffic source zone. |
| 6 | Enable DDoS Prevention | Example: ‘Checked’ if you want to enable DDoS prevention measures | Enable or disable Distributed Denial of Service (DDoS) prevention. |
| 7 | Limit | Example: 10/minute to limit matches to 10 times per minute. | Maximum average matching rate; specified as a number, with an optional /second, /minute, /hour, or /day suffix. |
| 8 | Limit Burst | Defines how many packets or connections can exceed the rate limit before the limiting mechanism kicks in. | |
| 9 | Source MAC Address | Example: any | any: Match traffic from any MAC address or specify a particular MAC address. |
| 10 | Source Address | Example: 192.168.1.0/24 | Match incoming traffic from the specified source IP address or range. |
| 11 | Source Port | Example: any if all source ports should be matched | any: Match incoming traffic from the specified source port or port range. |
| 12 | Destination Zone | Example: WAN | Specifies the traffic destination zone. |
| 13 | Destination address | Options: Any, or a specific IP address/subnet. | The IP address or range to which the incoming traffic is directed. |
| 14 | Destination port | Options: Any, or a specific port/port range. | Used to allow or block traffic to specific services, like permitting only HTTP (port 80) traffic. |
| 15 | Action | Example: ACCEPT | Options: ACCEPT, DROP, REJECT. Specify the action to take for matched traffic. |
| 16 | Extra arguments | Example: --log-prefix "Blocked: " to add a log prefix to log messages for this rule. | Passes additional arguments to iptables. Use with care as it can significantly alter rule behaviour. |
Click on save once configured.
SNAT Traffic Rule:
For configuring SNAT (Source Network Address Translation) traffic rules, you can control how outbound traffic from your local network is translated to a different IP address as it exits the network.
To add new source NAT,
Click on “ADD” in “New Source NAT:”
EDIT:
Specification details are below:
| SN | Field name | Sample value | Description |
| 1 | Name | Example: SNAT_WAN_to_LAN | Field must not be empty: Provide a unique and descriptive name for the SNAT rule. |
| 2 | Protocol | Example: TCP+UDP | TCP+UDP: Select the protocols that the SNAT rule will apply to. |
| 3 | Source Zone | Example: wan | wan: Specifies the source zone from which the traffic originates. |
| 4 | Source IP Address | Example: any or a specific range like 192.168.1.0/24 | -- please choose --: Specify the source IP address or range. Leave empty if the rule applies to any source IP. |
| 5 | Source Port | Example: any | any: Specify the source port or port range from which the traffic originates. |
| 6 | Destination Zone | Example: lan | lan: Specifies the destination zone to which the traffic is directed. |
| 7 | Destination IP Address | Example: any or a specific IP like 192.168.1.100 | -- please choose --: Specify the destination IP address or range. Leave empty if the rule applies to any destination IP. |
| 8 | Destination port | Example: any | any: Specify the destination port or port range to which the traffic is directed. |
| 9 | SNAT IP Address | Example: 203.0.113.5 (an external IP address) | -- please choose --: Specify the IP address to which the source IP should be translated. |
| 10 | SNAT Port | Example: Leave empty if not needed, or specify a port like ‘12345’ | Optionally, rewrite matched traffic to a specific source port. Leave empty to only rewrite the IP address. |
| 11 | Extra Arguments | Example: --log-prefix "SNAT_traffic: " (to add a log prefix to log messages for this rule) | Pass additional arguments to iptables. Use with care as it can significantly alter rule behaviour. |
Click on save once configured.
Parental Control:
For configuring parental control rules, you want to set restrictions based on time, source, and destination zones, as well as specific devices.
To add parental control in firewall,
Click on “Add and Edit” in “New parental control:” field.
EDIT:
Specification details are given below:
| SN | Field Name | Sample Value | Description |
| 1 | Name | Example: Parental_Control_Sunday | Field must not be empty: Provide a unique and descriptive name for the parental control rule. |
| 2 | Proto | all | all: This specifies that the rule will apply to all protocols. |
| 3 | Source Zone | Example: lan | Field must not be empty: Please look at Firewall->Zone Settings to find zone names. |
| 4 | Destination Zone | Example: wan | Field must not be empty: Please look at Firewall->Zone Settings to find zone names. |
| 5 | Source MAC Address | Example: 00:1A:2B:3C:4D:5E | Field: Enter the MAC address of the device you want to apply the parental control rule to. This is useful for restricting specific devices. |
| 6 | Target | Example: Reject | Accept: This specifies the action to take. For parental controls, you might want to use ‘Reject’ or ‘Drop’ to block traffic. |
| 7 | Weekdays | Example: Sunday | Sunday: Specify the days of the week when the rule should be active. |
| 8 | Month Days | Example: All | All: Specify the days of the month when the rule should be active. |
| 9 | Start Time (hh:mm:ss) | Example: 18:00:00 (6:00 PM) | Field must not be empty: Specify the start time when the rule should begin to apply. |
| 10 | Stop Time (hh:mm:ss) | Example: 22:00:00 (10:00 PM) | Field must not be empty: Specify the stop time when the rule should end. |
Click on save once configured.
Zone Forwarding:
Zone forwarding in network configuration allows traffic to be directed from one zone to another.
To ADD new zone,
Click on “Add” in “New Zone Forward:” field.
EDIT:
Specification details are below:
| SN | Field Name | Sample Value | Description |
| 1 | Source Zone | Example options: CWAN (1,2,3), EWAN (1,2,3), VPN & custom. | --please choose--: Select the source zone from which the traffic originates. |
| 2 | Destination Zone | Example options: SW_LAN, EWAN3 & custom. | --please choose--: Select the destination zone to which the traffic is directed. |
Click on save once configured.
3.5 Traffic Shaping
Traffic shaping also known as SQM (Smart Queue Management).
The combination of the correct interface, queueing discipline, setup script, and accurate
upload/download speed value allows SQM to effectively reduce latency, manage congestion, and
improve overall network performance.
EDIT:
Specification details are given below:
| SN | Field Name | Sample Value | Description |
| 1 | Interface | Options:
eth0.1 eth0.5 ra0 (WiFi 2.4 GHz) wlan0 (WiFi 5 GHz) eth1 |
You choose the interface corresponding to the connection you want to manage, whether it's a wired connection (eth0.x, eth1) or a wireless one (ra0, wlan0). |
| 2 | Queueing Discipline | Options:
Cake fq_code |
You select the appropriate qdisc based on your needs; Cake is often preferred for its advanced features and ease of configuration. |
| 3 | Queue Setup Script | Options:
piece_of_cake.qos layer_Cake.qos |
Choose the script that best suits your network environment; layer_Cake.qos provides more features, while piece_of_cake.qos is easier to use. |
| 4 | Upload Speed (kbps) | 10000 kbps | This field specifies the maximum upload speed in kilobits per second that your connection can handle. |
| 5 | Download Speed (kbps) | 85000 kbps | This field specifies the maximum download speed in kilobits per second that your connection can handle. |
Click on save once configured.
3.6 Loopback Rule
In this page the user can configure the port where he wants to forward the traffic to. Here the user can add/edit/delete different ports as per the requirement.
The user should click on ‘add’ and then ‘edit’ to do the required changes in the port and enter the valid information in each section to configure the port for forwarding.
EDIT:
Specification details are given below:
| SN | Field Name | Sample Value | Description |
| 1 | Name | Example: loopback | Provide a descriptive name for the rule. |
| 2 | Protocol | Example: TCP+UDP | TCP+UDP: Select the protocols that the rule will apply to. |
| 3 | Source IP Address [Optional] | Example: any or a specific IP range like 192.168.1.0/24 | Optionally specify the source IP address or range. Leave empty if the rule should apply to any source IP. |
| 4 | Source Port [Optional] | Example: any | any: Specify the source port or port range from which the traffic originates. any allows traffic from all ports. |
| 5 | Destination IP Address | Example: 172.16.31.25 | Only match incoming traffic with this Destination IP or range. Typically, this is 127.0.0.1. |
| 6 | Destination Port | Example: 81 | Only match incoming traffic originating with the given destination port or port range on the client host. |
| 7 | Action | Example: DNAT | This specifies the action to take either DNAT or SNAT. |
| 8 | Internal IP Address | Example: 192.168.1.100 | Field must not be empty: Specify the internal IP address to which the traffic should be redirected. |
| 9 | Internal Port | Example: 81 | Redirect matched incoming traffic to the given port on the internal host. |
Once the user is done with the required configurations, user should click save button and then click on update to save the changes.
3.7 Remote Monitoring
In this page the user can select which equipment needs to be monitored remotely.
Once the user selects the type of RMS click on save.
NMS:
In this page the user should type the server IP or domain name in the URL then click on save.
Click on upload and start (Once key is uploaded and this option is clicked, NMS automatically starts, and this router device gets registered with the NMS server provided).
TR_069:
To enable the TR_069 the user needs to click on the enable check box.
Once the user clicks on the check box of enable it will display all the required filed to configured.
Specification details are given below:
| SN | Field Name | Sample Value | Description |
| 1 | Enable TR-069 | Enable/Disable | When enabled, the device can be remotely managed and configured by a service provider using a TR-069 server. |
| 2 | Periodic Enable | Enable/Disable | It ensures that the device regularly checks in with the management server for updates, configuration changes, or status reports. |
| 3 | Accept Server Request | Enable/Disable | By accepting server requests, the device can be managed in real-time, allowing the server to push updates, configurations, or commands to the device. |
| 4 | Serving Interval | 300 | A value of 300 seconds means the device will check in with the ACS (auto-configuration servers) every 5 minutes. |
| 5 | Interface | This can be something like eth0 or wan. | This specifies the network interface used for TR-069 communication. |
| 6 | Username | Example: User | The username used to authenticate with the ACS. |
| 7 | Password | •••• | The password used to authenticate with the ACS. |
| 8 | URL | https://167.71.232.131 | The URL of the ACS. This is where the CPE (customer-premises equipment) will send its requests and where it will receive configurations and updates from. |
The user should fill all the required fields and click on the save button.
3.8 Tunnel
Tunnels are a method of transporting data across a network using protocols which are not supported by that network.
It is further categorised into 2 sections,
1.) General Settings
2.) GRE Tunnel
General Settings:
In this page the user needs to enable GRE tunnel to send the data.
Once the user enables GRE tunnel then click the save button.
GRE Tunnel:
A GRE (Generic Routing Encapsulation) tunnel configuration involves setting up a virtual point-to-point connection between two endpoints over an IP network.
Here the user can add/edit/delete the details of the tunnel.
EDIT:
Specification details are given below:
| SN | Field Name | Sample Value | Description |
| 1 | Tunnel name | Example: GRETunnel | GRETunnel: The name of the GRE tunnel. |
| 2 | Local external IP | Example: 10.1.1.66 | The IP address of the local endpoint that will initiate the GRE tunnel. |
| 3 | Remote external IP | Example: 10.1.1.40 | The IP address of the remote endpoint that will terminate the GRE tunnel. |
| 4 | Peer tunnel IP | Example: 10.1.1.4 | The IP address of the peer's tunnel interface. |
| 5 | Local tunnel IP | Example: 10.1.1.6 | The IP address of the local tunnel interface. |
| 6 | Local tunnel net mask | Example: 255.255.255.0 | The subnet mask of the local tunnel interface. |
| 7 | Remote IP | Example: 192.168.10.0/24 | The remote network that is reachable through the GRE tunnel. |
| 8 | Enable Tunnel Link | Check to enable | Enable or disable the GRE tunnel link. |
| 9 | Interface type | Example: EWAN2 | EWAN2: The type of network interface used for the GRE tunnel. |
| 10 | MTU | Example: 1476 | 1476: Maximum Transmission Unit size for the GRE tunnel. |
| 11 | TTL | Example: 64 | 64: Time To Live value for the packets within the GRE tunnel. |
| 12 | Tunnel key | Example: 12345678 | 12345678: A unique key used to identify the GRE tunnel. |
| 13 | Enable keep alive | Check to enable | Enable or disable the keep-alive feature to monitor the tunnel's status. |
| 14 | Keep alive interval | Example: 10 | 10: Interval in seconds for the keep-alive packets. |
Once the required update is done then click on update to save the changes.
4. Features
In this module the user can see all the features that the router has.
This module includes the below features.
- Mac Address Binding
- URL Filtering
- Web Server
- Others
4.1 Mac Address Binding
MAC address binding is a configuration that binds a specific MAC address to a specific IP address. This ensures that a particular device on the network always receives the same IP address from the DHCP server, which can be useful for network management, security, and ensuring consistent network behaviour.
Specification details are given below:
| SN | Field Name | Sample Value | Description |
| 1 | Device Name | Ex: Macbinding1 | A user-defined name for the binding configuration. |
| 2 | MAC Address | Ex: 48:9e:bd:da:45:91 | The unique identifier for the network interface of the device to which the IP address will be bound. |
| 3 | IP Address | Ex: 192.168.10.55 | The IP address that will be consistently assigned to the device with the specified MAC address. |
By applying this configuration, the DHCP server will always assign the IP address 192.168.10.55 to the device with the MAC address 48:9e:bd:da:45:91, ensuring consistency and stability in network addressing for that device.
- Once the user modifies the MAC address /IP Address then click on the save button to save the changes done.
- The user can click on the deleted button to delete an existing configured device.
- Post all the changes the user needs to click on the update to reflect all the changes in the application.
Click on save tab once changes have been made.
4.2 URL Filtering
In this submodule the user should provide the URL which needs to be blocked for the device. By implementing URL filtering with the specified URL, you can control and restrict access to certain websites, thereby improving network security and managing user access.
To add the new URL for blocking, click on the Add New button.
Once the user clicks on the Add New button a new pop will appear in that page write the URL and click on the save.
The user can select the status of that URL while defining the URL.
To edit / delete the existing URL the user needs to click on the edit /deleted button respectively.
Click on “save” after the changes are done as per the need.
4.3 Web Server
This configuration will allow your device to serve web traffic securely over HTTPS, keep its system time synchronized, and ensure that all HTTP traffic is redirected to HTTPS for better security.
Specification details are given below:
| SN | Field Name | Sample Value | Description |
| 1 | Enable HTTP | HTTP Port: 80
Enable or disable the HTTP server. |
Port 80 is the default port for HTTP traffic. It is used to serve web pages over an unencrypted connection. |
| 2 | Enable HTTPS | HTTPS Port: 443
Enable or disable the HTTPS server. |
Port 443 is the default port for HTTPS traffic. It is used to serve web pages over an encrypted connection. |
| 3 | Redirect HTTPS | Option to redirect HTTP traffic to HTTPS. | When enabled, all HTTP requests will be automatically redirected to the HTTPS port to ensure secure communication. |
| 4 | RFC1918 Filter | Enable/Disable | When enabled, this filter can block traffic from private IP ranges (e.g., 192.168.x.x, 10.x.x.x) from being routed through the public internet, enhancing network security. |
| 5 | Enable NTP Sync | Enable or disable NTP synchronization. | Synchronizes the device’s system clock with an external NTP server to maintain accurate time. |
| 6 | NTP Server | 0.openwrt.pool.ntp.org | The address of the NTP server used for time synchronization. The openwrt.pool.ntp.org server is a public NTP server pool. |
| 7 | NTP Sync Interval (In Minutes) | 15 | The interval at which the device will sync its clock with the NTP server, set to every 15 minutes in this case. |
4.4 Others
In this page the user will get to do all the other miscellaneous configuration with respect to the device based on the required parameters. Each utility serves a specific purpose, providing various functionalities for managing and troubleshooting network configurations and statuses.
Specification details are given below:
| SN | Field Name | Sample Value | Description |
| 1 | Set Date | Date and time fields (day, month, year, hour, minute, second) | Sets the system date and time to the specified values. |
| 2 | Get Date | System | Retrieves and displays the current system date and time. |
| 3 | IP Rule Show | Command ‘Get’ | Displays the current IP rules configured on the device. |
| 4 | Advanced Static Routes | Command ‘Run’ | Used to manually define routing paths for network traffic. |
| 5 | ipsec status all | Command ‘Get’ | Displays the status of all IPsec connections. |
| 6 | iPerf3 Client | IP address (e.g., 192.168.10.100) | Runs an iPerf3 client to measure network performance. |
| 7 | iPerf3 Server | Command ‘Run’ | Runs an iPerf3 server to measure network performance. |
| 8 | Ping | IP address or domain (e.g., 8.8.8.8) | Sends ICMP echo requests to the specified address to check connectivity. |
| 9 | traceroute | IP address or domain (e.g., 8.8.8.8) | Traces the route packets take to reach the specified address. |
| 10 | ReadSIMInfo | SIM1
SIM2 |
Reads and displays information about the SIM card installed in the device. |
| 11 | NTP Sync | Command ‘Sync’ | Synchronizes the system time with the configured NTP server. |
| 12 | ReadLogFiles | Log file identifier | Reads and displays the specified log file |
| 13 | Download Files | File or database identifier | Initiates a download of the specified file or database. |
| 14 | Restart Power | Command ‘Restart’ | Restarts the power of the device. |
| 15 | Restart Modem1 | Command ‘Restart’ | Restarts the modem. |
| 16 | Run AT Command | Enter AT command | Executes the specified AT command on the modem. |
| 17 | Scan Network operators for modem1 (Takes >3 mins) | Command ‘Scan’ | Initiates a scan for available network operators. |
| 18 | Network operator list for modem1 (First Perform Scan Network Operators) | Command ‘Show’ | Displays the list of network operators detected in the previous scan. |
| 19 | Show Board Configuration | Command ‘Show’ | Displays the current board configuration. |
| 20 | Switch SIM to Secondary (Takes >2 mins) | Command ‘Run’ | Switches the active SIM to the secondary SIM card. |
| 21 | Send test SMS | Phone number (e.g., +911234567890) message text (e.g., "Hello how are you?") | Sends a test SMS to the specified phone number. |
| 22 | ReadlatestSMS | Command ‘Read’ | Reads the most recent SMS received by the device. |
| 23 | Enable ssh (Admin) | Command ‘Run’ | Enables SSH access for the admin user. |
| 24 | Disable ssh (Admin) | Command ‘Run’ | Disables SSH access for the admin user. |
| 25 | Output | Any value | Displays output for all the above actions. |
5.Maintenance
In this module the user can configure/upgrade/modify the settings related to system, password, firmware and monitoring.
It includes below 6 submodules.
- General
- Password
- Reboot
- Import and Export config
- Firmware upgrade
- Monitor Application
5.1 General
Here you can configure the basic aspects of router like its hostname or the time zone.
It is further sub-divided into,
1.) General Settings
2.) Logging
3.) Language and Style
General Settings:
The System Properties section allows you to manage the general settings of your network device, including time settings, logging, hostname, and language preferences.
Specification details are given below:
| SN | Field Name | Sample Value | Description |
| 1 | Local Time | 2024/08/23 09:44:47 | The current local date and time set on the device. |
| 2 | Hostname | Silbo-RS | The hostname of the device, which is used to identify it on the network. |
| 3 | Time zone | Asia/Kolkata | The time zone setting of the device, which determines the local time. |
Time Synchronization:
| SN | Field Name | Sample Value | Description |
| 1 | Enable NTP Client | Enable/Disable | When enabled, the device periodically syncs its clock with an external NTP server, ensuring the local time remains accurate. |
| 2 | Enable NTP Server | Enable/Disable | When enabled, the device acts as an NTP server, allowing other devices on the network to sync their time with it. |
| 3 | NTP Server Candidates | 0.openwrt.pool.ntp.org
1.openwrt.pool.ntp.org 2.openwrt.pool.ntp.org 3.openwrt.pool.ntp.org |
Provides multiple server options to ensure redundancy and reliability in time synchronization. If one server is unavailable, the device can try another in the list.
You can add or remove any. |
Once the user configures the required details then click on save tab.
Logging:
Here the user can configure the basic aspects of your device related to system.
The system log configuration provided specifies how the device handles and stores log information, including buffer size, external log server details, and log detail levels.
Specification details are given below:
| SN | Field Name | Sample Value | Description |
| 1 | System log buffer size | Example: 32 kiB | The size of the memory buffer allocated (0-32) for storing system logs before they are either written to a file or sent to an external server. |
| 2 | External system log server | Example: 0.0.0.0 | The IP address of an external server where logs can be sent. |
| 3 | External system log server port | Example: 514 | The port used to send logs to the external log server. Port 514 is the default port for syslog. |
| 4 | Log output level | 1.) Debug
2.) Info 3.) Notice 4.) Warning 5.) Error 6.) Critical 7.) Alert 8.) Emergency |
Debug: Logs all messages, including detailed debugging information. This is the most verbose setting and can be useful for troubleshooting specific issues.
Info: Logs informational messages, which may include normal operational messages. Notice: Logs normal but significant conditions that aren't errors. Warning: Logs warning conditions that indicate potential issues. Error: Logs error conditions that indicate problems. Critical: Logs critical conditions that require immediate attention. Alert: Logs alert conditions that require urgent attention. Emergency: Logs only the most severe conditions that indicate the system is unusable. |
| 5 | Cron Log level | 1.) Debug
2.) Normal 3.) Warning |
Debug: Use for detailed troubleshooting.
Normal: Use for typical monitoring. Warning: Use to track only issues and errors. |
Time Synchronization:
| SN | Field Name | Sample Value | Description |
| 1 | Enable NTP Client | Enable/Disable | When enabled, the device periodically syncs its clock with an external NTP server, ensuring the local time remains accurate. |
| 2 | Enable NTP Server | Enable/Disable | When enabled, the device acts as an NTP server, allowing other devices on the network to sync their time with it. |
| 3 | NTP Server Candidates | 0.openwrt.pool.ntp.org
1.openwrt.pool.ntp.org 2.openwrt.pool.ntp.org 3.openwrt.pool.ntp.org |
Provides multiple server options to ensure redundancy and reliability in time synchronization. If one server is unavailable, the device can try another in the list.
You can add or remove any. |
Once the user configures the required details then click on save tab.
Language and Style:
Here the user can configure the basic aspects of your device related to language.
Time Synchronization:
| SN | Field Name | Sample Value | Description |
| 1 | Enable NTP Client | Enable/Disable | When enabled, the device periodically syncs its clock with an external NTP server, ensuring the local time remains accurate. |
| 2 | Enable NTP Server | Enable/Disable | When enabled, the device acts as an NTP server, allowing other devices on the network to sync their time with it. |
| 3 | NTP Server Candidates | 0.openwrt.pool.ntp.org
1.openwrt.pool.ntp.org 2.openwrt.pool.ntp.org 3.openwrt.pool.ntp.org |
Provides multiple server options to ensure redundancy and reliability in time synchronization. If one server is unavailable, the device can try another in the list.
You can add or remove any. |
Once the user configures the required details then click on save tab.
5.2 Password
In this module the user can set the password for the admin credentials.
Specifies the password for the guest account.
If the user enters a plaintext password here, it will get replaced with a crypted password on save.
The new password will be effective once the user logs out and log in again.
Save the page once you have changed the password.
5.3 Reboot
In this module the user can reboot the device remotely.
First option is to directly reboot the device without enabling the maintenance reboot tab.
Click on “Reboot Now” at the bottom of the screen to start the reboot process.
To start maintenance reboot process first the user needs to fill all the required fields.
Need to select the type of reboot for the device whether it needs to be Hardware or Software reboot.
Specification details are given below:
| SN | Field Name | Sample Value | Description |
| 1 | Enable Maintenance Reboot | Enable/Disable | Indicates whether the maintenance reboot feature is enabled or not. |
| 2 | Type | Maintenance Reboot | Specifies the type of reboot being scheduled. |
| 3 | Reboot Type | Software/Hardware | Hardware: A hardware reboot involves restarting the entire device as if it were powered off and on again.
Software: A software reboot involves restarting the operating system without powering off the hardware. |
| 4 | Minutes | Example: 59 | The minute at which the reboot should occur (0-59). |
| 5 | Hours | Example: 22 (10 PM) | The hour at which the reboot should occur (0-23, in 24-hour format). |
| 6 | Day Of Month | Example: All | Specifies which days of the month the reboot should occur (1-31). "All" means it will occur every day. |
| 7 | Month | Example: All | Specifies which months the reboot should occur (1-12). "All" means it will occur every month. |
| 8 | Day Of Week | Example: All | Specifies which days of the week the reboot should occur (0-6, where 0 is Sunday). "All" means it will occur every day of the week. |
Once the user fills all the required given parameters click on the save.
5.4 Import and Export
In this section, User can Import & Export Configuration files of the Device.
Click “Export Config” to export device configuration & settings to a text file,
Click “Import Config” to import device configuration & settings from a previously exported text file.
The user needs to select on the “choose file”, upload the required file and click on apply.
5.5 Firmware Upgrade
The user can upgrade with the latest software for the existing firmware.
Click on the flash image and chose the path where the sys-upgrade file is kept and then click on flash image, it will upgrade to the latest software once the reboot is done.
This option will completely reset the device to default settings.
Click on the Retain Config and flash and chose the path where the sys-upgrade file is kept and then click on Retain Config and flash, it will upgrade to the latest software once the reboot is done.
This refers to updating the firmware (flashing) of a device while preserving the current configuration settings.
Click on the Factory Reset for the complete reset of the device.
5.6 Monitor Application
In this section, the monitor application is divided into major 2 configurations which is further sub-divided into 4 editable options,
1.) Modem 1 Local Monitor Application:
2.) Modem 1 Remote Monitor Application:
Modem 1 Local Monitor Application:
Specification details are given below:
| SN | Field Name | Sample Value | Description |
| 1 | Enable Router Local Ping Check Application | Enable/Disable | Turns on the functionality to perform ping checks on specified IP addresses. |
| 2 | Time Interval for Check (In minutes) | Example: 10 minutes | Frequency at which the ping checks are performed. |
| 3 | Select No of IP addresses to ping | Example: 1 | Number of IP addresses that will be pinged. |
| 4 | IP Address 1 | Example: 8.8.8.8 | The IP address to ping. |
| 5 | No. of Retries | Example: 5 | Number of times to retry pinging an IP address if the initial ping fails. |
| 6 | Failure Criteria in (%) | Example: 80% (If 4 out of 5 pings fail, it’s considered a failure) | Percentage of failed pings required to consider the ping check a failure. |
| 7 | Action On Failure | Options: Restart IPsec, Restart Board, Restart Modem | Action to be taken if the ping check fails according to the criteria. |
| 8 | Enable Second Level Action | Enable/Disable | Option to enable a secondary action if the primary action fails multiple times. |
| 9 | Second Level Action Threshold | Example: 2 | Number of failures required to trigger the secondary action. |
| 10 | Second Level Action | Example: Restart Board (Reboots the entire hardware board) | The action to be taken if the second level action threshold is met. |
Save the details once made necessary changes.
Modem 1 Remote Monitor Application:
Specification details are given below:
| SN | Field Name | Sample Value | Description |
| 1 | Enable Router Remote Ping Check Application | Enable/Disable | Activates the ping check functionality to monitor router performance. |
| 2 | Time Interval for Check (In minutes) | Example: 10 minutes | How frequently the ping checks are performed. |
| 3 | Select No of IP Addresses to Ping | Example: 1 (Please select the appropriate number based on your requirements) | Choose the number of IP addresses to ping. This typically involves selecting from a list or entering multiple addresses. |
| 4 | No. of Retries | Example: 3 | Number of retries if a ping fails. |
| 5 | Failure Criteria in (%) | Example: 80% (If 80% of the pings fail, it’s deemed a failure) | Percentage of failed pings required to consider the ping check as failed. |
| 6 | Action On Failure | Options: Restart IPsec, Restart Board, Restart Modem | The action taken if the ping check fails according to the criteria. |
| 7 | Enable Second Level Action | Enable/Disable | Option to enable an additional action if the primary action fails. |
| 8 | Second Level Action Threshold | Example: Specify the number of failures, such as 4 | Number of times the primary action must fail before the secondary action is triggered. |
| 9 | Second Level Action | Example: Restart Board | The action to be taken if the second level action threshold is met. |
Save the details once made necessary changes.
6. Routing
Routing refers to the process of determining the path that data packets take from their source to their destination across networks.
This section is divided into 5 sections,
- Static Routing
- BGP (Border Gateway Protocol)
- OSPF (Open Shortest Path First)
- Dynamic Custom File
- Routing Debug
6.1 Static Routing
In this submodule the user can configure the parameters related to routing of the device like Target address, Networks address etc. Routing configurations allow network packets to be directed between different subnets and networks.
It is further divided into 2 sections,
Static IPV4 Routes
Advanced Static IPV4 Routes
Static IPV4 Routes:
Click on ‘Add’ to add a new interface.
EDIT:
To edit the existing device the user needs to click on the edit option.
Once the changes are done click on the save button to save all the changes.
Click on the deleted button to delete the existing device detail.
Specification details are given below:
| SN | Field Name | Sample Value | Description |
| 1 | Interface | Ex: eth0.1 | The network interface to be used for this route. Select the one to use from dropdown. |
| 2 | Target | Ex: 192.168.20.0 | The destination subnet to which traffic should be routed. |
| 3 | IPv4 Netmask | 255.255.255.0 | The subnet mask for the target network. |
| 4 | Metric | 0 | The priority of the route.
Lower values indicate higher priority. |
| 5 | IPv4 Gateway | Ex: 192.168.10.1 | The gateway IP address to be used for routing traffic to the target subnet. |
| 6 | Route Type | Unicast | Standard route for individual destination IP addresses.
Custom changes can be made. |
Click on save once configuration changes have been made.
Advanced Static IPV4 Routes:
This is further divided into 2 sections,
Routing Tables
Routing Rules for IPV4
Routing Tables:
Adding a new table in static routing allows you to define specific routes for traffic within a network.
Click on ‘Add’ to add a new Table.
EDIT:
Specification details are given below:
| SN | Field Name | Sample Value | Description |
| 1 | ID of Table | Ex: 1 | A unique identifier for the routing table. Multiple tables can be used to define different sets of routing rules, providing flexibility in how traffic is managed. |
| 2 | Name of Table | Ex: Route | A descriptive name for the routing table, making it easier to manage and identify different tables. |
| 3 | Target | Ex: 192.168.10.0 | Specifies the destination network or IP address that the route is intended for. |
| 4 | IPv4 Netmask | 255.255.255.0 | Defines the subnet mask for the target network. |
| 5 | Metric | Ex: 0 | Indicates the priority of the route. A lower metric value means a higher priority. Routes with lower metrics are preferred over those with higher metrics. |
| 6 | IPv4 Gateway | Ex: 10.1.1.1 | Specifies the next hop or gateway IP address through which the traffic to the target network should be routed. |
| 7 | Route Type | 1.) Unicast
2.) Custom |
Unicast: Standard route where packets are sent to a single destination IP address.
Custom: Enables advanced routing configurations or specific protocols that might not be covered by default. |
Routing Rules for IPV4:
Click on ‘Add’ to add a new interface.
EDIT:
To edit the existing device the user needs to click on the edit option.
Once the changes are done click on the save button to save all the changes.
Click on the deleted button to delete the existing device detail.
Specification details are given below:
| SN | Field Name | Sample Value | Description |
| 1 | Interface | Ex: ra0 | Select the specific network interface on the router through which traffic enters or exits. |
| 2 | To | Ex: 192.168.10.1 | The destination IP address or network. In this case, 192.168.10.1 is the target IP address for routing traffic. |
| 3 | IPv4 Netmask | Ex: 255.255.255.192 | Defines the subnet mask, which helps determine the size of the network. |
| 4 | Table ID | Ex: 1 | Identifies which routing table this rule applies to. |
| 5 | From | Ex: 192.168.100.1 | Specifies the source IP address or network from which the traffic originates. In this case, the traffic is coming from 192.168.100.1. |
| 6 | Priority | Ex:20 | Determines the order in which routing rules are evaluated. Lower numbers have higher priority. If two rules conflict, the one with the lower priority number will be applied first. |
| 7 | Outgoing Interface | 1.) fwmark
2.) iif (Incoming Interface) 3.) oif (Outgoing Interface) 4.) lookup 5.) blackhole 6.) prohibited 7.) unreachable |
1.) This allows you to create rules that apply only to traffic that has been marked in a specific way by the firewall.
2.) This is often used to create rules based on the interface through which traffic is received. 3.) This allows you to control the flow of traffic based on the desired outgoing interface. 4.) It tells the router to check the specific routing table ID mentioned to determine how to route the traffic. 5.) This is used when you want to block traffic without notifying the sender. 6.) Like blackhole but sends an ICMP unreachable message to the sender, indicating that the route is prohibited. 7.) Causes the router to send an ICMP unreachable message to the source IP, notifying that the destination is unreachable. |
6.2 BGP
BGP is crucial for the operation of the internet, allowing routers to exchange information and find the best paths for data to travel across multiple networks globally.
This section is divided into 5 sub sections,
- Status
- General settings
- Instance
- Peers
- Peer Group
The ‘Status’ section will show the status of the connections made.
General Settings:
Specification details are given below:
| SN | Field Name | Sample Value | Description |
| 1 | Enable BGP | Enable/Disable | This setting is used to turn on BGP functionality on the router. Once enabled, the router can participate in BGP routing, exchange routing information with other BGP peers. |
| 2 | Enable vty | Enable/Disable | vty refers to the Virtual Terminal lines on a router, which allow remote users to connect to the router using protocols like Telnet or SSH. |
| 3 | Password | ***** | The password is set to secure access to the router's vty lines. |
Click on save and update once changes have been made.
Instance:
In configuring BGP on a router, the "BGP Instance" section is critical as it defines the unique settings for BGP operations on that particular router.
Specification details are given below:
| SN | Field Name | Sample Value | Description |
| 1 | AS | Ex: 12 | BGP uses AS numbers to maintain separation between different networks and to prevent routing loops.
This field must not be empty because it is essential for BGP to function correctly. |
| 2 | Router ID | Ex: 192.168.10.12 | The Router ID is a unique identifier for the BGP instance within an AS. It helps distinguish between multiple routers within the same AS. |
| 3 | Network Import Check | Enable/Disable | This option enables or disables checking if a route exists in the local routing table before it is advertised to BGP peers. |
| 4 | Advertise Networks | Ex: 192.168.10.0/24 | This field is used to specify which networks should be advertised to BGP peers. |
| 5 | Redistribute Options | 1.) None
2.) Kernel Added Routes 3.) Connected Routes 4.) OSPF Routes 5.) NHRP Routes 6.) Static Routes |
None: No routes are redistributed.
Kernel Added Routes: Routes that are added by the kernel are redistributed. Connected Routes: Directly connected routes are redistributed. OSPF Routes: Routes learned through OSPF are redistributed into BGP. NHRP Routes: Routes discovered through NHRP will be advertised to BGP peers. Static Routes: Any static routes defined by an administrator will be advertised to BGP peers. |
| 6 | Deterministic MED | Enable/Disable | This option, when enabled, ensures that the router uses a deterministic method to select the best path when there are multiple routes with the same AS path length but different MED values. |
Click on save and update once changes have been made.
Peers:
These are other routers with which your router establishes a BGP session to exchange routing information. Peers can be within the same organization or with external networks.
EDIT:
To edit the existing device the user needs to click on the edit option.
Once the changes are done click on the save button to save all the changes.
Click on the deleted button to delete the existing device detail.
Specification details are given below:
| SN | Field Name | Sample Value | Description |
| 1 | Name | Ex: Route | This is an identifier that helps you distinguish between different peers or configurations. |
| 2 | AS | Ex: 12 | BGP uses AS numbers to differentiate between different networks. |
| 3 | IP Address | Ex: 10.1.1.0 | Specifies the IP address of the BGP peer. |
| 4 | Update Source | Ex: loopback | Name of the Loopback Interface |
| 5 | EBGP MultiHop | Ex: 5 | The TTL (Time to Live) value that allows BGP to establish a session with a peer multiple hops away. The value 5 means the BGP peer is up to 5 hops away. |
| 6 | Password | ***** | Both peers must have the same password configured to establish a secure BGP session. |
| 7 | Weight | Ex: 100 | A higher weight is preferred, and 100 is a common value for prioritizing routes from this peer. |
| 8 | Default Originate | Enable/Disable | This setting would be enabled if you want your router to advertise a default route (0.0.0.0/0) to the BGP peer, indicating that your router can be used as a default gateway. |
| 9 | Next Hop Self | Enable/Disable | This option would be enabled if you want your router to advertise its own IP address as the next hop for routes sent to the BGP peer. |
| 10 | Inbound Soft Reconfiguration | Enable/Disable | When enabled, this allows for BGP policy changes without resetting the session. |
| 11 | Hold Time | Ex: 180 (seconds) | The maximum time the router will wait before considering the peer is unreachable. |
| 12 | Keepalive Time | Ex: 60 (seconds) | It is typically set to one-third of the Hold Time to ensure the peer is still responsive. |
| 13 | Connect Retry Time | Ex:120 (seconds) | The time the router waits before retrying a connection to the BGP peer if the session fails. |
Peer Groups:
Peer groups allow you to group several peers together and apply the same routing policies to them, simplifying the management of BGP configurations.
EDIT:
To edit the existing device the user needs to click on the edit option.
Once the changes are done click on the save button to save all the changes.
Click on the deleted button to delete the existing device detail.
Specification details are given below:
| SN | Field Name | Sample Value | Description |
| 1 | Name | Ex: Route | This is an identifier that helps you distinguish between different peers or configurations. |
| 2 | AS | Ex: 12 | BGP uses AS numbers to differentiate between different networks. |
| 3 | Neighbor Address | 192.168.1.2 | This is the IP address of the BGP neighbor (peer) you're establishing a session with. |
| 4 | Password | **** | Both peers must have the same password configured to establish a secure session. |
| 5 | Weight | Ex: 100 | A higher weight is preferred. 100 is a common value used to prioritize routes from this peer. |
| 6 | Inbound Soft Reconfiguration | Enable/Disable | When enabled, this allows for BGP policy changes without resetting the session. |
| 7 | Hold Time | Ex: 180 (seconds) | The maximum time the router will wait before considering the peer is unreachable. |
| 8 | Keepalive Time | Ex: 60 (seconds) | It is typically set to one-third of the Hold Time to ensure the peer is still responsive. |
| 9 | Connect Retry Time | Ex:120 (seconds) | The time the router waits before retrying a connection to the BGP peer if the session fails. |
Click on save and update once changes have been made.
6.3 OSPF
OSPF (Open Shortest Path First) is a link-state protocol, which means it builds a complete map (or topology) of the network and uses that map to calculate the shortest path to each destination.
This section is divided into 5 sub sections,
- Status
- General settings
- Instance
- Network and Area
- Interface
The ‘Status’ section will show the status of the connections made.
General Settings:
Specification details are given below:
| SN | Field Name | Sample Value | Description |
| 1 | Enable OSPF | Enable/Disable | When you enable OSPF, the router starts participating in OSPF processes, such as exchanging routing information with other OSPF-enabled routers and calculating the shortest path to each network. |
| 2 | Enable vty | Enable/Disable | vty refers to the Virtual Terminal lines on a router, which allow remote users to connect to the router using protocols like Telnet or SSH. |
| 3 | Password | ***** | The password is set to secure access to the router's vty lines. |
Click on save and update once changes have been made.
Instance:
This setup enables a well-structured and efficient OSPF deployment, ensuring that the right routes are advertised while keeping the OSPF process streamlined by controlling where OSPF traffic is generated.
Specification details are given below:
| SN | Field Name | Sample Value | Description |
| 1 | Router ID | Ex: 192.168.10.12 | The Router ID identifies the OSPF router uniquely in the network. |
| 2 | Passive Interfaces | 1.) None
2.) Loopback 3.) Eth 0.5 4.) custom |
None: No interface is set as passive.
loopback: Marks the loopback interface as passive. eth 0.5: Marks the eth0.5 interface as passive. custom: Allows you to specify a custom interface name. Passive interfaces are used when you want to advertise a network in OSPF but do not want to establish OSPF neighbour relationships on that interface, reducing unnecessary OSPF traffic. |
| 3 | Redistribute Options | 1.) None
2.) Kernel Added Routes 3.) Connected Routes 4.) NHRP Routes 5.) Static Routes 6.) BGP |
None: No routes are redistributed.
Kernel Added Routes: Routes that are added by the kernel are redistributed. Connected Routes: Directly connected routes are redistributed. NHRP Routes: Routes discovered through NHRP will be advertised to BGP peers. Static Routes: Any static routes defined by an administrator will be advertised to BGP peers. BGP: Redistributes routes from Border Gateway Protocol (BGP) into OSPF. |
Click on save and update once changes have been made.
Network and Area:
EDIT:
To edit the existing device the user needs to click on the edit option.
Once the changes are done click on the save button to save all the changes.
Click on the deleted button to delete the existing device detail.
Specification details are given below:
| SN | Field Name | Sample Value | Description |
| 1 | Name | Ex: Network | A descriptive name that helps identify the connection |
| 2 | Network | Ex: 192.168.25.0/24 | This network will be advertised by OSPF to other OSPF routers in the same area. |
| 3 | Area | Ex: 0.0.0.0 | OSPF areas help segment large networks to reduce routing overhead. Area 0.0.0.0 is the backbone area, and all other areas typically connect through this area. |
Interface:
The interface determines the physical or logical port through which the connection will be routed.
EDIT:
To edit the existing device the user needs to click on the edit option.
Once the changes are done click on the save button to save all the changes.
Click on the deleted button to delete the existing device detail.
Specification details are given below:
| SN | Field Name | Sample Value | Description |
| 1 | Name | Ex: Route | This name helps distinguish between different connections within the router's configuration. |
| 2 | Interface | 1.) Loopback
2.) Eth0.5 3.) Custom |
Loopback: Typically used for internal routing within the router, often for the router's own identification (127.0.0.1).
Eth0.5: Refers to a physical or virtual Ethernet interface on the router Custom: Allows you to specify a different or specialized interface, depending on your network setup. |
| 3 | Priority | Ex: 10, 20 | A lower priority number (e.g., 10) means this route will be preferred over others with a higher number (e.g., 20) when routing decisions are made. |
| 4 | Cost | Ex: 10 | The cost can be based on bandwidth, where faster links have lower costs.
For example, 10 might be assigned to a high-speed interface, while 100 might be assigned to a slower one. |
| 5 | Hello Interval | Ex: 10secs | Adjusting the Hello Interval can impact OSPF neighbour formation and stability.
Default is usually 10 seconds for broadcast and point-to-point networks. |
| 6 | Dead Interval | Ex: 40secs | This interval determines how long OSPF waits before considering a neighbour lost.
Default is usually 40 seconds (four times the Hello Interval). |
| 7 | Retransmit Interval | Ex: 5secs | It should be set according to the network's performance and reliability. |
| 8 | Network Type | 1.) Broadcast
2.) Non-broadcast 3.) Point-to-point 4.) Point-to-multipoint |
Broadcast: For Ethernet or other broadcast-capable networks where a DR/BDR is elected.
Non-broadcast: For networks that don't support broadcasting, like Frame Relay, where neighbours must be manually configured. Point-to-point: For direct connections between two routers with no need for a DR/BDR. Point-to-multipoint: For networks with multiple connections that don’t require a DR/BDR. The choice of network type should match the physical and logical topology of the network. |
| 9 | Authentication | 1.) None
2.) General key 3.) MD5 |
None: No authentication is used.
General key: Uses a simple password (plaintext). MD5: Uses MD5 hash-based authentication, which is more secure. |
Save and update the page once configured.
6.4 Dynamic Routing Custom File Upload
Dynamic Routing Custom File Upload allows you to select and upload a custom configuration file for dynamic routing settings (e.g., OSPF, BGP).
Enable “Upload Custom File”
Upload Custom File:
- Purpose: Finalizes the selection and prepares the file for uploading to the router.
- Expected Action: Click "Upload" after selecting your file.
- Explanation: This action uploads the file to the router, making it available for the router to use or store in its configuration directory.
Once you upload and apply the configuration, the router will update its routing tables or other related settings based on the contents of the custom file.
Use Case:
If you're managing a complex network and need to implement specific dynamic routing protocols or settings not available through the standard router interface, you can upload a custom file with the exact configurations required.
Save and update the page once configured.
6.5 Routing Debug
The "Routing Debug" section provides various utilities and commands to diagnose and monitor routing protocols like BGP (Border Gateway Protocol) and OSPF (Open Shortest Path First).
Specification details are given below:
| SN | Field Name | Sample Value | Description |
| 1 | Show BGP Summary | Command ‘RUN’ | Displays a summary of the BGP sessions, including the status of each BGP neighbour. |
| 2 | Show BGP Running Config | Command ‘RUN’ | Displays the current running configuration for BGP. |
| 3 | Show IP BGP | Command ‘RUN’ | Shows the current BGP routing table. |
| 4 | Refresh BGP Table | Command ‘RUN’ | Refreshes the BGP routing table, which can be useful after making changes to BGP configuration. |
| 5 | Show BGP Neighbors | Ex: 10.1.1.120 | Displays detailed information about the BGP neighbor with the specified IP address. |
| 6 | Show Received Routes | Ex: 10.1.1.120 | Shows the routes received from the specified BGP neighbor. |
| 7 | Run Custom BGP Command | Ex: show ip bgp summary | Allows you to run any custom BGP command to gather specific information. |
| 8 | Show OSPF Neighbors | router-id | Displays the list of OSPF neighbors and their statuses. |
| 9 | Show OSPF Route | Command ‘RUN’ | Displays the OSPF routing table, showing routes learned through OSPF. |
| 10 | Show OSPF Database | Command ‘RUN’ | Shows the OSPF link-state database, which contains all the LSA (Link-State Advertisements) information. |
| 11 | Show IP Route | Command ‘RUN’ | A list of all routes in the routing table, including destination networks, next hops, and metrics. |
| 12 | Show IP Rule | Command ‘RUN’ | Shows IP rules that determine routing decisions based on specific criteria. |
| 13 | Show IP Route Table | Enter a specific command | Displays the content of a specific routing table. |
| 14 | Show IP Route Get | Ex: 10.1.1.10 (destination IP address) | Information on the route to the destination, including the next hop and outgoing interface. |
| 15 | Flush IP Routes Cache | Command ‘RUN’ | Clears the IP route cache, forcing the router to rebuild the cache with fresh data. |
| 16 | Output | Results | The results of the executed commands and utilities are displayed. |
7.Logout
Click on log out option to exit the application.

