
IPSec SOPHOS and SILBO
Prerequisite:
- SOPHOS firewall
- SILBO Router or gateway
- Static Public IP on wired internet connection
- SIM card with active internet
Note: This document is prepared using XGS3100 (SFOS 20.0.1 MR-1-Build342) X31020MJG8C2MEF &
SILBO 1.16_1.13 FW version.
SOPHOS VPN setup
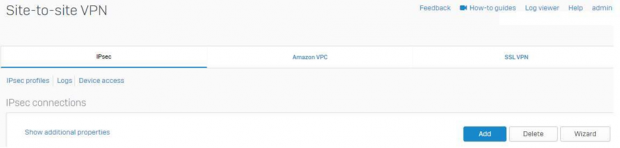
1. Creating IPSec Policy/Profile.
Create a new IPSec tunnel by navigating to Configure>> Site-to-Site VPN & click on IPsec profiles.

In the SOPHOS Firewall first we should create a Policy suitable for the need of architecture. Click on Add button once IPsec Profiles option window is available to configure.

Give a Name to the profile.
Select “Key Exchange” & “Authentication mode” as per need.
For unlimited key negotiation use “0” in “Key negotiation tries” option. Keep “Re-key connection” option enabled.

Key Exchange and Mode configured as IKEv1 & Main Mode.
Let us configure Phase 1 and then 2 configurations in the policy.
The Phase 1 configuration and Phase 2 configuration can be same or different.
Phase 1 configuration:

Phase 2 configuration:

The DPD (Dead Peer Detection) Should be disabled when SOPHO Firewall is configured as VPN server and in case it is used as client then it can be enabled.
Note: High encryption and authentication algorithm meaning less IPsec throughput and based on Internet speed on the Local and remote side the option should be selected.
Save the configuration so that this Policy can be used in IPsec VPN.
Navigate to Configure>>Site-to-Site for IPsec VPN.
- Click on Add or use Wizard to create IPSec VPN.

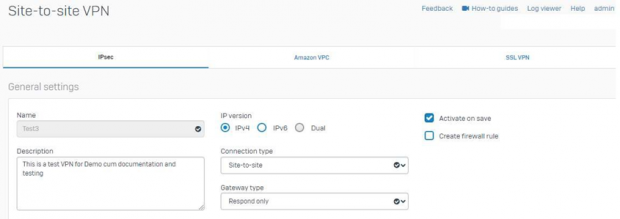
General Settings:
- Give a name to the VPN in this example we are giving “Test3” name.
- Configure it as IPv4 as this document is for IPv4 only.
- Select connection type as “Ste-to-site”
- Gateway type as “Respond only” as this firewall is going to respond to all the incoming VPN connections.
- Enable “Activate on Save” if you do not wish to enable this VPN on save. Also Create Firewall rule option can be enabled if you wish SOPHOS to create an Auto VPN firewall rule.

Encryption:
- The profile should be correctly selected.
- The same IPsec Profile / policy “SILBOIPSEC” is selected for this IPsec VPN.
- Select the Authentication type as PSK (Preshared Key).


Gateway Settings:
- The Listening IP is the Public IP or the WAN IP on which IPSec ports are forwarded from Public IP. i.e. UDP 4500 and UDP 500.
- Gateway address can be marked as “*” when IPSec destination IP address (Public IP) is unknown.
- Local and Remote ID type can be anything among available options, but we are using “DNS” which is a domain name so that we can use a name containing Alphanumeric character string in Local and Remote ID options.
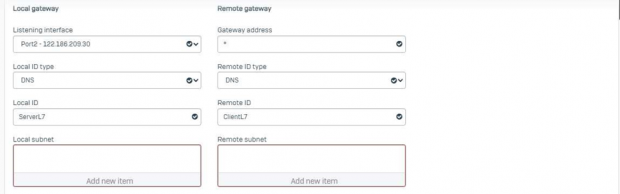
- Local and Remote Subnet should be selected if already created in System>Host and services>> IP Host option or can be created directly by clicking on “Add new item”
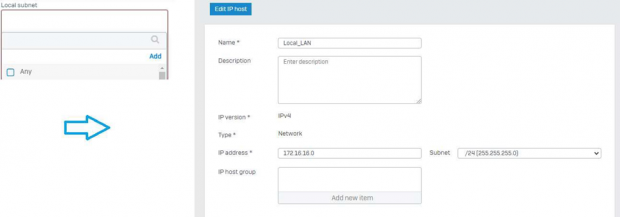 Here we gave a name as Local_LAN and given a standard SOPHOS LAN subnet as shown in below image.
  Same way a remote Subnet can be configured. In Local Subnet /24 network was configured for remote side /32 subnet can be selected in case of IPSec is created with a loopback interface on SILBO side, in case Local LAN is must then changes can be made accordingly.
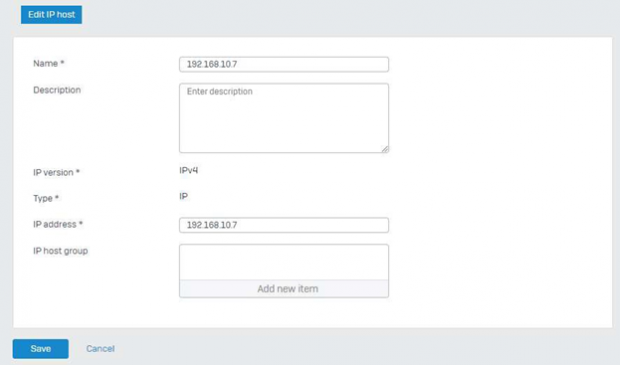
- NAT should be kept disabled.


Configuring SILBO Router/gateway:
Login to router using default IP 192.168.10.1 for gateways Default IP address is 192.168.9.1 and default credentials are admin/admin.

Once login we can see the FW version.

Change the IP address to required IP, in this testing we are using 192.168.11.1 IP address.
To do that Navigate to Settings>>Network from 192.168.10.1 to 192.168.11.1 and save / update.
For loopback configuration Navigate to Settings>>Network>>Loopback IP Settings and configured IP address and NetMask as shown.
Save and then Update which is must for Network section.

Upon IP changed configure VPN.
Navigate to >> Settings>>VPN>> IPsec>> and do as per below images

And configure IPSec as per SOPHOS configuration.

Once all the configuration is correctly configured and clicked on save button device will show VPN configuration >> General settings.
Save and then navigate to VPN>>Ipsec setting page and click on update.
IPsec will come up after some time and it can be seen as established as shown below.

Also, in SOPHOS it can be seen as below.
![]()
To Ping server LAN, navigate to features>>Others and give LAN IP and ping.
If the ping is not working then check the firewall side settings whether the ping is allowed or not.

Note: In SOHOS The below Firewall Rules should be present if not then should be created.
Navigate to Protect>>Rules and Policies>>Firewall Rules in SOPHOS.

To create a new firewall rule click on “Add firewall rule ”.
LAN to VPN Overview.

Basically the below configuration should be added without touching other configuration options in the firewall rule.
for Both LAN to VPN and VPN to LAN.

The Firewall from SILBO should also should be as below.


How to create IPsec VPN in SOPHOS similar to exsisting VPN?
Ans: Step 1 choose which VPN tunnel is correct and you want to create identical but a different tunnel
![]()
Step2: Make changes into these sections into a new duplicate tunnel.

Note: Use different loopback IP for each router in router/gateway in case of more routers are planned to communicate with same SOPHOS. Also make these changes “Name” it should be unique , “Local subnet”, “Local and remote Identifier” as per SOHOS configuration.