GRD44B-5R Quick Start Guide v2: Difference between revisions
No edit summary |
No edit summary |
||
| (13 intermediate revisions by the same user not shown) | |||
| Line 1: | Line 1: | ||
== Quick Start Guide for SILBO-GRD44B-5R == | |||
[[File:GRD44B-5R OUTLINE .png|center|350x350px]] | |||
== 1. About Router. == | == 1. About Router. == | ||
=== 1.1 LED Indication === | === 1.1 LED Indication === | ||
[[File:GRD44B-5R | [[File:GRD44B-5R LED Indication.png|center|350x350px]][[File:Grd44b 5r led indication 1.png|center|335x335px]] | ||
{| class="wikitable"style="margin:auto;" | |||
|+ | |||
!LED | |||
!STATUS | |||
!INDICATION | |||
|- | |||
|Cellular Mode | |||
|ON/OFF | |||
|ON indicates Network connection mode is 4G. | |||
OFF indicate Network connection mode is 2G/3G. | |||
|- | |||
|Modem Activity | |||
|ON/OFF Flashing | |||
|Flashing slowly (200ms ON/1800ms OFF) Network searching. | |||
Flashing slowly (1800ms ON/200ms OFF) Idle. | |||
Flashing quickly (125ms ON/125ms OFF) Data transfer is ongoing. | |||
|- | |||
|Wi-Fi | |||
|ON/OFF Flashing | |||
|ON indicates Wi-Fi Network is ready. | |||
Flashing indicates Data transfer is ongoing/Device booting indication. | |||
|- | |||
|Power | |||
|ON/OFF | |||
|Turns ON as the device is powered with 9-30V DC. | |||
|- | |||
|RS485 RX | |||
|Flashing | |||
|Flashing indicates RS485 Interface data reception ongoing. | |||
|- | |||
|RS485 TX | |||
|Flashing | |||
|Flashing indicates RS485 Interface data transmission ongoing. | |||
|} | |||
=== 1.3 Interfaces === | |||
[[File:Grd44b 5r front view outline.png|center|350x350px]] | |||
[[File:Grd44b side view outline.png|center|350x350px]] | |||
[[File:Grd44b 5r side view outline .png|center|350x350px]] | |||
=== 1.4 SIM Insertion / Removal Process === | |||
Insertion of primary SIM and secondary SIM as per below Figure. The SIM connector in the SILBO-GRD44B-5R router is push-push type. You push to insert the SIM (until you hear a click sound) and push to extract the SIM out. | |||
[[File:Grd44b 5r SIM Insertion - Removal Process.png|center|350x350px]][[File:Sim outline.png|frameless|120x120px]] | |||
== 2. Web Page Login == | |||
Follow the below instructions to log into devices WEBGUI. | |||
Connect the LAPTOP/Desktop to the LAN interface(ETH1) or connect to the router/Gateway using Mobile/Tablet/LAPTOP over Wi-Fi. | |||
Router/Gateway will assign IP using built-in DHCP server or LAN/WLAN Client can have static IP in 192.168.10.x/24 or 192.168.100.x/24 subnet respectively for LAN or Wi-Fi interface. | |||
Use LAN IP 192.168.10.1 or WLAN IP 192.168.100.1 in the web browser to log in as shown. | |||
[[File:Login to device.png|center|679x679px]] | |||
'''Login credentials -''' | |||
'''WebUI:''' admin/admin | |||
'''Wi-Fi SSID:''' AP_(device serial number) | |||
'''Wi-Fi Password:''' 12345678 | |||
For support write an email to '''routersupport@invendis.com''' | |||
[[Category:Quick start Guide's]] | |||
Latest revision as of 04:47, 3 December 2024
Quick Start Guide for SILBO-GRD44B-5R

1. About Router.
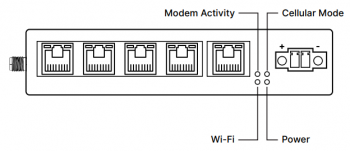
1.1 LED Indication


| LED | STATUS | INDICATION |
|---|---|---|
| Cellular Mode | ON/OFF | ON indicates Network connection mode is 4G.
OFF indicate Network connection mode is 2G/3G. |
| Modem Activity | ON/OFF Flashing | Flashing slowly (200ms ON/1800ms OFF) Network searching.
Flashing slowly (1800ms ON/200ms OFF) Idle. Flashing quickly (125ms ON/125ms OFF) Data transfer is ongoing. |
| Wi-Fi | ON/OFF Flashing | ON indicates Wi-Fi Network is ready.
Flashing indicates Data transfer is ongoing/Device booting indication. |
| Power | ON/OFF | Turns ON as the device is powered with 9-30V DC. |
| RS485 RX | Flashing | Flashing indicates RS485 Interface data reception ongoing. |
| RS485 TX | Flashing | Flashing indicates RS485 Interface data transmission ongoing. |
1.3 Interfaces


1.4 SIM Insertion / Removal Process
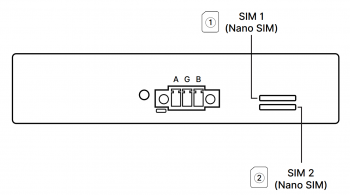
Insertion of primary SIM and secondary SIM as per below Figure. The SIM connector in the SILBO-GRD44B-5R router is push-push type. You push to insert the SIM (until you hear a click sound) and push to extract the SIM out.

2. Web Page Login
Follow the below instructions to log into devices WEBGUI.
Connect the LAPTOP/Desktop to the LAN interface(ETH1) or connect to the router/Gateway using Mobile/Tablet/LAPTOP over Wi-Fi.
Router/Gateway will assign IP using built-in DHCP server or LAN/WLAN Client can have static IP in 192.168.10.x/24 or 192.168.100.x/24 subnet respectively for LAN or Wi-Fi interface.
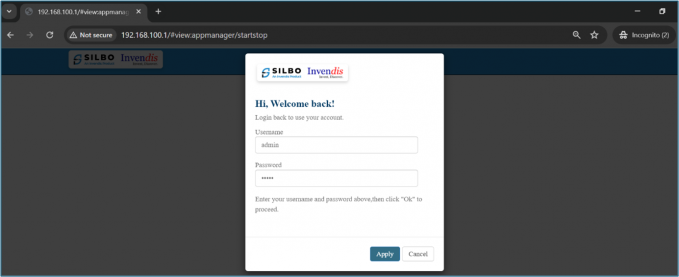
Use LAN IP 192.168.10.1 or WLAN IP 192.168.100.1 in the web browser to log in as shown.

Login credentials -
WebUI: admin/admin
Wi-Fi SSID: AP_(device serial number)
Wi-Fi Password: 12345678
For support write an email to routersupport@invendis.com

